Western Digital WD1200JB User Manual (pdf) - Page 18
Install an Additional Storage Drive
 |
UPC - 718037104522
View all Western Digital WD1200JB manuals
Add to My Manuals
Save this manual to your list of manuals |
Page 18 highlights
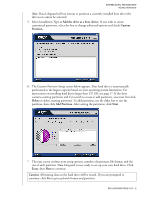
WESTERN DIGITAL EIDE HARD DRIVE INSTALLATION GUIDE Install an Additional Storage Drive 1. Insert the Data Lifeguard Tools CD into your CD-ROM drive. a) If using the DOS version, restart the computer and boot from the CD. b) If using the Windows version, the CD autoruns on your desktop. 2. Select Run Data Lifeguard Installation Software from the setup menu. 3. The main menu appears after Data Lifeguard has loaded. Click on Set Up Your Hard Drive from the list of available options. Data Lifeguard will take several moments to scan for all of your system devices. 4. After Data Lifeguard Tools has detected your installed hard drives, select the new drive that you want to format or partition as the new boot drive and click Next. DATA LIFEGUARD TOOLS V11.0 - 14
-
 1
1 -
2
-
3
-
4
-
5
-
6
-
7
-
8
-
9
-
10
-
11
-
12
-
 13
13 -
 14
14 -
 15
15 -
 16
16 -
 17
17 -
 18
18 -
 19
19 -
 20
20 -
 21
21 -
 22
22 -
 23
23 -
24
-
25
-
26
-
27
-
28
-
29
-
30
-
31
-
32
-
33
-
34
-
35
-
36
 |
 |
