Yamaha CL3 Cl Stagemix V3.0 User Guide - Page 21
HPF, 2.2 EQ Bands 1 & 4 - case
 |
View all Yamaha CL3 manuals
Add to My Manuals
Save this manual to your list of manuals |
Page 21 highlights
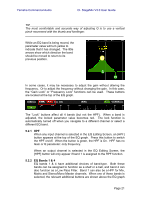
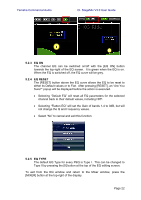
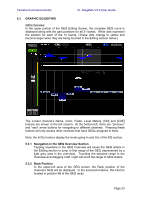
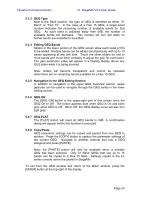
Yamaha Commercial Audio CL StageMix V3.0 User Guide TIP The most comfortable and accurate way of adjusting Q is to use a vertical pinch movement with the thumb and forefinger While an EQ band is being moved, the parameter value will turn yellow to indicate that it has changed. The little arrows show which direction the band should be moved to return to its previous position. In some cases, it may be necessary to adjust the gain without altering the frequency. Or to adjust the frequency without changing the gain. In this case, the "Gain Lock" or "Frequency Lock" functions can be used. These buttons are located at the top of the EQ graph. The "Lock" buttons affect all 4 bands (but not the HPF). When a band is adjusted, the locked parameter value becomes red. The lock function is automatically turned off when you navigate to a different channel or select a different EQ band. 5.2.1 HPF When any input channel is selected in the EQ Editing Screen, an [HPF] button appears at the top of the EQ graph. Press this button to switch the HPF on/off. When the button is green, the HPF is On. HPF has no Gain or Q parameter: only frequency. When an output channel is selected in the EQ Editing Screen, the [HPF] button will only appear if band 1 is assigned to the HPF function. 5.2.2 EQ Bands 1 & 4 EQ bands 1 & 4 have additional choices of band-type. Both these bands can be assigned to function as a shelf or a bell, and band 4 can also function as a Low Pass Filter. Band 1 can also be a HPF for Mix, Matrix and Stereo/Mono Master channels. When one of these bands is selected, the relevant additional buttons are shown above the EQ graph. Page 21
-
 1
1 -
2
-
3
-
4
-
5
-
6
-
7
-
8
-
9
-
10
-
11
-
12
-
13
-
14
-
15
-
 16
16 -
 17
17 -
 18
18 -
 19
19 -
 20
20 -
 21
21 -
 22
22 -
 23
23 -
 24
24 -
 25
25 -
 26
26 -
27
-
28
-
29
-
30
-
31
-
32
-
33
-
34
-
35
-
36
-
37
 |
 |
