Yamaha CL3 Cl Stagemix V3.0 User Guide - Page 30
Decrement / Increment Scene, Scene List, Scene Range - cl 300
 |
View all Yamaha CL3 manuals
Add to My Manuals
Save this manual to your list of manuals |
Page 30 highlights
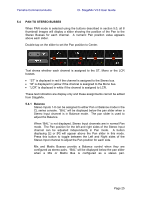
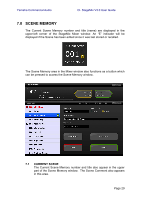
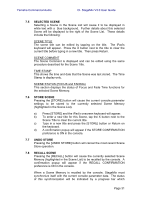
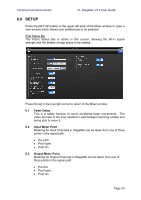
Yamaha Commercial Audio CL StageMix V3.0 User Guide 7.2 DECREMENT / INCREMENT SCENE Buttons in the upper right part of the Scene window allow instant recall of the Previous and Next Scene relative to the current Scene. For example, if the Current Scene is 005, pressing the [INC SCENE] button will recall Scene 006 in the console. However, if Scene 006 is empty, the next highest Scene containing data will be recalled. Note: the [DEC SCENE] and [INC SCENE] buttons will only appear in the Scene window if the related preference has been enabled in the Setup window (refer to 8.7). 7.3 SCENE LIST When the Scene Memory window is accessed for the first time after launching StageMix, the Scene List will be sent from the console to StageMix. Note: if StageMix loses its Wi-Fi connection to the console, the Scene List will need to be sent from the console again after the connection is re-established. 12 Scenes can be viewed simultaneously in the Scene List. Drag up and down in the list to access other Scenes. The Current Scene will be indicated by a check mark to the right of the Scene Title (the current scene is also displayed in the upper left portion of the Scene screen). Empty Scene Memories locations will be displayed with a grey background. Scene titles that have not been sent from the console to StageMix will be indicated by a question mark. 7.4 SCENE RANGE If the console contains a large number of Scenes, it may take some time for the complete Scene List to be transmitted to StageMix. To minimize the time required to update the Scene List in StageMix, a Scene Range can be set so that only necessary Scenes are sent from the console to StageMix. By default, the Scene Range is set to the full range from Scene 0 to 300. By pressing the [SCENE RANGE] button, the user can define the range of Scenes that will be updated in the Scene List. This range will be remembered by StageMix and will continue to be used until it is changed. To update the Scene Range, tap the [SCENE RANGE] button on the right side of the Scene Memory window. A small popup will appear. Press the [FIRST] or [LAST] button to access the iPad's onscreen keyboard. Enter a number for the First and/or Last Scenes in the Range and press Return. Then press the [UPDATE RANGE] button in this popup to update the Scene List based on the currently active range. Page 30
-
 1
1 -
2
-
3
-
4
-
5
-
6
-
7
-
8
-
9
-
10
-
11
-
12
-
13
-
14
-
15
-
16
-
17
-
18
-
19
-
20
-
21
-
22
-
23
-
24
-
 25
25 -
 26
26 -
 27
27 -
 28
28 -
 29
29 -
 30
30 -
 31
31 -
 32
32 -
 33
33 -
 34
34 -
 35
35 -
36
-
37
 |
 |