Yamaha CL3 Cl Stagemix V3.0 User Guide - Page 8
Select a Mixer and Begin Working, 3.4 Edit Mixer Configurations
 |
View all Yamaha CL3 manuals
Add to My Manuals
Save this manual to your list of manuals |
Page 8 highlights
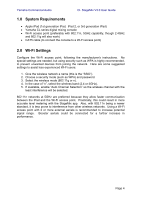
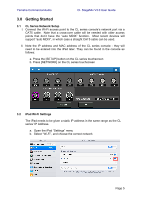
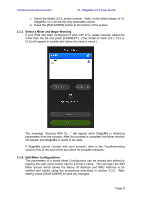
Yamaha Commercial Audio CL StageMix V3.0 User Guide v. Select the Model of CL series console. Note: in the initial release of CL StageMix, CL5 will be the only selectable choice. vi. Press the [ADD MIXER] button at the bottom of the screen. 3.3.3 Select a Mixer and Begin Working If your iPad has been configured to work with a CL series console, select the mixer from the list and press [CONNECT]. (The model of mixer (CL1, CL3 or CL5) will appear in smaller text below the mixer's name.) The message "Syncing With CL..." will appear while StageMix is obtaining parameters from the console. After this process is complete, the Mixer window will appear and StageMix is ready to be used. If StageMix cannot connect with your console, refer to the Troubleshooting section (9.0) at the end of this document for possible solutions. 3.3.4 Edit Mixer Configurations The parameters of a saved Mixer Configuration can be viewed and edited by tapping the right arrow button next to a mixer's name. This will open the Edit Mixer screen which allows the Name, IP Address and MAC Address to be verified and edited using the procedures described in section 3.3.2. After editing, press [SAVE MIXER] to save any changes. Page 8
-
 1
1 -
2
-
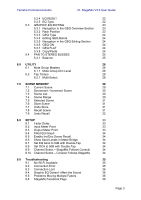 3
3 -
 4
4 -
 5
5 -
 6
6 -
 7
7 -
 8
8 -
 9
9 -
 10
10 -
 11
11 -
 12
12 -
 13
13 -
14
-
15
-
16
-
17
-
18
-
19
-
20
-
21
-
22
-
23
-
24
-
25
-
26
-
27
-
28
-
29
-
30
-
31
-
32
-
33
-
34
-
35
-
36
-
37
 |
 |
