Yamaha CVP-509 Owner's Manual - Page 74
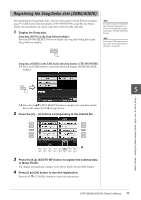
Use the TAB, Press the button which corresponds to the file to display
 |
View all Yamaha CVP-509 manuals
Add to My Manuals
Save this manual to your list of manuals |
Page 74 highlights
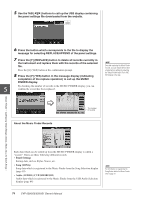
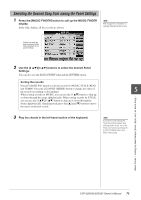
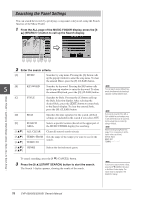
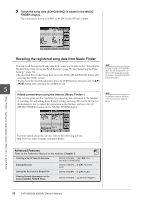
5 Use the TAB [E][F] buttons to call up the USB display containing the panel settings file downloaded from the website. 6 Press the button which corresponds to the file to display the message for selecting REPLACE/APPEND of the panel settings. 7 Press the [F] (REPLACE) button to delete all records currently in the instrument and replace them with the records of the selected file. Press the [G] (YES) button at the confirmation prompt. 8 Press the [F] (YES) button in the message display (indicating completion of the replace operation) to call up the MUSIC FINDER display. By checking the number of records in the MUSIC FINDER display, you can 5 confirm the record has been replaced. NOTE Even after replacing the Music Finder records, you can restore them to their original factory settings by selecting the "MusicFinderPreset" file in PRESET display of the step. About the Music Finder Records The number of records Music Finder - Calling Up Ideal Setups (Voice, Style, etc.) for Each Song - Each data which can be called up from the MUSIC FINDER display is called a "record." There are three following different records. • Panel Settings Setting data, such as Styles, Voices, etc. • Song (SONG) Song data which is registered to the Music Finder from the Song Selection display (page 59) • Audio (AUDIO) (CVP-509/505/503) Audio data which is registered to the Music Finder from the USB Audio Selection display (page 84) NOTE For information on registering the Song/Audio data to the Music Finder, refer to page 77. 74 CVP-509/505/503/501 Owner's Manual
-
 1
1 -
2
-
3
-
4
-
5
-
6
-
7
-
8
-
9
-
10
-
11
-
12
-
13
-
14
-
15
-
16
-
17
-
18
-
19
-
20
-
21
-
22
-
23
-
24
-
25
-
26
-
27
-
28
-
29
-
30
-
31
-
32
-
33
-
34
-
35
-
36
-
37
-
38
-
39
-
40
-
41
-
42
-
43
-
44
-
45
-
46
-
47
-
48
-
49
-
50
-
51
-
52
-
53
-
54
-
55
-
56
-
57
-
58
-
59
-
60
-
61
-
62
-
63
-
64
-
65
-
66
-
67
-
68
-
 69
69 -
 70
70 -
 71
71 -
 72
72 -
 73
73 -
 74
74 -
 75
75 -
 76
76 -
 77
77 -
 78
78 -
 79
79 -
80
-
81
-
82
-
83
-
84
-
85
-
86
-
87
-
88
-
89
-
90
-
91
-
92
-
93
-
94
-
95
-
96
-
97
-
98
-
99
-
100
-
101
-
102
-
103
-
104
-
105
-
106
-
107
-
108
-
109
-
110
-
111
-
112
-
113
-
114
-
115
-
116
-
117
-
118
-
119
-
120
-
121
-
122
-
123
-
124
-
125
-
126
-
127
-
128
-
129
-
130
-
131
-
132
-
133
-
134
-
135
-
136
-
137
-
138
 |
 |
