Yamaha CVP-509 Owner's Manual - Page 87
ing destination, Check the information of the USB flash memory as a record
 |
View all Yamaha CVP-509 manuals
Add to My Manuals
Save this manual to your list of manuals |
Page 87 highlights
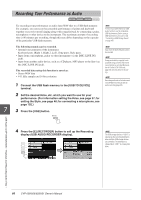
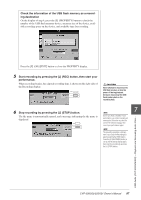
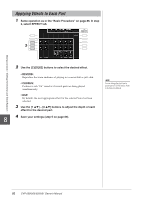
Check the information of the USB flash memory as a recording destination On the display of step 4, press the [E] (PROPERTY) button to check the number of the USB flash memory device, memory size of the device, available recording space on the device, and available time for recording. Press the [F] (OK)/[EXIT] button to close the PROPERTY display. 5 Start recording by pressing the [J] (REC) button, then start your performance. When recording begins, the elapsed recording time is shown on the right side of the Recording display. CAUTION Never attempt to disconnect the USB flash memory or turn the power off during playback. Doing so may corrupt the USB flash memory data or the recording data. 6 Stop recording by pressing the [J] (STOP) button. NOTE 7 The file name is automatically named, and a message indicating the file name is displayed. Even if you make a mistake in your performance, you cannot overwrite an existing file. Delete the recorded file on the File Selection display, then record your performance again. NOTE The recording operation continues, even if you close the Recording display by pushing the [EXIT] button. Press the [E] (RECORDER) button to call up the Recording display again, then stop the recording by pressing the [J] (STOP) button. USB Audio (CVP-509/505/503) - Playback and Recording Audio Files - CVP-509/505/503/501 Owner's Manual 87
-
 1
1 -
2
-
3
-
4
-
5
-
6
-
7
-
8
-
9
-
10
-
11
-
12
-
13
-
14
-
15
-
16
-
17
-
18
-
19
-
20
-
21
-
22
-
23
-
24
-
25
-
26
-
27
-
28
-
29
-
30
-
31
-
32
-
33
-
34
-
35
-
36
-
37
-
38
-
39
-
40
-
41
-
42
-
43
-
44
-
45
-
46
-
47
-
48
-
49
-
50
-
51
-
52
-
53
-
54
-
55
-
56
-
57
-
58
-
59
-
60
-
61
-
62
-
63
-
64
-
65
-
66
-
67
-
68
-
69
-
70
-
71
-
72
-
73
-
74
-
75
-
76
-
77
-
78
-
79
-
80
-
81
-
 82
82 -
 83
83 -
 84
84 -
 85
85 -
 86
86 -
 87
87 -
 88
88 -
 89
89 -
 90
90 -
 91
91 -
 92
92 -
93
-
94
-
95
-
96
-
97
-
98
-
99
-
100
-
101
-
102
-
103
-
104
-
105
-
106
-
107
-
108
-
109
-
110
-
111
-
112
-
113
-
114
-
115
-
116
-
117
-
118
-
119
-
120
-
121
-
122
-
123
-
124
-
125
-
126
-
127
-
128
-
129
-
130
-
131
-
132
-
133
-
134
-
135
-
136
-
137
-
138
 |
 |
