Yamaha CVP-509 Owner's Manual - Page 78
Recalling the registered song data from Music Finder
 |
View all Yamaha CVP-509 manuals
Add to My Manuals
Save this manual to your list of manuals |
Page 78 highlights
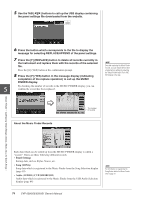
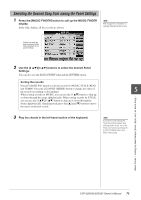
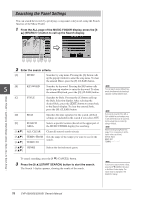
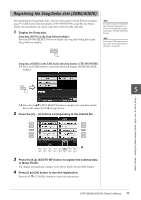
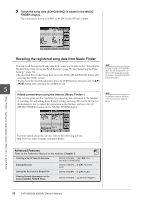
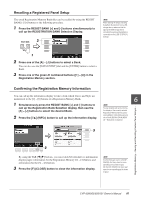
5 Check the song data (SONG/AUDIO) is added in the MUSIC FINDER display. The song data is shown as SONG or AUDIO in the STYLE column. Recalling the registered song data from Music Finder You can recall the registered song data in the same way as done in the "Selecting the Desired Song from among the Panel Settings" (page 75) and "Searching the Panel Settings" (page 76). • To play back the recalled Song data, press the SONG [PLAY/PAUSE] button after selecting the SONG record. • To play back the recalled audio data, press the [USB] button, then press the [2 ▲▼] (F/ II) button after selecting the AUDIO record. NOTE If you want to play back Song/Audio data in the USB storage device, connect the USB storage device containing the data to the [USB TO DEVICE] terminal beforehand. 5 Added convenience using the Internet (Music Finder+) This service gives you the capability, by connecting the instrument to the Internet, of searching for and adding desired panel settings and song data via the Internet to NOTE The available contents of the Music Finder Plus service are subject to change. the instrument. Let's connect the instrument to the Internet, and press the [J] (MUSIC FINDER+) button on the MUSIC FINDER display! Music Finder - Calling Up Ideal Setups (Voice, Style, etc.) for Each Song - For more details about this service, refer to the following website. http://services.music.yamaha.com/musicfinder/ Advanced Features Refer to the Reference Manual on the website, Chapter 5. Creating a Set of Favorite Records: [MUSIC FINDER] → TAB [E][F] ALL → [H] (ADD TO FAVORITE) Editing Records: [MUSIC FINDER] → [8 ▲▼] (RECORD EDIT) Saving the Record as a Single File: [MUSIC FINDER] → [7 ▲▼] (FILES) Viewing Record Information on the Internet (MUSIC FINDER Plus): [MUSIC FINDER] → [J] (MUSIC FINDER +) 78 CVP-509/505/503/501 Owner's Manual
-
 1
1 -
2
-
3
-
4
-
5
-
6
-
7
-
8
-
9
-
10
-
11
-
12
-
13
-
14
-
15
-
16
-
17
-
18
-
19
-
20
-
21
-
22
-
23
-
24
-
25
-
26
-
27
-
28
-
29
-
30
-
31
-
32
-
33
-
34
-
35
-
36
-
37
-
38
-
39
-
40
-
41
-
42
-
43
-
44
-
45
-
46
-
47
-
48
-
49
-
50
-
51
-
52
-
53
-
54
-
55
-
56
-
57
-
58
-
59
-
60
-
61
-
62
-
63
-
64
-
65
-
66
-
67
-
68
-
69
-
70
-
71
-
72
-
 73
73 -
 74
74 -
 75
75 -
 76
76 -
 77
77 -
 78
78 -
 79
79 -
 80
80 -
 81
81 -
 82
82 -
 83
83 -
84
-
85
-
86
-
87
-
88
-
89
-
90
-
91
-
92
-
93
-
94
-
95
-
96
-
97
-
98
-
99
-
100
-
101
-
102
-
103
-
104
-
105
-
106
-
107
-
108
-
109
-
110
-
111
-
112
-
113
-
114
-
115
-
116
-
117
-
118
-
119
-
120
-
121
-
122
-
123
-
124
-
125
-
126
-
127
-
128
-
129
-
130
-
131
-
132
-
133
-
134
-
135
-
136
-
137
-
138
 |
 |
