Yamaha CVP-601 Reference Manual - Page 64
Saving the Record as a Single File, Calling Up Music Finder Records Saved to USER or USB
 |
View all Yamaha CVP-601 manuals
Add to My Manuals
Save this manual to your list of manuals |
Page 64 highlights
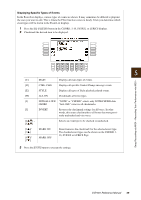
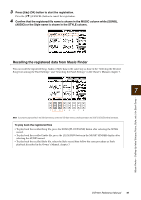
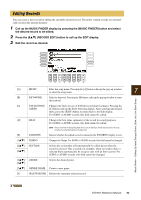
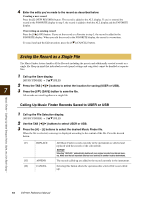
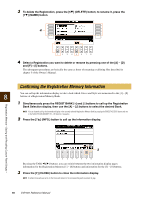
4 Enter the edits you've made to the record as described below. Creating a new record Press the [J] (NEW RECORD) button. The record is added to the ALL display. If you've entered the record to the FAVORITE display in step 3, the record is added to both the ALL display and the FAVORITE display. Overwriting an existing record Press the [8] (OK) button. If you set the record as a Favorite in step 3, the record is added to the FAVORITE display. When you edit the record in the FAVORITE display, the record is overwritten. To cancel and quit the Edit operation, press the [8] (CANCEL) button. Saving the Record as a Single File The Music Finder feature handles all the Records including the presets and additionally created records as a single file. Keep in mind that individual records (panel settings and song data) cannot be handled as separate files. 1 Call up the Save display. [MUSIC FINDER] [7] FILES 2 Press the TAB [-][3] buttons to select the location for saving (USER or USB). 7 3 Press the [6] (SAVE) button to save the file. All records are saved together as a single file. Calling Up Music Finder Records Saved to USER or USB 1 Call up the File Selection display. [MUSIC FINDER] [7] FILES 2 Use the TAB [-][3] buttons to select USER or USB. 3 Press the [A] - [J] buttons to select the desired Music Finder file. When the file is selected, a message is displayed according to the content of the file. Press the desired button. [F] REPLACE [G] APPEND [H] CANCEL All Music Finder records currently in the instrument are deleted and replaced with the records of the selected file. NOTICE Selecting "REPLACE" automatically deletes all your original records from internal memory. Make sure that all important data has been archived to another location beforehand. The records called up are added to the record currently in the instrument. Selecting this button aborts the operation (the selected file is not called up). Music Finder - Calling Up Ideal Setups (Voice, Style, etc.) for Each Song - 64 CVP-601 Reference Manual
-
 1
1 -
2
-
3
-
4
-
5
-
6
-
7
-
8
-
9
-
10
-
11
-
12
-
13
-
14
-
15
-
16
-
17
-
18
-
19
-
20
-
21
-
22
-
23
-
24
-
25
-
26
-
27
-
28
-
29
-
30
-
31
-
32
-
33
-
34
-
35
-
36
-
37
-
38
-
39
-
40
-
41
-
42
-
43
-
44
-
45
-
46
-
47
-
48
-
49
-
50
-
51
-
52
-
53
-
54
-
55
-
56
-
57
-
58
-
 59
59 -
 60
60 -
 61
61 -
 62
62 -
 63
63 -
 64
64 -
 65
65 -
 66
66 -
 67
67 -
 68
68 -
 69
69 -
70
-
71
-
72
-
73
-
74
-
75
-
76
-
77
-
78
-
79
-
80
-
81
-
82
-
83
-
84
-
85
-
86
-
87
-
88
-
89
-
90
-
91
-
92
-
93
-
94
-
95
-
96
-
97
-
98
 |
 |
