Yamaha DGX-640 Owner's Manual - Page 11
Setting Up, Attach the stand bases., Attach the back board. - used
 |
View all Yamaha DGX-640 manuals
Add to My Manuals
Save this manual to your list of manuals |
Page 11 highlights
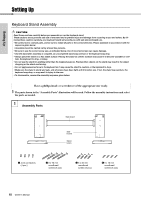
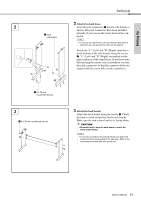
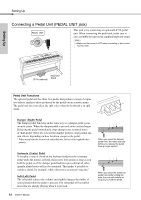
Setting Up 2 q Joint connectors "L" "R" w 6 x 70 mm roundhead screws 3 e 6 x 30 mm roundhead screws Setting Up 2 Attach the stand bases. Insert the joint connectors q into the side boards as shown. The joint connectors have been installed properly if you can see the screw head on the connector. NOTE • If you put the connectors in wrong direction and want to take them out, tap around the holes on the boards. Attach the "L" (Left) and "R" (Right) stand bases to the bottom of the side boards, using the screws w. "L" (Left) and "R" (Right) are marked on the upper surfaces of the stand bases. If you have trouble fastening the screws, use a screwdriver to rotate the joint connectors so that the connector holes are aligned with the screw holes on the stand bases. 3 Attach the back board. Attach the back board, using the screws e. Check the back-to-front orientation for the side boards. Make sure the non-colored surface is facing down. CAUTION • Be careful not to drop the back board or touch the sharp metal fittings. NOTE • If you have purchased an optional pedal unit, attach the pedal unit before proceeding to the next step. Refer to the instructions provided with your pedal unit. Owner's Manual 11
-
 1
1 -
2
-
3
-
4
-
5
-
 6
6 -
 7
7 -
 8
8 -
 9
9 -
 10
10 -
 11
11 -
 12
12 -
 13
13 -
 14
14 -
 15
15 -
 16
16 -
17
-
18
-
19
-
20
-
21
-
22
-
23
-
24
-
25
-
26
-
27
-
28
-
29
-
30
-
31
-
32
-
33
-
34
-
35
-
36
-
37
-
38
-
39
-
40
-
41
-
42
-
43
-
44
-
45
-
46
-
47
-
48
-
49
-
50
-
51
-
52
-
53
-
54
-
55
-
56
-
57
-
58
-
59
-
60
-
61
-
62
-
63
-
64
-
65
-
66
-
67
-
68
-
69
-
70
-
71
-
72
-
73
-
74
-
75
-
76
-
77
-
78
-
79
-
80
-
81
-
82
-
83
-
84
-
85
-
86
-
87
-
88
-
89
-
90
-
91
-
92
-
93
-
94
-
95
-
96
-
97
-
98
-
99
-
100
-
101
-
102
-
103
-
104
-
105
-
106
-
107
-
108
-
109
-
110
-
111
-
112
-
113
-
114
-
115
-
116
-
117
-
118
-
119
-
120
 |
 |
