Yamaha DGX-640 Owner's Manual - Page 58
Recording will start when you play on the keyboard.
 |
View all Yamaha DGX-640 manuals
Add to My Manuals
Save this manual to your list of manuals |
Page 58 highlights
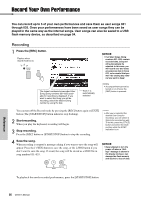
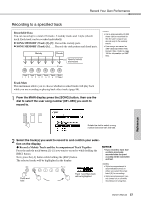
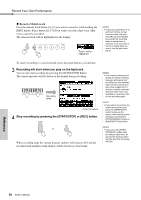
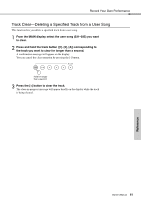
Record Your Own Performance Record a Melody track Press the melody track button [1]-[5] you want to record to while holding the [REC] button. Select button [1]-[3] if you want to record a dual voice. Split voices cannot be recorded. The selected track will be highlighted in the display. Track 1 will be highlighted NOTE • If style accompaniment is on and track [A] has not yet been recorded, the style track [A] will automatically be selected for recording when a melody track is selected. If you only want to record a melody track, be sure to turn the style track [A] off. To cancel recording to a selected track, press that track button a second time. 3 Recording will start when you play on the keyboard. You can also start recording by pressing the [START/STOP] button. The current measure will be shown on the display during recording. Recording starts Current measure 4 Stop recording by pressing the [START/STOP] or [REC] button. or When recording stops the current measure number will return to 001 and the recorded track numbers in the display will be shown in a box border. NOTE • If the memory becomes full during recording a warning message will appear and recording will stop automatically. Use the song clear or track clear (pages 60-61) function to delete unwanted data and make more room available for recording, then do the recording again. NOTE • If you want to record only the rhythm (percussion) part, press the [START/STOP] button to play just the rhythm, then add the section change by pressing the [INTO/ENDING/rit.] button or [MAIN/AUTO FILL] button. NOTE • If you press the [INTRO/ ENDING/rit.] button while recording a style track, an appropriate ending pattern will play and then recording will stop. Reference 58 Owner's Manual
-
 1
1 -
2
-
3
-
4
-
5
-
6
-
7
-
8
-
9
-
10
-
11
-
12
-
13
-
14
-
15
-
16
-
17
-
18
-
19
-
20
-
21
-
22
-
23
-
24
-
25
-
26
-
27
-
28
-
29
-
30
-
31
-
32
-
33
-
34
-
35
-
36
-
37
-
38
-
39
-
40
-
41
-
42
-
43
-
44
-
45
-
46
-
47
-
48
-
49
-
50
-
51
-
52
-
 53
53 -
 54
54 -
 55
55 -
 56
56 -
 57
57 -
 58
58 -
 59
59 -
 60
60 -
 61
61 -
 62
62 -
 63
63 -
64
-
65
-
66
-
67
-
68
-
69
-
70
-
71
-
72
-
73
-
74
-
75
-
76
-
77
-
78
-
79
-
80
-
81
-
82
-
83
-
84
-
85
-
86
-
87
-
88
-
89
-
90
-
91
-
92
-
93
-
94
-
95
-
96
-
97
-
98
-
99
-
100
-
101
-
102
-
103
-
104
-
105
-
106
-
107
-
108
-
109
-
110
-
111
-
112
-
113
-
114
-
115
-
116
-
117
-
118
-
119
-
120
 |
 |
