Yamaha DGX-640 Owner's Manual - Page 56
Record Your Own Performance - keyboard case
 |
View all Yamaha DGX-640 manuals
Add to My Manuals
Save this manual to your list of manuals |
Page 56 highlights
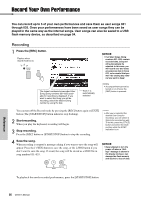
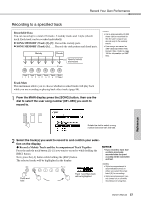
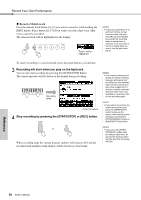
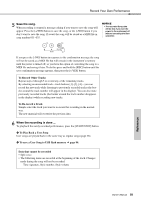
Record Your Own Performance You can record up to 5 of your own performances and save them as user songs 031 through 035. Once your performances have been saved as user songs they can be played in the same way as the internal songs. User songs can also be saved to a USB flash memory device, as described on page 94. Recording 1 Press the [REC] button. Flashes when record mode is on. The lowest-numbered unrecorded User Song (Song numbers 031-035) available for recording is displayed. If you want to select the Song you will be recording, select the desired Song number by using the dial. Track 1 is automatically selected NOTICE • If all User Songs (Song numbers 031-035) contain recorded data, Song 031 will automatically be selected. In this case, you will record over and erase any previous data in Song 031, so be careful that you won't be erasing any material you want to keep! NOTE • Accompaniment cannot be turned on or off once the [REC] button is pressed. You can turn off the Record mode by pressing the [REC] button again or [EXIT] button (The [START/STOP] button indicator stop flashing). 2 Start recording. When you play the keyboard, recording will begin. 3 Stop recording. Press the [REC] button or [START/STOP] button to stop the recording. NOTE • After you've selected the desired User Song for recording, you can select a Style to be recorded as well. To do this, press the [STYLE] button and select the Style number while the ACMP indication is on. 4 Save the song. When recording is stopped a message asking if you want to save the song will appear. Press the [+/YES] button to save the song, or the [-/NO] button if you don't want to save the song. If saved, the song will be stored as a MIDI file in song number 031-035. NOTICE • Never attempt to turn the power off when a "Writing!" message is shown in the display. Doing so can damage the flash memory and result in a loss of data. Reference To playback the newly recorded performance, press the [START/STOP] button. 56 Owner's Manual
-
 1
1 -
2
-
3
-
4
-
5
-
6
-
7
-
8
-
9
-
10
-
11
-
12
-
13
-
14
-
15
-
16
-
17
-
18
-
19
-
20
-
21
-
22
-
23
-
24
-
25
-
26
-
27
-
28
-
29
-
30
-
31
-
32
-
33
-
34
-
35
-
36
-
37
-
38
-
39
-
40
-
41
-
42
-
43
-
44
-
45
-
46
-
47
-
48
-
49
-
50
-
 51
51 -
 52
52 -
 53
53 -
 54
54 -
 55
55 -
 56
56 -
 57
57 -
 58
58 -
 59
59 -
 60
60 -
 61
61 -
62
-
63
-
64
-
65
-
66
-
67
-
68
-
69
-
70
-
71
-
72
-
73
-
74
-
75
-
76
-
77
-
78
-
79
-
80
-
81
-
82
-
83
-
84
-
85
-
86
-
87
-
88
-
89
-
90
-
91
-
92
-
93
-
94
-
95
-
96
-
97
-
98
-
99
-
100
-
101
-
102
-
103
-
104
-
105
-
106
-
107
-
108
-
109
-
110
-
111
-
112
-
113
-
114
-
115
-
116
-
117
-
118
-
119
-
120
 |
 |
