Yamaha MX61 Reference Manual - Page 23
Setting up the MX49/MX61, Setting up Cubase, QuickSetup
 |
View all Yamaha MX61 manuals
Add to My Manuals
Save this manual to your list of manuals |
Page 23 highlights
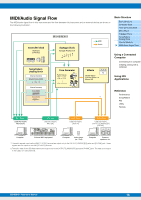
Setting up the MX49/MX61 1 Use the Quick Setup function to specify the "DAW Rec" connection. Press [UTILITY] [JOB] Select "01:QuickSetup" [ENTER] Set "Type" to "DAW Rec" [ENTER]. The following parameters are set as shown. Local Control (page 65) is set to off. Use this setting when you want to record your performance on this instrument (excepting Arpeggio data) to DAW software. JOB*QuickSetup c******Type=*DAW*Rec Basic Structure Basic Structure Controller Block Tone Generator Block Effect Block Arpeggio Block Song/Pattern Playing Block Internal Memory MIDI/Audio Signal Flow Direct Monitor switch LocalCtrl MIDI Sync Clock Out Arpeggio MIDI output switch DAW Rec on off auto off off 2 Store the settings, then return the Performance top display. Press [STORE], then press [EXIT] repeatedly to return to the top display after storing the settings. 3 Make sure that the Layer and Split functions are off. If the lamps of the [LAYER] button and/or [SPLIT] button are lit, press the buttons to turn them off. Setting up Cubase 1 Start Cubase on your computer. Important Cubase cannot recognize the MX49/MX61 if you turn the power of the MX49/MX61 on after starting Cubase. Make sure to start Cubase after turning on the power of the MX49/MX61. 2 On Cubase, open a new project. Select the "Empty" project in the "More" area of the Project Assistant window, and then click [Create]. 3 Confirm that MIDI Thru is set to "on" on Cubase. Click "File" menu "Preference" "MIDI." Confirm that "MIDI Thru Active" is checked. Then, click [OK] to close the Preference window. When MIDI Thru is set to on, the MIDI data generated by playing the keyboard and received by the computer is returned back to the MX49/MX61. As shown in the illustration below, this allows you to play selected tracks on Cubase (each with a different MIDI channel) and have the respective Parts on the MX49/ MX61 sound. For example, if Tracks 1, 2 and 3 are set to MIDI channels 1, 2 and 3, respectively, and the MX49/ MX61 is set to play Piano, Bass and Strings on MIDI channels 1, 2 and 3, respectively-you can individually select a track for playing/recording and have that respective instrument sound on the MX49/MX61. Select Track 1 and play/record the Piano part; select Track 2 to play/record the Bass, and so on. Using a Connected Computer Connecting to a computer Creating a Song with a computer Using iOS Applications Reference Performance Song/Pattern File Utility Remote USB [TO HOST] terminal Tone generator block (recognizing MIDI Channel 3 data) Keyboard (output via MIDI Channel 1) Local Control = off MX49/MX61 Computer (Cubase, etc.) IN CH1 OUT CH3 MIDI Thru = on MX49/MX61 Reference Manual 23
-
 1
1 -
2
-
3
-
4
-
5
-
6
-
7
-
8
-
9
-
10
-
11
-
12
-
13
-
14
-
15
-
16
-
17
-
 18
18 -
 19
19 -
 20
20 -
 21
21 -
 22
22 -
 23
23 -
 24
24 -
 25
25 -
 26
26 -
 27
27 -
 28
28 -
29
-
30
-
31
-
32
-
33
-
34
-
35
-
36
-
37
-
38
-
39
-
40
-
41
-
42
-
43
-
44
-
45
-
46
-
47
-
48
-
49
-
50
-
51
-
52
-
53
-
54
-
55
-
56
-
57
-
58
-
59
-
60
-
61
-
62
-
63
-
64
-
65
-
66
-
67
-
68
-
69
-
70
-
71
 |
 |
