Yamaha MX61 Reference Manual - Page 29
Setting up Cubase
 |
View all Yamaha MX61 manuals
Add to My Manuals
Save this manual to your list of manuals |
Page 29 highlights
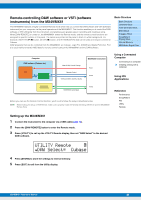
3 Use the Quick Setup function to specify the "Arp Rec" connection. Press [UTILITY] [JOB] Select "01:QuickSetup" [ENTER] Set "Type" to "Arp Rec" [ENTER]. The following parameters are automatically set. This setting is used for recording your performance on the instrument, including Arpeggio data, to DAW software. JOB*QuickSetup c******Type=*Arp*Rec DirectMonitor (Direct Monitor switch) LocalCtrl MIDI Sync Clock Out MIDI OUT (Arpeggio MIDI output switch) Arp Rec on on auto off on Basic Structure Basic Structure Controller Block Tone Generator Block Effect Block Arpeggio Block Song/Pattern Playing Block Internal Memory MIDI/Audio Signal Flow Using a Connected Computer Connecting to a computer Creating a Song with a computer 4 Set the instrument so that the Sequencer Control signals-Start, Stop, etc.-are not received from Cubase. Press [EXIT] twice Select "02:MIDI" Press [ENTER] "SeqCtrl" = "out" or "off". 5 Store the settings, then return to the Performance top display. Press [STORE], then press [EXIT] to return to the top display after Store is completed. 6 Make sure that the Layer and Split functions are off. If the lamps of the [LAYER] button and [SPLIT] button are lit, press the buttons to turn them off. Setting up Cubase 1 Start Cubase on your computer. Important Cubase cannot recognize the MX49/MX61 if you turn the power of the MX49/MX61 on after starting Cubase. Make sure to start Cubase after turning on the power of the MX49/MX61. 2 On Cubase, open a new project. Select the "Empty" project in the "More" area of the Project Assistant window, and then click [Create]. 3 Create a MIDI track. Click "Project" menu "Add Track" "MIDI" [Add Track]. 4 On the MIDI track, set the Input/Output Routing to disable the MIDI thru function. Set the Input Routing to "All MIDI Input" and set the Output Routing to "Not Connected." All MIDI data will be input to Cubase, and MIDI track data will not be output to the MX49/MX61. Disable the MIDI thru function of the MIDI track in order to prevent the to-be-recorded Arpeggio phrase from being output to the MX49/MX61, which would otherwise result in a feedback loop between the instrument and the computer. Using iOS Applications Reference Performance Song/Pattern File Utility Remote Input Routing Output Routing MX49/MX61 Reference Manual 29
-
 1
1 -
2
-
3
-
4
-
5
-
6
-
7
-
8
-
9
-
10
-
11
-
12
-
13
-
14
-
15
-
16
-
17
-
18
-
19
-
20
-
21
-
22
-
23
-
 24
24 -
 25
25 -
 26
26 -
 27
27 -
 28
28 -
 29
29 -
 30
30 -
 31
31 -
 32
32 -
 33
33 -
 34
34 -
35
-
36
-
37
-
38
-
39
-
40
-
41
-
42
-
43
-
44
-
45
-
46
-
47
-
48
-
49
-
50
-
51
-
52
-
53
-
54
-
55
-
56
-
57
-
58
-
59
-
60
-
61
-
62
-
63
-
64
-
65
-
66
-
67
-
68
-
69
-
70
-
71
 |
 |
