Yamaha MX61 Reference Manual - Page 27
Recording your performance on the MX49/MX61 to DAW software as audio data - videos
 |
View all Yamaha MX61 manuals
Add to My Manuals
Save this manual to your list of manuals |
Page 27 highlights
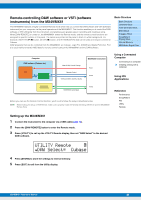
Recording your performance on the MX49/MX61 to DAW software as audio data In this section, you'll learn how to convert the MIDI data you created in the previous section to audio data using the MX49/MX61 Voices. By recording audio data, you can create audio CDs, or use the MX49/MX61 Song data as an audio file in other applications, such as sound editors or video production software. In this section, set up the connections and signal flow as shown in the following illustration. Powered speakers DAW MIDI Tracks 1 2 Computer MIDI Audio OUTPUT [L MONO] / [R] 16 Audio Track 1 Port 1 USB [TO HOST] Basic Structure Basic Structure Controller Block Tone Generator Block Effect Block Arpeggio Block Song/Pattern Playing Block Internal Memory MIDI/Audio Signal Flow Using a Connected Computer Connecting to a computer Creating a Song with a computer Direct Monitor = on MX49/MX61 Tone generator Rhythm Pattern (MIDI) Arpeggio MIDI Out = off Controllers (keyboard, knobs, etc.) Using iOS Applications Reference Performance Song/Pattern File Utility Remote 1 Set up the MX49/MX61 according to the instructions in "Setting up the MX49/MX61" on page 23. 2 Create a new Audio track in the Project you created in the previous section ("Recording your performance on the MX49/MX61 to the DAW software as MIDI data"). Click "Project" menu "Add Track" "Audio" [Add Track]. 3 In this new Audio track, set the Input/Output destinations for the MX49/MX61. Set the Input Routing to "Stereo In," and set the Output Routing to "Stereo Out." NOTE "Stereo In" and "Stereo Out" are the bus names set on the VST Connection window which is called up from the "Device" menu. If you've added other bus names on the VST Connection window, make sure to set the routings to the appropriate bus names. 4 Using all MIDI data that was recorded to the Project, record the MX49/MX61 sound to Cubase as audio data. After setting the time position to zero, click (Record). The MIDI data of all tracks will be played back to record the data to the Audio track. When the MIDI data reaches the end, click (Stop) to stop recording. 5 After muting all tracks in the Project window on Cubase (except the new Audio track), check the recorded audio data by playing the Audio track. MX49/MX61 Reference Manual 27
-
 1
1 -
2
-
3
-
4
-
5
-
6
-
7
-
8
-
9
-
10
-
11
-
12
-
13
-
14
-
15
-
16
-
17
-
18
-
19
-
20
-
21
-
 22
22 -
 23
23 -
 24
24 -
 25
25 -
 26
26 -
 27
27 -
 28
28 -
 29
29 -
 30
30 -
 31
31 -
 32
32 -
33
-
34
-
35
-
36
-
37
-
38
-
39
-
40
-
41
-
42
-
43
-
44
-
45
-
46
-
47
-
48
-
49
-
50
-
51
-
52
-
53
-
54
-
55
-
56
-
57
-
58
-
59
-
60
-
61
-
62
-
63
-
64
-
65
-
66
-
67
-
68
-
69
-
70
-
71
 |
 |
