Yamaha MX61 Reference Manual - Page 28
Recording Arpeggio phrases of the MX49/MX61 to DAW software as MIDI data, Setting up the MX49/MX61
 |
View all Yamaha MX61 manuals
Add to My Manuals
Save this manual to your list of manuals |
Page 28 highlights
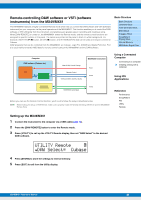
Recording Arpeggio phrases of the MX49/MX61 to DAW software as MIDI data In this section, you'll learn how to record Arpeggio phrases to Cubase as MIDI data. Doing this allows you to simply create fully realized, comprehensive songs, without having to play difficult phrases on the keyboard. In this section, set the signal flow as shown in the following illustration and use the convenient Quick Setup function to simplify the connection settings on the MX49/MX61. Powered speakers DAW MIDI Tracks 1 2 16 Computer MIDI Thru = off MIDI Audio MIDI clock Basic Structure Basic Structure Controller Block Tone Generator Block Effect Block Arpeggio Block Song/Pattern Playing Block Internal Memory MIDI/Audio Signal Flow Using a Connected Computer Connecting to a computer Creating a Song with a computer OUTPUT [L MONO] / [R] Direct Monitor = on Tone generator USB [TO HOST] Arpeggio MIDI Out = on Local Control = on Rhythm Pattern (MIDI) Using iOS Applications Reference Performance Song/Pattern File Utility Remote MX49/MX61 Controllers (keyboard, knobs, etc.) Setting up the MX49/MX61 1 For Part 1, determine the desired Arpeggio type for recording, then set the Arpeggio switch to on. Press [EDIT] in the Performance display Select "02:Part" with the Cursor [E] button, then press [ENTER] Press [PIANO] (1) Select "03:ArpSelect" with the Cursor [V]/[E] buttons, then press [ENTER] Set "Switch" to "on," and select desired "Category"/"Type." 2 Set the Arpeggio switch to on. Press [ARP] so that it's lamp lights. This functions for the entire Performance. MX49/MX61 Reference Manual 28
-
 1
1 -
2
-
3
-
4
-
5
-
6
-
7
-
8
-
9
-
10
-
11
-
12
-
13
-
14
-
15
-
16
-
17
-
18
-
19
-
20
-
21
-
22
-
 23
23 -
 24
24 -
 25
25 -
 26
26 -
 27
27 -
 28
28 -
 29
29 -
 30
30 -
 31
31 -
 32
32 -
 33
33 -
34
-
35
-
36
-
37
-
38
-
39
-
40
-
41
-
42
-
43
-
44
-
45
-
46
-
47
-
48
-
49
-
50
-
51
-
52
-
53
-
54
-
55
-
56
-
57
-
58
-
59
-
60
-
61
-
62
-
63
-
64
-
65
-
66
-
67
-
68
-
69
-
70
-
71
 |
 |
