Yamaha MX61 Reference Manual - Page 30
Playing the recorded Arpeggio phrases
 |
View all Yamaha MX61 manuals
Add to My Manuals
Save this manual to your list of manuals |
Page 30 highlights
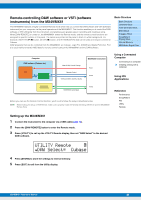
5 Set the MIDI clock so that it is transmitted from Cubase to the MX49/MX61. Click the "Transport" menu "Project Synchronization Setup" In "MIDI Clock Destinations" area, check "Yamaha MX49/MX61 - 1," "MIDI Clock Follows Project Position," and "Always Send Start Message" Click [OK]. NOTE The "Send MIDI Clock in Stop Mode" setting determines whether the Arpeggio is played back when recording or playing is stopped on Cubase (Stop mode). If you wish to playback the Arpeggio in the Stop mode, also check the "Send MIDI Clock in Stop Mode." Basic Structure Basic Structure Controller Block Tone Generator Block Effect Block Arpeggio Block Song/Pattern Playing Block Internal Memory MIDI/Audio Signal Flow 6 Record Arpeggio phrases of the MX49/MX61 to the selected MIDI track. After setting the time position to zero, click (Record), then play the keyboard of the MX49/MX61 to playback the Arpeggio. The Arpeggio phrases will be output as MIDI data, allowing you to record them to a MIDI track in Cubase. When you have finished the performance, click (Stop) to finish recording. Playing the recorded Arpeggio phrases 1 Press [ARP] on the MX49/MX61 so that the lamp turns off. The Arpeggio switch which functions for the entire Performance is set to off. 2 On the MIDI track to which the Arpeggio phrases were recorded, set the MIDI thru function to active. Set the Output Routing to "Yamaha MX49/MX61-1." The recorded MIDI data will be output to the MX49/MX61. 3 Check the recorded Arpeggio phrases. After setting the time position to zero, click (Start). Using a Connected Computer Connecting to a computer Creating a Song with a computer Using iOS Applications Reference Performance Song/Pattern File Utility Remote MX49/MX61 Reference Manual 30
-
 1
1 -
2
-
3
-
4
-
5
-
6
-
7
-
8
-
9
-
10
-
11
-
12
-
13
-
14
-
15
-
16
-
17
-
18
-
19
-
20
-
21
-
22
-
23
-
24
-
 25
25 -
 26
26 -
 27
27 -
 28
28 -
 29
29 -
 30
30 -
 31
31 -
 32
32 -
 33
33 -
 34
34 -
 35
35 -
36
-
37
-
38
-
39
-
40
-
41
-
42
-
43
-
44
-
45
-
46
-
47
-
48
-
49
-
50
-
51
-
52
-
53
-
54
-
55
-
56
-
57
-
58
-
59
-
60
-
61
-
62
-
63
-
64
-
65
-
66
-
67
-
68
-
69
-
70
-
71
 |
 |
