eMachines M6809 eMachines M-Series Notebook User's Guide - Page 67
The battery pack is keyed so that it can be inserted in only
 |
View all eMachines M6809 manuals
Add to My Manuals
Save this manual to your list of manuals |
Page 67 highlights
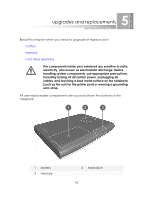
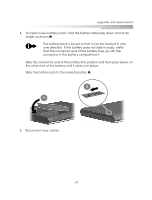
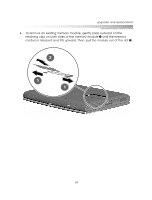
upgrades and replacements 4. To insert a new battery pack, hold the battery label side down and at an angle, as shown 1. The battery pack is keyed so that it can be inserted in only one direction. If the battery does not slide in easily, verify that the connector end of the battery lines up with the connector in the battery compartment. Slide the connector end of the battery into position and then press down on the other end of the battery until it clicks into place. Slide the battery lock to the locked position 2. 5. Reconnect your cables. 67
-
 1
1 -
2
-
3
-
4
-
5
-
6
-
7
-
8
-
9
-
10
-
11
-
12
-
13
-
14
-
15
-
16
-
17
-
18
-
19
-
20
-
21
-
22
-
23
-
24
-
25
-
26
-
27
-
28
-
29
-
30
-
31
-
32
-
33
-
34
-
35
-
36
-
37
-
38
-
39
-
40
-
41
-
42
-
43
-
44
-
45
-
46
-
47
-
48
-
49
-
50
-
51
-
52
-
53
-
54
-
55
-
56
-
57
-
58
-
59
-
60
-
61
-
 62
62 -
 63
63 -
 64
64 -
 65
65 -
 66
66 -
 67
67 -
 68
68 -
 69
69 -
 70
70 -
 71
71 -
 72
72 -
73
-
74
-
75
-
76
-
77
-
78
-
79
-
80
-
81
-
82
-
83
-
84
-
85
-
86
-
87
-
88
-
89
-
90
 |
 |

67
upgrades and replacements
4.
To insert a new battery pack,
hold the battery label side down and at an
angle, as shown
1
.
Slide the connector end of the battery into position and then press down on
the other end of the battery until it clicks into place.
Slide the battery lock to the locked position
2
.
5.
Reconnect your cables.
The battery pack is keyed so that it can be inserted in only
one direction. If the battery does not slide in easily, verify
that the connector end of the battery lines up with the
connector in the battery compartment.