eMachines T3656 8512161 - eMachines Desktop Hardware Reference Guide - Page 72
Checking the hard drive for errors
 |
View all eMachines T3656 manuals
Add to My Manuals
Save this manual to your list of manuals |
Page 72 highlights
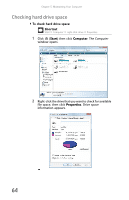
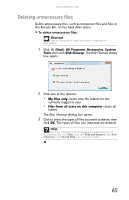
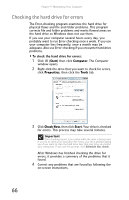
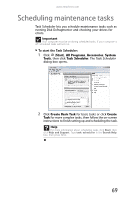
Chapter 5: Maintaining Your Computer Checking the hard drive for errors The Error-checking program examines the hard drive for physical flaws and file and folder problems. This program corrects file and folder problems and marks flawed areas on the hard drive so Windows does not use them. If you use your computer several hours every day, you probably want to run Error-checking once a week. If you use your computer less frequently, once a month may be adequate. Also use Error-checking if you encounter hard drive problems. To check the hard drive for errors: 1 Click (Start) then click Computer. The Computer window opens. 2 Right-click the drive that you want to check for errors, click Properties, then click the Tools tab. 3 Click Check Now, then click Start. Your drive is checked for errors. This process may take several minutes. Important Error checking cannot scan a drive while the drive is being used. If you try to check your hard drive for errors, you see a prompt asking you if you want to scan the hard drive later (the next time you restart your computer). If you see this prompt, click Schedule disc check. After Windows has finished checking the drive for errors, it provides a summary of the problems that it found. 4 Correct any problems that are found by following the on-screen instructions. 66
-
 1
1 -
2
-
3
-
4
-
5
-
6
-
7
-
8
-
9
-
10
-
11
-
12
-
13
-
14
-
15
-
16
-
17
-
18
-
19
-
20
-
21
-
22
-
23
-
24
-
25
-
26
-
27
-
28
-
29
-
30
-
31
-
32
-
33
-
34
-
35
-
36
-
37
-
38
-
39
-
40
-
41
-
42
-
43
-
44
-
45
-
46
-
47
-
48
-
49
-
50
-
51
-
52
-
53
-
54
-
55
-
56
-
57
-
58
-
59
-
60
-
61
-
62
-
63
-
64
-
65
-
66
-
 67
67 -
 68
68 -
 69
69 -
 70
70 -
 71
71 -
 72
72 -
 73
73 -
 74
74 -
 75
75 -
 76
76 -
 77
77 -
78
-
79
-
80
-
81
-
82
-
83
-
84
-
85
-
86
-
87
-
88
-
89
-
90
-
91
-
92
-
93
-
94
-
95
-
96
-
97
-
98
-
99
-
100
-
101
-
102
-
103
-
104
-
105
-
106
-
107
-
108
-
109
-
110
-
111
-
112
-
113
-
114
-
115
-
116
-
117
-
118
-
119
-
120
-
121
-
122
-
123
-
124
-
125
-
126
-
127
-
128
-
129
-
130
-
131
-
132
-
133
-
134
 |
 |