2000 Honda CR-V Owner's Manual - Page 252
2000 Honda CR-V Manual

Page 252 highlights
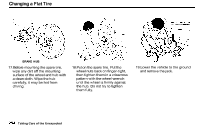
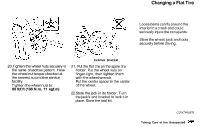
Changing a Flat Tire EXTENSION JACKING POINT WHEEL WRENCH 14.Locate the jacking point nearest the tire you need to change. It is pointed to by an arrow molded into the underside of the body. Place the jack under the jacking point. Turn the end bracket clockwise until the top of the jack contacts the jacking point. Make sure the jacking point tab is resting in the jack notch. 15.Use the extension and wheel wrench as shown to raise the vehicle until the flat tire is off the ground. 16.Remove the wheel nuts and flat tire. Temporarily place the flat tire on the ground with the outside surface of the wheel facing up. You could scratch the wheel if you put it face clown. CONTINUED Taking Care of the Unexpected
-
 1
1 -
2
-
3
-
4
-
5
-
6
-
7
-
8
-
9
-
10
-
11
-
12
-
13
-
14
-
15
-
16
-
17
-
18
-
19
-
20
-
21
-
22
-
23
-
24
-
25
-
26
-
27
-
28
-
29
-
30
-
31
-
32
-
33
-
34
-
35
-
36
-
37
-
38
-
39
-
40
-
41
-
42
-
43
-
44
-
45
-
46
-
47
-
48
-
49
-
50
-
51
-
52
-
53
-
54
-
55
-
56
-
57
-
58
-
59
-
60
-
61
-
62
-
63
-
64
-
65
-
66
-
67
-
68
-
69
-
70
-
71
-
72
-
73
-
74
-
75
-
76
-
77
-
78
-
79
-
80
-
81
-
82
-
83
-
84
-
85
-
86
-
87
-
88
-
89
-
90
-
91
-
92
-
93
-
94
-
95
-
96
-
97
-
98
-
99
-
100
-
101
-
102
-
103
-
104
-
105
-
106
-
107
-
108
-
109
-
110
-
111
-
112
-
113
-
114
-
115
-
116
-
117
-
118
-
119
-
120
-
121
-
122
-
123
-
124
-
125
-
126
-
127
-
128
-
129
-
130
-
131
-
132
-
133
-
134
-
135
-
136
-
137
-
138
-
139
-
140
-
141
-
142
-
143
-
144
-
145
-
146
-
147
-
148
-
149
-
150
-
151
-
152
-
153
-
154
-
155
-
156
-
157
-
158
-
159
-
160
-
161
-
162
-
163
-
164
-
165
-
166
-
167
-
168
-
169
-
170
-
171
-
172
-
173
-
174
-
175
-
176
-
177
-
178
-
179
-
180
-
181
-
182
-
183
-
184
-
185
-
186
-
187
-
188
-
189
-
190
-
191
-
192
-
193
-
194
-
195
-
196
-
197
-
198
-
199
-
200
-
201
-
202
-
203
-
204
-
205
-
206
-
207
-
208
-
209
-
210
-
211
-
212
-
213
-
214
-
215
-
216
-
217
-
218
-
219
-
220
-
221
-
222
-
223
-
224
-
225
-
226
-
227
-
228
-
229
-
230
-
231
-
232
-
233
-
234
-
235
-
236
-
237
-
238
-
239
-
240
-
241
-
242
-
243
-
244
-
245
-
246
-
 247
247 -
 248
248 -
 249
249 -
 250
250 -
 251
251 -
 252
252 -
 253
253 -
 254
254 -
 255
255 -
 256
256 -
 257
257 -
258
-
259
-
260
-
261
-
262
-
263
-
264
-
265
-
266
-
267
-
268
-
269
-
270
-
271
-
272
-
273
-
274
-
275
-
276
-
277
-
278
-
279
-
280
-
281
-
282
-
283
-
284
-
285
-
286
-
287
-
288
-
289
-
290
-
291
-
292
-
293
-
294
-
295
-
296
-
297
-
298
-
299
-
300
-
301
-
302
-
303
 |
 |

Changing a Flat Tire
JACKING POINT
14.Locate the jacking point nearest
the tire you need to change. It is
pointed to by an arrow molded into
the underside of the body. Place
the jack under the jacking point.
Turn the end bracket clockwise
until the top of the jack contacts
the jacking point. Make sure the
jacking point tab is resting in the
jack notch.
EXTENSION
WHEEL WRENCH
15.Use the extension and wheel
wrench as shown to raise the
vehicle until the flat tire is off the
ground.
16.Remove the wheel nuts and flat
tire. Temporarily place the flat tire
on the ground with the outside
surface of the wheel facing up.
You could scratch the wheel if you
put it face clown.
CONTINUED
Taking Care of the Unexpected