2000 Honda CR-V Owner's Manual - Page 255
2000 Honda CR-V Manual

Page 255 highlights
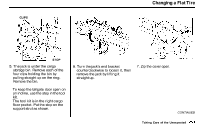
Changing a Flat Tire TOP SLIT OUTSIDE SEAM 23.Hold the cover at the 10 o'clock and 2 o'clock positions, then place the top of it over the spare tire, making sure the top slit on the back of the cover is vertical. 24.Step back to check the alignment of the logo. If needed, move the cover left or right until the logo is straight. NOTICE Make sure the cover is at room temperature before you install it. If it's too cold, it won't fit easily over the tire. 25.Starting at the top of the tire, position the outside seam of the cover slightly over the outside edge of the tire. Pull the cover on, a little at a time, and alternate side to side along the tire until you reach the bottom. Taking Care of the Unexpected
-
 1
1 -
2
-
3
-
4
-
5
-
6
-
7
-
8
-
9
-
10
-
11
-
12
-
13
-
14
-
15
-
16
-
17
-
18
-
19
-
20
-
21
-
22
-
23
-
24
-
25
-
26
-
27
-
28
-
29
-
30
-
31
-
32
-
33
-
34
-
35
-
36
-
37
-
38
-
39
-
40
-
41
-
42
-
43
-
44
-
45
-
46
-
47
-
48
-
49
-
50
-
51
-
52
-
53
-
54
-
55
-
56
-
57
-
58
-
59
-
60
-
61
-
62
-
63
-
64
-
65
-
66
-
67
-
68
-
69
-
70
-
71
-
72
-
73
-
74
-
75
-
76
-
77
-
78
-
79
-
80
-
81
-
82
-
83
-
84
-
85
-
86
-
87
-
88
-
89
-
90
-
91
-
92
-
93
-
94
-
95
-
96
-
97
-
98
-
99
-
100
-
101
-
102
-
103
-
104
-
105
-
106
-
107
-
108
-
109
-
110
-
111
-
112
-
113
-
114
-
115
-
116
-
117
-
118
-
119
-
120
-
121
-
122
-
123
-
124
-
125
-
126
-
127
-
128
-
129
-
130
-
131
-
132
-
133
-
134
-
135
-
136
-
137
-
138
-
139
-
140
-
141
-
142
-
143
-
144
-
145
-
146
-
147
-
148
-
149
-
150
-
151
-
152
-
153
-
154
-
155
-
156
-
157
-
158
-
159
-
160
-
161
-
162
-
163
-
164
-
165
-
166
-
167
-
168
-
169
-
170
-
171
-
172
-
173
-
174
-
175
-
176
-
177
-
178
-
179
-
180
-
181
-
182
-
183
-
184
-
185
-
186
-
187
-
188
-
189
-
190
-
191
-
192
-
193
-
194
-
195
-
196
-
197
-
198
-
199
-
200
-
201
-
202
-
203
-
204
-
205
-
206
-
207
-
208
-
209
-
210
-
211
-
212
-
213
-
214
-
215
-
216
-
217
-
218
-
219
-
220
-
221
-
222
-
223
-
224
-
225
-
226
-
227
-
228
-
229
-
230
-
231
-
232
-
233
-
234
-
235
-
236
-
237
-
238
-
239
-
240
-
241
-
242
-
243
-
244
-
245
-
246
-
247
-
248
-
249
-
 250
250 -
 251
251 -
 252
252 -
 253
253 -
 254
254 -
 255
255 -
 256
256 -
 257
257 -
 258
258 -
 259
259 -
 260
260 -
261
-
262
-
263
-
264
-
265
-
266
-
267
-
268
-
269
-
270
-
271
-
272
-
273
-
274
-
275
-
276
-
277
-
278
-
279
-
280
-
281
-
282
-
283
-
284
-
285
-
286
-
287
-
288
-
289
-
290
-
291
-
292
-
293
-
294
-
295
-
296
-
297
-
298
-
299
-
300
-
301
-
302
-
303
 |
 |

Changing a Flat Tire
TOP SLIT
23.Hold the cover at the 10 o'clock
and 2 o'clock positions, then place
the top of it over the spare tire,
making sure the top slit on the
back of the cover is vertical.
Make sure the cover is at room
temperature before you install it. If it's
too cold, it won't fit easily over the tire.
24.Step back to check the alignment
of the logo. If needed, move the
cover left or right until the logo is
straight.
OUTSIDE SEAM
25.Starting at the top of the tire,
position the outside seam of the
cover slightly over the outside
edge of the tire. Pull the cover on,
a little at a time, and alternate side
to side along the tire until you
reach the bottom.
Taking Care of the Unexpected
NOTICE