2001 Nissan Quest Owner's Manual - Page 183
2001 Nissan Quest Manual
Page 183 highlights
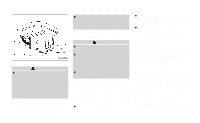
● The screen rotates down to view and up into the housing to store when not in use. Ensure that the screen is latched securely into the housing when stored. ● The VCP and floor console covers should remain closed when the videocassette is playing. ● When the ignition is turned ON, audio is set to low volume through the headphones. Press the VOLUME button on the RSEM to increase the volume. To listen through the vehicle's speaker system, press the speaker control button. To remove the videocassette tape, press the STOP button and then press the EJECT button. When the engine is turned OFF, the videocassette tape is automatically ejected from the VCP. Playing a Videocassette Tape CAUTION ● Do not insert foreign objects into the VCP. LHA0092 Flip-down screen CAUTION ● The glass screen on the liquid crystal display may break if hit with a hard or sharp object. If the glass breaks, do not touch the liquid crystalline material, which contains a small amount of mercury. In case of contact with skin, wash immediately with soap and water. ● Only operate the VCP while the vehicle engine is running. Operating the VCP for extended periods of time with the engine OFF can discharge the vehicle battery. ● Do not leave a videocassette tape in the VCP for extended periods of time. The FES is automatically activated when the vehicle ignition and radio are both ON. Open the floor console and insert the videocassette tape into the Video Cassette Player (VCP). The videocassette tape will start to play automatically. ● The system will not allow a videocassette to be inserted in the wrong position. To Play a Video Game 1. Connect the video line from your video game device to the VIDEO jack. 2. Connect the audio cable to the left and right AUDIO jacks. 3. Press the MEDIA button to activate the AUX mode. The LCD screen will turn on and the AUX indicator will illuminate. 4. If desired, press the speaker control button and plug a headphone into the headphone jack. With the headphones ON, the rear speakers will not operate. 4-40 Heater, air conditioner and audio systems
-
 1
1 -
2
-
3
-
4
-
5
-
6
-
7
-
8
-
9
-
10
-
11
-
12
-
13
-
14
-
15
-
16
-
17
-
18
-
19
-
20
-
21
-
22
-
23
-
24
-
25
-
26
-
27
-
28
-
29
-
30
-
31
-
32
-
33
-
34
-
35
-
36
-
37
-
38
-
39
-
40
-
41
-
42
-
43
-
44
-
45
-
46
-
47
-
48
-
49
-
50
-
51
-
52
-
53
-
54
-
55
-
56
-
57
-
58
-
59
-
60
-
61
-
62
-
63
-
64
-
65
-
66
-
67
-
68
-
69
-
70
-
71
-
72
-
73
-
74
-
75
-
76
-
77
-
78
-
79
-
80
-
81
-
82
-
83
-
84
-
85
-
86
-
87
-
88
-
89
-
90
-
91
-
92
-
93
-
94
-
95
-
96
-
97
-
98
-
99
-
100
-
101
-
102
-
103
-
104
-
105
-
106
-
107
-
108
-
109
-
110
-
111
-
112
-
113
-
114
-
115
-
116
-
117
-
118
-
119
-
120
-
121
-
122
-
123
-
124
-
125
-
126
-
127
-
128
-
129
-
130
-
131
-
132
-
133
-
134
-
135
-
136
-
137
-
138
-
139
-
140
-
141
-
142
-
143
-
144
-
145
-
146
-
147
-
148
-
149
-
150
-
151
-
152
-
153
-
154
-
155
-
156
-
157
-
158
-
159
-
160
-
161
-
162
-
163
-
164
-
165
-
166
-
167
-
168
-
169
-
170
-
171
-
172
-
173
-
174
-
175
-
176
-
177
-
 178
178 -
 179
179 -
 180
180 -
 181
181 -
 182
182 -
 183
183 -
 184
184 -
 185
185 -
 186
186 -
 187
187 -
 188
188 -
189
-
190
-
191
-
192
-
193
-
194
-
195
-
196
-
197
-
198
-
199
-
200
-
201
-
202
-
203
-
204
-
205
-
206
-
207
-
208
-
209
-
210
-
211
-
212
-
213
-
214
-
215
-
216
-
217
-
218
-
219
-
220
-
221
-
222
-
223
-
224
-
225
-
226
-
227
-
228
-
229
-
230
-
231
-
232
-
233
-
234
-
235
-
236
-
237
-
238
-
239
-
240
-
241
-
242
-
243
-
244
-
245
-
246
-
247
-
248
-
249
-
250
-
251
-
252
-
253
-
254
-
255
-
256
-
257
-
258
-
259
-
260
-
261
-
262
-
263
-
264
-
265
-
266
-
267
-
268
-
269
-
270
-
271
-
272
-
273
-
274
-
275
-
276
-
277
-
278
-
279
-
280
-
281
-
282
-
283
-
284
-
285
-
286
-
287
-
288
-
289
-
290
-
291
-
292
-
293
-
294
-
295
-
296
-
297
-
298
-
299
-
300
-
301
-
302
-
303
-
304
 |
 |
