1993 Pontiac Sunbird Owner's Manual - Page 142
1993 Pontiac Sunbird Manual
Page 142 highlights
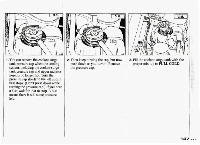
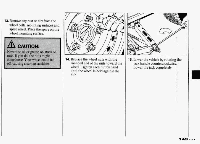
8. Using the wheel wrench, remove the plastic capnuts and loosen all the wheel nuts. Don't remove the wheel nuts yet. 9. Near each wheel well is a notch in the frame which the jack head fits in. The front notch is 9" (23 cm) back from the rear wheel well.The rear notch is 8'' (20 cm) forward from the rear wheel well. If your vehicle has flared side moldings, both front and rear notches are 18" (46 cm) from the wheel wells. 10. Position the jack under the vehicle. Raise the jack headuntil it fit$> firmly into the notch in the vehicle's frame nearest the flat tire. Put the compact spare tire near you.
-
 1
1 -
2
-
3
-
4
-
5
-
6
-
7
-
8
-
9
-
10
-
11
-
12
-
13
-
14
-
15
-
16
-
17
-
18
-
19
-
20
-
21
-
22
-
23
-
24
-
25
-
26
-
27
-
28
-
29
-
30
-
31
-
32
-
33
-
34
-
35
-
36
-
37
-
38
-
39
-
40
-
41
-
42
-
43
-
44
-
45
-
46
-
47
-
48
-
49
-
50
-
51
-
52
-
53
-
54
-
55
-
56
-
57
-
58
-
59
-
60
-
61
-
62
-
63
-
64
-
65
-
66
-
67
-
68
-
69
-
70
-
71
-
72
-
73
-
74
-
75
-
76
-
77
-
78
-
79
-
80
-
81
-
82
-
83
-
84
-
85
-
86
-
87
-
88
-
89
-
90
-
91
-
92
-
93
-
94
-
95
-
96
-
97
-
98
-
99
-
100
-
101
-
102
-
103
-
104
-
105
-
106
-
107
-
108
-
109
-
110
-
111
-
112
-
113
-
114
-
115
-
116
-
117
-
118
-
119
-
120
-
121
-
122
-
123
-
124
-
125
-
126
-
127
-
128
-
129
-
130
-
131
-
132
-
133
-
134
-
135
-
136
-
 137
137 -
 138
138 -
 139
139 -
 140
140 -
 141
141 -
 142
142 -
 143
143 -
 144
144 -
 145
145 -
 146
146 -
 147
147 -
148
-
149
-
150
-
151
-
152
-
153
-
154
-
155
-
156
-
157
-
158
-
159
-
160
-
161
-
162
-
163
-
164
-
165
-
166
-
167
-
168
-
169
-
170
-
171
-
172
-
173
-
174
-
175
-
176
-
177
-
178
-
179
-
180
-
181
-
182
-
183
-
184
-
185
-
186
-
187
-
188
-
189
-
190
-
191
-
192
-
193
-
194
-
195
-
196
-
197
-
198
-
199
-
200
-
201
-
202
-
203
-
204
-
205
-
206
-
207
-
208
-
209
-
210
-
211
-
212
-
213
-
214
-
215
-
216
-
217
-
218
-
219
-
220
-
221
-
222
-
223
-
224
-
225
-
226
-
227
-
228
-
229
-
230
-
231
-
232
-
233
-
234
-
235
-
236
-
237
-
238
-
239
-
240
-
241
-
242
-
243
 |
 |

8.
Using the wheel wrench, remove the
plastic
cap nuts and
loosen
all the
wheel nuts. Don't remove the wheel
nuts yet.
9.
Near each wheel
well
is
a
notch in
the frame which the jack head fits in.
The front notch is
9"
(23
cm) back
from the rear wheel
well. The rear
notch is
8''
(20
cm) forward from the
rear wheel
well.
If
your
vehicle
has
flared
side
moldings,
both front and
rear notches are
18"
(46
cm) from the
wheel
wells.
10.
Position the jack under the vehicle.
Raise the jack
head until it fit$>
firmly into
the
notch
in
the
vehicle's
frame nearest the flat tire. Put
the
compact spare tire near
you.