3Com 3CRWE554G72 User Guide - Page 19
Hardware Installation, Introduction, Safety Information, Positioning the Gateway
 |
UPC - 662705468846
View all 3Com 3CRWE554G72 manuals
Add to My Manuals
Save this manual to your list of manuals |
Page 19 highlights
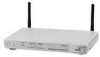
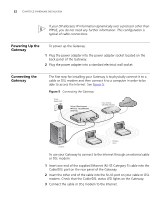
2 HARDWARE INSTALLATION Introduction This chapter will guide you through a basic installation of the Gateway, including: ■ Connecting the Gateway to the Internet. ■ Connecting the Gateway to your network. ■ Setting up your computers for networking with the Gateway. Safety Information WARNING: Please read the "Safety Information" section in Appendix D before you start. VORSICHT: Bitte lesen Sie den Abschnitt "Wichtige Sicherheitshinweise" sorgfältig durch, bevor Sie das Gerät einschalten. AVERTISSEMENT: Veuillez lire attentivement la section "Consignes importantes de sécurité" avant de mettre en route. Positioning the Gateway You should place the Gateway in a location that: ■ is conveniently located for connection to the cable or DSL modem that will be used to connect to the Internet. ■ is centrally located to the wireless computers that will connect to the Gateway. A suitable location might be on top of a high shelf or similar furniture to optimize wireless connections to computers in both horizontal and vertical directions, allowing wider coverage. ■ allows convenient connection to the computers that will be connected to the four LAN ports on the rear panel, if desired. ■ allows easy viewing of the front panel LED indicator lights, and access to the rear panel connectors, if necessary.
-
 1
1 -
2
-
3
-
4
-
5
-
6
-
7
-
8
-
9
-
10
-
11
-
12
-
13
-
 14
14 -
 15
15 -
 16
16 -
 17
17 -
 18
18 -
 19
19 -
 20
20 -
 21
21 -
 22
22 -
 23
23 -
 24
24 -
25
-
26
-
27
-
28
-
29
-
30
-
31
-
32
-
33
-
34
-
35
-
36
-
37
-
38
-
39
-
40
-
41
-
42
-
43
-
44
-
45
-
46
-
47
-
48
-
49
-
50
-
51
-
52
-
53
-
54
-
55
-
56
-
57
-
58
-
59
-
60
-
61
-
62
-
63
-
64
-
65
-
66
-
67
-
68
-
69
-
70
-
71
-
72
-
73
-
74
-
75
-
76
-
77
-
78
-
79
-
80
-
81
-
82
-
83
-
84
-
85
-
86
-
87
-
88
-
89
-
90
-
91
-
92
-
93
-
94
-
95
-
96
-
97
-
98
-
99
-
100
-
101
-
102
-
103
-
104
-
105
-
106
-
107
-
108
-
109
-
110
-
111
-
112
-
113
-
114
-
115
-
116
-
117
-
118
-
119
-
120
-
121
-
122
-
123
-
124
-
125
-
126
 |
 |
