3Ware 9550SXU-12 User Guide - Page 145
Deleting a Unit, In Linux and FreeBSD
 |
UPC - 693494970128
View all 3Ware 9550SXU-12 manuals
Add to My Manuals
Save this manual to your list of manuals |
Page 145 highlights
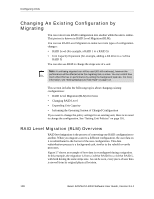
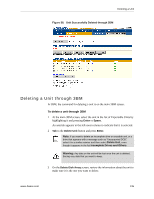
Deleting a Unit • Go to Administrative Tools > Computer Management, and then select Disk Management in the list on the left. Only dynamic disks can be expanded with Windows Disk Management. If the unit is shown as a basic disk, right-click on the disk icon and change it to a dynamic disk. Older Windows systems cannot convert basic disks into dynamic disks after the file system has been created. • If the unit is shown as a dynamic disk, right-click on it and choose Extend Volume to launch the Extend Volume wizard. In Linux and FreeBSD, the tools to expand the partition and file system can vary, depending on the kernel version and file system that you are using. Please consult your Linux/FreeBSD documentation and the 3ware Knowledgebase for more information. Deleting a Unit You delete a unit-either an array of disks, or a Single Disk-when you want to reconfigure the unit or use the drives for other purposes. After you delete a unit, the drives appear in the list of Available Drives. Warning: When a unit is deleted, all of the data on that unit will be lost. The drives cannot be reassembled into the same unit because the data on it is erased. If you want to reassemble the drives into the same unit on another controller, use the Remove Unit button in 3DM instead of the Delete Unit button. Or, if you're at the BIOS level already, you can shut down the computer and physically move the drives to another 3ware 9000 series RAID controller. When you restart your system, the controller will recognize the unit. For more information see "Moving a Unit from One Controller to Another" on page 138. If you have incomplete drives, or drives that appear with a message such as "Unsupported DCB," indicating that they were previously part of a unit on a 3ware 7000/8000 series controller, they must be deleted before you use them. (If you want to move a unit from a 7/8000 controller to a 9000 series controller, you must convert the drives first. For more information, see "Moving a Unit from One Controller to Another" on page 138.) www.3ware.com 133
-
 1
1 -
2
-
3
-
4
-
5
-
6
-
7
-
8
-
9
-
10
-
11
-
12
-
13
-
14
-
15
-
16
-
17
-
18
-
19
-
20
-
21
-
22
-
23
-
24
-
25
-
26
-
27
-
28
-
29
-
30
-
31
-
32
-
33
-
34
-
35
-
36
-
37
-
38
-
39
-
40
-
41
-
42
-
43
-
44
-
45
-
46
-
47
-
48
-
49
-
50
-
51
-
52
-
53
-
54
-
55
-
56
-
57
-
58
-
59
-
60
-
61
-
62
-
63
-
64
-
65
-
66
-
67
-
68
-
69
-
70
-
71
-
72
-
73
-
74
-
75
-
76
-
77
-
78
-
79
-
80
-
81
-
82
-
83
-
84
-
85
-
86
-
87
-
88
-
89
-
90
-
91
-
92
-
93
-
94
-
95
-
96
-
97
-
98
-
99
-
100
-
101
-
102
-
103
-
104
-
105
-
106
-
107
-
108
-
109
-
110
-
111
-
112
-
113
-
114
-
115
-
116
-
117
-
118
-
119
-
120
-
121
-
122
-
123
-
124
-
125
-
126
-
127
-
128
-
129
-
130
-
131
-
132
-
133
-
134
-
135
-
136
-
137
-
138
-
139
-
 140
140 -
 141
141 -
 142
142 -
 143
143 -
 144
144 -
 145
145 -
 146
146 -
 147
147 -
 148
148 -
 149
149 -
 150
150 -
151
-
152
-
153
-
154
-
155
-
156
-
157
-
158
-
159
-
160
-
161
-
162
-
163
-
164
-
165
-
166
-
167
-
168
-
169
-
170
-
171
-
172
-
173
-
174
-
175
-
176
-
177
-
178
-
179
-
180
-
181
-
182
-
183
-
184
-
185
-
186
-
187
-
188
-
189
-
190
-
191
-
192
-
193
-
194
-
195
-
196
-
197
-
198
-
199
-
200
-
201
-
202
-
203
-
204
-
205
-
206
-
207
-
208
-
209
-
210
-
211
-
212
-
213
-
214
-
215
-
216
-
217
-
218
-
219
-
220
-
221
-
222
-
223
-
224
-
225
-
226
-
227
-
228
-
229
-
230
-
231
-
232
-
233
-
234
-
235
-
236
-
237
-
238
-
239
-
240
-
241
-
242
-
243
-
244
-
245
-
246
-
247
-
248
-
249
-
250
-
251
-
252
-
253
-
254
-
255
-
256
-
257
-
258
-
259
-
260
-
261
-
262
-
263
-
264
-
265
-
266
-
267
-
268
-
269
-
270
-
271
-
272
-
273
-
274
-
275
-
276
-
277
-
278
-
279
-
280
-
281
-
282
-
283
-
284
-
285
-
286
-
287
-
288
-
289
-
290
-
291
-
292
-
293
-
294
-
295
-
296
-
297
-
298
-
299
-
300
-
301
-
302
-
303
-
304
-
305
-
306
-
307
-
308
-
309
-
310
-
311
-
312
-
313
-
314
-
315
-
316
-
317
-
318
-
319
-
320
-
321
-
322
-
323
-
324
-
325
-
326
-
327
-
328
-
329
-
330
-
331
-
332
-
333
-
334
-
335
-
336
-
337
-
338
-
339
-
340
-
341
-
342
-
343
-
344
-
345
-
346
-
347
-
348
-
349
-
350
-
351
-
352
-
353
-
354
-
355
-
356
-
357
-
358
-
359
-
360
-
361
 |
 |