3Ware 9550SXU-12 User Guide - Page 248
Remove Unit, Delete Unit., Caution, Warning
 |
UPC - 693494970128
View all 3Ware 9550SXU-12 manuals
Add to My Manuals
Save this manual to your list of manuals |
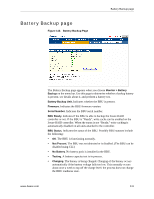
Page 248 highlights
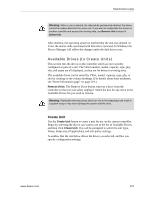
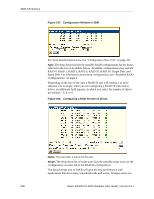
3DM 2 Reference Caution: Before you click Remove Unit, make sure the unit you are removing is unmounted from the operating system and that the system is not accessing it. If a unit is not unmounted and you remove it, it is the equivalent of physically yanking a hard drive out from under the operating system. You could lose data, the system could hang, or the controller could reset. To unmount a unit under windows, use Administrative Tools > Computer Management > Disk Management. In the Computer Management window, rightclick on the partition and Remove the logical drive letter associated with the unit. To unmount a unit under Linux, unmount the mount point to where the RAID unit is mounted. For example, if you want to remove unit 0 and you know that 0 corresponds to /dev/sdb, you should unmount all partitions for sdbx (where x is the number of the partition). umount /dev/sdbx For FreeBSD, the command would be umount /dev/twedx When you click Remove Unit, you will be asked to confirm that you want to proceed. When you confirm the removal, the unit number and information will be removed from 3DM. (Units created in the future can reclaim this unit number.) The operating system is notified that the unit was removed. In Linux the device node associated with this unit is removed. In Windows the Device Manager will reflect the changes under the disk drives icon. Information about the unit remains intact on the drives. This allows the drive or drives to be reassembled into a unit again on this controller, or if moved to another controller. Warning: Physically removing drives which are not in hot swap bays can result in a system hang, data loss, or may even damage the system and the drive. Delete Unit. Deletes the selected unit and allows you to use the drives to create another unit. The drives appear in the list of Available Drives. Caution: Before you click Delete Unit, make sure the unit you are removing is unmounted from the operating system and that the system is not accessing it. Devices can be unmounted through the operating system. For details, see the discussion under Remove Unit, above. 236 3ware SAS/SATA RAID Software User Guide, Version 9.5.1
-
 1
1 -
2
-
3
-
4
-
5
-
6
-
7
-
8
-
9
-
10
-
11
-
12
-
13
-
14
-
15
-
16
-
17
-
18
-
19
-
20
-
21
-
22
-
23
-
24
-
25
-
26
-
27
-
28
-
29
-
30
-
31
-
32
-
33
-
34
-
35
-
36
-
37
-
38
-
39
-
40
-
41
-
42
-
43
-
44
-
45
-
46
-
47
-
48
-
49
-
50
-
51
-
52
-
53
-
54
-
55
-
56
-
57
-
58
-
59
-
60
-
61
-
62
-
63
-
64
-
65
-
66
-
67
-
68
-
69
-
70
-
71
-
72
-
73
-
74
-
75
-
76
-
77
-
78
-
79
-
80
-
81
-
82
-
83
-
84
-
85
-
86
-
87
-
88
-
89
-
90
-
91
-
92
-
93
-
94
-
95
-
96
-
97
-
98
-
99
-
100
-
101
-
102
-
103
-
104
-
105
-
106
-
107
-
108
-
109
-
110
-
111
-
112
-
113
-
114
-
115
-
116
-
117
-
118
-
119
-
120
-
121
-
122
-
123
-
124
-
125
-
126
-
127
-
128
-
129
-
130
-
131
-
132
-
133
-
134
-
135
-
136
-
137
-
138
-
139
-
140
-
141
-
142
-
143
-
144
-
145
-
146
-
147
-
148
-
149
-
150
-
151
-
152
-
153
-
154
-
155
-
156
-
157
-
158
-
159
-
160
-
161
-
162
-
163
-
164
-
165
-
166
-
167
-
168
-
169
-
170
-
171
-
172
-
173
-
174
-
175
-
176
-
177
-
178
-
179
-
180
-
181
-
182
-
183
-
184
-
185
-
186
-
187
-
188
-
189
-
190
-
191
-
192
-
193
-
194
-
195
-
196
-
197
-
198
-
199
-
200
-
201
-
202
-
203
-
204
-
205
-
206
-
207
-
208
-
209
-
210
-
211
-
212
-
213
-
214
-
215
-
216
-
217
-
218
-
219
-
220
-
221
-
222
-
223
-
224
-
225
-
226
-
227
-
228
-
229
-
230
-
231
-
232
-
233
-
234
-
235
-
236
-
237
-
238
-
239
-
240
-
241
-
242
-
 243
243 -
 244
244 -
 245
245 -
 246
246 -
 247
247 -
 248
248 -
 249
249 -
 250
250 -
 251
251 -
 252
252 -
 253
253 -
254
-
255
-
256
-
257
-
258
-
259
-
260
-
261
-
262
-
263
-
264
-
265
-
266
-
267
-
268
-
269
-
270
-
271
-
272
-
273
-
274
-
275
-
276
-
277
-
278
-
279
-
280
-
281
-
282
-
283
-
284
-
285
-
286
-
287
-
288
-
289
-
290
-
291
-
292
-
293
-
294
-
295
-
296
-
297
-
298
-
299
-
300
-
301
-
302
-
303
-
304
-
305
-
306
-
307
-
308
-
309
-
310
-
311
-
312
-
313
-
314
-
315
-
316
-
317
-
318
-
319
-
320
-
321
-
322
-
323
-
324
-
325
-
326
-
327
-
328
-
329
-
330
-
331
-
332
-
333
-
334
-
335
-
336
-
337
-
338
-
339
-
340
-
341
-
342
-
343
-
344
-
345
-
346
-
347
-
348
-
349
-
350
-
351
-
352
-
353
-
354
-
355
-
356
-
357
-
358
-
359
-
360
-
361
 |
 |