3Ware 9550SXU-12 User Guide - Page 149
Removing a Unit Through 3DM
 |
UPC - 693494970128
View all 3Ware 9550SXU-12 manuals
Add to My Manuals
Save this manual to your list of manuals |
Page 149 highlights
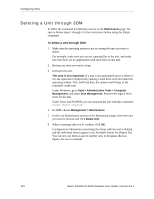
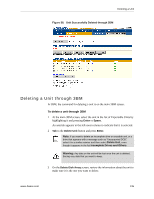
Removing a Unit Removing a Unit Through 3DM In 3DM, the command for deleting a unit is on the Maintenance page. Be sure to follow steps 1 and 2 in the instructions before using the Remove command. To remove a unit through 3DM Note: If your drives are not in hot swap bays, you do not need to remove a unit via 3DM. Simply power down the system and remove the applicable drives. Refer to your system's user guide for details on removing fixed disks. If your drives are in hot swap bays, follow the steps below. 1 Make sure the operating system is not accessing the unit you want to remove. For example, make sure you are not copying files to the unit, and make sure that there are no applications with open files on that unit. 2 Unmount the unit. This step is very important. If a unit is not unmounted and you remove it, it is the equivalent of physically yanking a hard drive out from under the operating system. You could lose data, the system could hang, or the controller could reset. Under Windows, go to Start > Administrative Tools > Computer Management, and select Disk Management. Remove the logical drive letter for the unit. Under Linux and FreeBSD, you can unmount the unit with this command: umount 3 In 3DM, choose Management > Maintenance. 4 In the Unit Maintenance table on the Maintenance page, select the unit you want to remove and click Remove Unit. 5 When a message asks you to confirm, click OK. The unit number and information is removed from the Maintenance page in 3DM. The operating system is notified that the unit was removed. In Linux the device node associated with this unit is removed. In Windows the Device Manager will reflect the changes under the disk drives icon. You can now physically remove the drives and move them to another controller. If the drive is in a hot swap bay, you can do this without shutting down the system. If the drive is not in a hot swap bay, powerdown the system and ground yourself before making changes to the hardware. www.3ware.com 137
-
 1
1 -
2
-
3
-
4
-
5
-
6
-
7
-
8
-
9
-
10
-
11
-
12
-
13
-
14
-
15
-
16
-
17
-
18
-
19
-
20
-
21
-
22
-
23
-
24
-
25
-
26
-
27
-
28
-
29
-
30
-
31
-
32
-
33
-
34
-
35
-
36
-
37
-
38
-
39
-
40
-
41
-
42
-
43
-
44
-
45
-
46
-
47
-
48
-
49
-
50
-
51
-
52
-
53
-
54
-
55
-
56
-
57
-
58
-
59
-
60
-
61
-
62
-
63
-
64
-
65
-
66
-
67
-
68
-
69
-
70
-
71
-
72
-
73
-
74
-
75
-
76
-
77
-
78
-
79
-
80
-
81
-
82
-
83
-
84
-
85
-
86
-
87
-
88
-
89
-
90
-
91
-
92
-
93
-
94
-
95
-
96
-
97
-
98
-
99
-
100
-
101
-
102
-
103
-
104
-
105
-
106
-
107
-
108
-
109
-
110
-
111
-
112
-
113
-
114
-
115
-
116
-
117
-
118
-
119
-
120
-
121
-
122
-
123
-
124
-
125
-
126
-
127
-
128
-
129
-
130
-
131
-
132
-
133
-
134
-
135
-
136
-
137
-
138
-
139
-
140
-
141
-
142
-
143
-
 144
144 -
 145
145 -
 146
146 -
 147
147 -
 148
148 -
 149
149 -
 150
150 -
 151
151 -
 152
152 -
 153
153 -
 154
154 -
155
-
156
-
157
-
158
-
159
-
160
-
161
-
162
-
163
-
164
-
165
-
166
-
167
-
168
-
169
-
170
-
171
-
172
-
173
-
174
-
175
-
176
-
177
-
178
-
179
-
180
-
181
-
182
-
183
-
184
-
185
-
186
-
187
-
188
-
189
-
190
-
191
-
192
-
193
-
194
-
195
-
196
-
197
-
198
-
199
-
200
-
201
-
202
-
203
-
204
-
205
-
206
-
207
-
208
-
209
-
210
-
211
-
212
-
213
-
214
-
215
-
216
-
217
-
218
-
219
-
220
-
221
-
222
-
223
-
224
-
225
-
226
-
227
-
228
-
229
-
230
-
231
-
232
-
233
-
234
-
235
-
236
-
237
-
238
-
239
-
240
-
241
-
242
-
243
-
244
-
245
-
246
-
247
-
248
-
249
-
250
-
251
-
252
-
253
-
254
-
255
-
256
-
257
-
258
-
259
-
260
-
261
-
262
-
263
-
264
-
265
-
266
-
267
-
268
-
269
-
270
-
271
-
272
-
273
-
274
-
275
-
276
-
277
-
278
-
279
-
280
-
281
-
282
-
283
-
284
-
285
-
286
-
287
-
288
-
289
-
290
-
291
-
292
-
293
-
294
-
295
-
296
-
297
-
298
-
299
-
300
-
301
-
302
-
303
-
304
-
305
-
306
-
307
-
308
-
309
-
310
-
311
-
312
-
313
-
314
-
315
-
316
-
317
-
318
-
319
-
320
-
321
-
322
-
323
-
324
-
325
-
326
-
327
-
328
-
329
-
330
-
331
-
332
-
333
-
334
-
335
-
336
-
337
-
338
-
339
-
340
-
341
-
342
-
343
-
344
-
345
-
346
-
347
-
348
-
349
-
350
-
351
-
352
-
353
-
354
-
355
-
356
-
357
-
358
-
359
-
360
-
361
 |
 |