AIWA CX-NA71 Operating Instructions
AIWA CX-NA71 Manual
 |
View all AIWA CX-NA71 manuals
Add to My Manuals
Save this manual to your list of manuals |
AIWA CX-NA71 manual content summary:
- AIWA CX-NA71 | Operating Instructions - Page 1
For assistance and information call toll free 1=800-BUY-AIWA (United States and Puerto Rico) 87-NF5-911-11 971216 BKH-U-9 m dliIEiiE DIGITAL AUDIO - AIWA CX-NA71 | Operating Instructions - Page 2
SERVICEABLE PARTS INSIDE. REFER SERVICING TO QUALIFIED SERVICE operate this product. 1 ENGLISH Read the Operating Instructions carefully and completely before operating the unit. Be sure to keep the Operating Instructions for future reference. All warnings and cautions in the Operating Instructions - AIWA CX-NA71 | Operating Instructions - Page 3
DO NOT ATTEMPT TO SERVICE THE UNIT YOURSELF. TABLE OF CONTENTS Precautions l PREPARATIONS CONNECTIONS m 3 REMOTE CONTROL 6 BEFORE OPERATION 7 SOUND AUDIO ADJUSTMENTS 7 GRAPHIC EQUALIZER 8 DSP SURROUND SYSTEM 8 RADIO RECEPTION MANUAL TUNING 9 PRESETTING STATIONS s 9 CD - AIWA CX-NA71 | Operating Instructions - Page 4
page 5. I I Operating Instructions, etc. Owner's record ~ For your convenience, record the model number and serial number (you will find them on the rear of your set) in the space , provided below, Please refer to them when you contact yourAiwa dealer in case of difficulty. Model No, CX-NA71 SX - AIWA CX-NA71 | Operating Instructions - Page 5
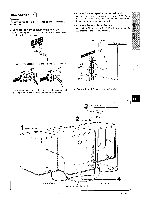
I NSX-A72/NSX-A71 I Speakers The speaker marked R is the right speaker, and the marked L is the left speaker. 7 Connect the right speaker to the main unit. O Connect the surround speaker cord to the SURROUND SPEAKERS R terminal. 2 Connect the left speaker to the main unit. Connect the surround - AIWA CX-NA71 | Operating Instructions - Page 6
EsEEmEiEl izizl 1 Connect the right and left speakers to the main unit. Connect the right speaker cord to the SPEAKERS R terminals, and left to the SPEAKERS L terminals. 3 Connect thesupplied antennas. Connect the FM antenna to the FM 75 Q terminals and the AM antenna to the AM LOOP terminals. The - AIWA CX-NA71 | Operating Instructions - Page 7
the batteries The maximum operational distance between the remote control and the sensor on the main unit should be approximately 5 meters (16 feet). When this distance decreases, replace the batteries with new ones. Using the remote control The instructions in this manual refer mainly to the - AIWA CX-NA71 | Operating Instructions - Page 8
VOLUME Turn the VOLUME control on the main unit, or press the VOLUME buttons on the remote control. The volume level is displayed as a number from O to MAX (31). The volume level is automatically set to 16 when the power is turned off with the volume level set to 17or more. BBE SYSTEM The BBE system - AIWA CX-NA71 | Operating Instructions - Page 9
system can recreate the effect of sounds reflected from walls or ceilllngs. This system enhances is monaural Select LIVE to obtain a simulated stereo effect. When DISCO or HALL is selected, plugged in, Sound adjustment during recording The output volume and tone (except BBE) of the speakers or - AIWA CX-NA71 | Operating Instructions - Page 10
MANUAL TUNING ~ 1 PRESETTING STATI.ONS 1 Press the TUNER/BAND button repeatedly to select the desired band. FM - AM I When the TUNER/BAND button is pressed while - AIWA CX-NA71 | Operating Instructions - Page 11
and G go out from the display. m' During random play following operations are not possible: -to select the tracks directly with the numbered buttons , check the remaining time, and select a disc or track. Use the remote control. 1 Press the PRGM button twice in stop mode. The PRGM indicator lights - AIWA CX-NA71 | Operating Instructions - Page 12
BASIC OPERATIONS PLAYING BACK A TAPE I.N..S-E-R.TI.N.G. . . . T. A. P..ES-- ¤~i \ [l--$ I DOLBY NR .,".0.,=1 - TAPEI DECK 112 II+ . \ -4- DIRECTION/ %.-"4 !'3 P,-R-F-S-F-T - to open the cassette holder. w Jr N II For tapes recorded with DOLBY NR, - AIWA CX-NA71 | Operating Instructions - Page 13
PRESET NUMBER TUNING Use the remote control to select the preset number directly. 1 Press Ihe TUNEFUBAND button interval is 10 kHz/step. If you use this unit in an area where the frequency allocation system is 9 kHz/step, change the tuning interval. Press the POWER button while pressing the TUNER/ - AIWA CX-NA71 | Operating Instructions - Page 14
BASIC OPERATIONS LOADING DISCS DISC DIRECT PLAY 1' -9,+10 Press the CD button, only, press one of the DISC DIRECT PLAY. buttons. The selected disc is played once. To play with the remote control Press the DISC DIRECT PLAY button, then press one of the numbered buttons 1 to 3 within 3 seconds to - AIWA CX-NA71 | Operating Instructions - Page 15
tape with a pencil or similar tool before use. Slack tape may break cx jam in the mechanism. After playback on one deck finishes, the tape in continues until the s button is pressed. DOLBY NR system The Dolby Noise Reduction system reduces tape hiss noise. For optimum performance when playing - AIWA CX-NA71 | Operating Instructions - Page 16
BASIC RECORDING This section explains how to record from the tuner, CD player, or external equipment. Preparation q Set the tape to the point where recording will start. q Use Type I (normal) and Type II (high/CrOz) tapes for recording. 1 Insert the tape to be recorded on into deck 2. Insert the - AIWA CX-NA71 | Operating Instructions - Page 17
DUBBING A TAPE MANUALLY DUBBING THE WHOLE TAPE 1,4 1 3 2 2 5 Em3 q Set the tape to the point where recording will start. q The reverse mode is automatically set to 1. Note that recording - AIWA CX-NA71 | Operating Instructions - Page 18
/CHECK button to select side A or B. 2 Press one of the DISC DIRECT PLAY buttons to select a disc. 3 Press the numbered buttons on the remote control to select tracks. PRGM appears on the display. A track whose playing time is longer than the remaining time cannot be programmed. 4 Repeat steps 2 and - AIWA CX-NA71 | Operating Instructions - Page 19
the DISC DIRECT PLAY button, then press one of the numbered buttons 1 to 3 within 3 seconds on the remote control. Then, press the numbered buttons and the + 10 button on the remote control to program a track. Example: To select the 10th track of disc 2, press the DISC DIRECT PLAY and 2 buttons - AIWA CX-NA71 | Operating Instructions - Page 20
and tone of the source. 4 Press the MIC button and turn the VOLUME control within 4 seconds to adjust the microphone volume. The microphone volume can be selected from 1 to MAX (7) or OFF (cancel). The volume of both microphones is adjusted simultaneously. 5 Press the ECHO button and turn the - AIWA CX-NA71 | Operating Instructions - Page 21
off, MPX-L is restored. m s The Karaoke functions may not operate correctly with the following kinds of CDs or tapes. - Those with current track. Each reservation is cleared when it finishes playing. Use the remote control 1 Press the PRGM button U. Press it once more to cancel the Karaoke - AIWA CX-NA71 | Operating Instructions - Page 22
clock starts from 00 seconds. m To display the current time Press the CLOCK button on the remote control. The time is If you press the II SET button after 4 seconds, another operation may start. displayed for 4 seconds. However, the time cannot be displayed during recording. 2 Designate the - AIWA CX-NA71 | Operating Instructions - Page 23
off the power, repeat step 5 to prepare the source, and adjust the volume and tone. m q Timer playback and timer recording will not begin unless \2 The unit can be turned off automatically at a specified time. Use the remote control. 1 Press the SLEEP button. 2 Within 4 seconds, press the ++ or - AIWA CX-NA71 | Operating Instructions - Page 24
APOWER tT0uT1 ml '""- - SUPtH WOOFER ~ Refer to the operating instructions of the connected equipment for details. q The connecting cords With the power on, press the POWER button while pressing the Use an Aiwa turntable equipped with a built-in equalizer amplifier. VIDEO/AUX button. Repeat the - AIWA CX-NA71 | Operating Instructions - Page 25
TROUBLESHOOTING GUIDE Occasional care and maintenance of the unit and the software are needed to optimize the performance of your unit, If the unit fails to perform as described in these Operating Instructions, check the following guide not stereo. c parts the Dolby NR system operating? (+ page 13 - AIWA CX-NA71 | Operating Instructions - Page 26
SPECIFICATIONS ~ Main unit CX-NA71 FM tuner section Tuning range . Usable sensitivity (IHF) ohms or more Cassette deck section Track format Frequency response Signal-to-noise ratio Recording system Heads 4 tracks, 2 channels stereo CrOz tape: 50 Hz -16000 Hz Normal tape: 50 Hz - 15000 Hz 60 - AIWA CX-NA71 | Operating Instructions - Page 27
loud. Sound is perceived as coming from the speaker with the greater volume, so that the singer's voice appears to shift toward the right stereo effect is limited to the narrow area shown in Figure 2-@. To solve this problem, Aiwa has developed unidirectional speakers for this new speaker system - AIWA CX-NA71 | Operating Instructions - Page 28
SERVICEABLE PARTS INSIDE. REFER SERVICING TO QUALIFIED SERVICE PERSONNEL." Lea cuidadosa y completamente el manual de i,nstrucciones antes de utilizar la unidad. Asegurese de guardar el manual durante unas pocas horas y repita de nuevo la operation. 8 Montaje en pared o techo - La unidad nose - AIWA CX-NA71 | Operating Instructions - Page 29
250, PARTE H) Mantenimiento Limpie la unidad solo como se recomienda en el manual de instrucciones LA UNIDAD USTED MISMO. INDICE PRECAUCIONES 1 PREPARATIVES CONEXIONIES 3 CONTROL REMOTO 6 ANTES DE LA OPERACION 7 SONIDO AJUSTES DE AIWA s 26 INDICE DE LAS PARTES Cwbiertatrasera ESPANOL 2 - AIWA CX-NA71 | Operating Instructions - Page 30
(Para el NSX-A71 ) m' .Control remote Antena de AM Antena de FM q NSX-A740 o NSX-A74 + Pagina 5. 1 I -, Manual de instrucciones, etc. Anotacion del propietarici ' Para su"conveniencia con su concesionario Aiwa en caso de tener dificultades. N." de modelo CX-NA71 SX-NA741SX-ANA72 - AIWA CX-NA71 | Operating Instructions - Page 31
NSX-A72/NSX-A71 Altavoces El aitavoz con la marca R es e! altavoz derecho, y el que tiene la marca L es el altavoz izquierdo. 1 Conecte el altavoz derecho a la unidad principal. O Conecte el cable de altavoz de sonido ambiental al terminal SURROUND SPEAKERS R. 2 Conecte el altavoz izquierdo a la - AIWA CX-NA71 | Operating Instructions - Page 32
EEEil@Eml ~ 1 Conecte Ios altavoces derecho e izquierdo a la unidad principal. Conecte el cable del altavoz derecho a [OS terminals " SPEAKERS R, y el cable del altavoz izquierd 10a 10s terminals SPEAKERS L. & 4 zafl 3 Conecte Ias antenas suministradas. Conecte la antena de FM a Ios - AIWA CX-NA71 | Operating Instructions - Page 33
CONTROL REMOTO Insertion de Ias pilas Quite la tapa de Ias pilas, ubicada en la parte trasera del control maxima de operation entre el control remoto control rermoto Las instrucciones descritas en este manual se refieren principalmente a Ios botones de la unidad principal. Los botones del control - AIWA CX-NA71 | Operating Instructions - Page 34
CONTROL DEVOLUMEN Gire el control VOLUME de la unidad principal o pulse IOS botones VOLUME del control botones de funcion, Ios botones para esa operation se encenderan o parpadearan. Ejemplo: Cuando conecte Ventanilla parpadeante La ventanilla de la parte superior de la unidad se encendera - AIWA CX-NA71 | Operating Instructions - Page 35
ECUALIZADOR GRAFICO SISTEMA DE SONIDO AMBIENTAlm DSP GEQ GEQ SURROUND Esta unidad ofrece Ias tres curvas de ecualizacion diferentes siguientes: ROCK: Sonido potente que realza Ios agudos y Ios graves. POP: Mas presencia en Ias votes y en la gama de registro medio. CLASSIC: Sonido enriquecido - AIWA CX-NA71 | Operating Instructions - Page 36
~ i1 SINTONIZACION MANUAL ~ 1/, ! MONO ; ,. ,. I I I 2 PREAJUSTE DE EMISORAS .' 1 SLEAR 2 0-9,+1 o / 1 Pulse repetidamente el estereo por FM tenga ruido '-- Pulse el bot6n MONO del control remoto para que "MONO aparezca en el visualizador. E"l ruido se reducira, pero la recepcion sera - AIWA CX-NA71 | Operating Instructions - Page 37
SINTONIZACION MEDIANTE NLIMERO DE PREAJUSTE Utilice el control remoto para seleccionar directamente el ntimero de preajuste. 7 Pulse el boton TUNER/BAND para seleccionar una banda. 2 Pulse Ios botones numerados para seleccionar un numero - AIWA CX-NA71 | Operating Instructions - Page 38
reproducer un disco solarnente, pulse uno de Ios botones DISC DIRECT PLAY. El disco seleccionado se reproducira una vez. Para reproducer con 61 control remoto Pulse el boton DISC DIRECT PLAY, y Iuego pulse uno de Ios botones numerados 1 a 3 antes de que pasen 3 segundos para seleccionar un disco - AIWA CX-NA71 | Operating Instructions - Page 39
REPRODUCTION ALEATORIAj REPETITION DE REPRODUCTION Utillce el control remoto, Reproduction aleatoria Todas Ias canciones del disco comprobacion del tiempo restante y la seleccion de un disco o cancion, Utilice el control remoto. 1 Pulse dos veces el boton PRGM estando modo de parada. El indicador - AIWA CX-NA71 | Operating Instructions - Page 40
[ OPERAClONES BASICAS ~8 ;~t ~~ INSERCION DE CINTAS \ .. j ~ ! $, i ~ REV MODE A EJECT Platina 1 " TAPEI DECK 1/2 & EJECT Platina 2 q En la platina 1, Ias cintas se reproduce siempre por ambas caras. En la platina 2, podra. seleccionar un modo de inversion para reproducer una o dos - AIWA CX-NA71 | Operating Instructions - Page 41
SENSOR MUSICAL Si hay un espacio sin grabar de 4 segundos o mas entre cada cancion, la busqueda del principio de la cancion que este siendo reproducida o de la siguiente cancion podra realizarse facilmente. Pulse el boton U o ®> durante la reproduction observando el indicadorde la cara de - AIWA CX-NA71 | Operating Instructions - Page 42
GRABACION BASICA Esta seccion explica como grabar del sintonizador, del reproductor de discos compactos o de equipos exteriors. > Preparation q Bobine la cinta hasta el punto donde vaya a empezar la grabacion. q Utilice cintas tipo I (normales) y tipo II (alta polarization/CrOz) para la - AIWA CX-NA71 | Operating Instructions - Page 43
COPIADO MANUAL DE UNA CINTA COPIADO DE T(IDA LA GINTA 1,4 2 q Ponga la cinta en el punto donde vaya a empezar la grabacion. q El modo de inversion se ajusta - AIWA CX-NA71 | Operating Instructions - Page 44
. En unos pocos segundos, el microprocesador decidira Ias canciones que vayan a ser grabadas en cada cara de la cinta. q Los botones numerados del control remoto tambien se pueden utilizar para designar la duration de la cinta. Ejemplo: Cuando utilice una cinta de 60 minutes, pulse Ios botones - AIWA CX-NA71 | Operating Instructions - Page 45
Pulse el boton DISC DIRECT PLAY, y Iuego pulse uno de IOS botones numerados 1 a 3 del control remoto antes de que pasen 3 segundos. Luego, pulse Ios botones numerados y el boton +1 O del control remoto para programar una cancion. Ejemplo: Para seleccionar la cancion numero 10 del disco 2, pulse Ios - AIWA CX-NA71 | Operating Instructions - Page 46
y et tono de la fuente de sonido. 4 Pulse el boton MIC y gire el control VOLUME antes de que pasen 4 segundos para ajustar el volumen del microfono. El volumen del microfono evitar el aullido. Pongase en contacto con su concesionario Aiwa para que Ie de Ios detalles. FUNClONES DE DESVANECIMIENTO - AIWA CX-NA71 | Operating Instructions - Page 47
mono - Discos o cintas grabados con ecos fuertes Discos o cintas con la parte vocal grabada en el Iado derecho o izquierdo del sonido q Mientras la . Cada reserva se borrara cuando termine de reproducirse la cancion. Utilice el control remoto. f rulse el u oIon rMe4wl una vez. 2 Pulse el boton - AIWA CX-NA71 | Operating Instructions - Page 48
. Para visualizer la hors actual Pulse el boton CLOCK de} control remoto. durante 4 segundos. Sin embargo, la hors no se ~sualizara y la hors parpadeara. m Si pulsa el boton II SET despues empiece otra operation. de 4 segundos tal vez 2 Designe la hors de encendido del temporizador pulsando el - AIWA CX-NA71 | Operating Instructions - Page 49
minutes. El tiempo especificado Para comprobar el tiempo restanite hasta que se desconecte la alimentacion Pulse una vez el boton SLEEP del control remoto. El tiempo restante se visualizara durante 4 segundos. - Para cancelisr el temporizador para dormir Pulse dos veces el boton SLEEP para que - AIWA CX-NA71 | Operating Instructions - Page 50
(OPTICAL) - VIDEO/AUX - MD -LINEOUT - SUPER WOOFER Consulte el manual de instrucciones del equipo conectado para tener mas detalles. q Los cables de . Obtenga Ios cables de conexion necesarios. q Consulte con su concesionario AIWA en cuanto al equipo optional. TOMAS VIDEO/AUX, M12 Esta unidad - AIWA CX-NA71 | Operating Instructions - Page 51
algodon humedecido en Iiquido de Iimpieza, espere hasta que Ias partes Iimpiadas esten completamente secas antes de introducer Ias cintas, SOLUCION DE PROBLEMAS Si la unidad no funciona como se describe en este manual de instrucciones, compruebe la gufa siguiente: GENERALIDADES No hay sonido. . ~ - AIWA CX-NA71 | Operating Instructions - Page 52
ESPECIFICACIONES Unidad principal CX-NA71 Seccion del sintonizador de FM Gama de sintonizacion 87,5 MHz a 108 MHz Sensibilidad util (IHF) 13,2 dBf Terminals de antena 75 ohmios (desequilibrada) Seccion del - AIWA CX-NA71 | Operating Instructions - Page 53
izquierdo, oye la voz de un cantante que precede de la parte delantera central. Los sonidos de 10S instruments se distribuyen uniformemente entre ambos mostrada en la figura 2@. Para resolver este,problema, Aiwa ha desarrollado altavoces unidireccionales Dara este nuevo Sistema de altavoces - AIWA CX-NA71 | Operating Instructions - Page 54
REMOVE COVER (OR BACK). NO USER-SERVICEABLE PARTS INSIDE. REFER SERVICING TO QUALIFIED SERVICE PERSONNEL." PRECAUTIONS Lire Ie mode d'emploi ne penetre clans I'appareil pas Ies orifices de ventilation. 6 Chariot et support - Si I'appareil est pose ou monte sur un supporl ou un chariot - AIWA CX-NA71 | Operating Instructions - Page 55
L'article 810 du code national d'electricity ( m&, de la structure de support et du conducteur arrivant SYSTEME SURROUND DSP RECEPTION RADIO ACCORD MANUEL 9 MEMORISATION DE STATIONS 9 LECTURE DE DISQUES COIMPACTS OPERATIONS PROBLEME 24 SPECIFICATIONS 25 PRINCIPE DES ENCEINTES ACOUSTIQUES AIWA - AIWA CX-NA71 | Operating Instructions - Page 56
},,'/ \ "+ Yf ?@___J Exz'@ (5 0 0 CX-NA71 Radio magnetocassette Iecteur de disques . compacts stereo @ SX-NA74 (G, D) Enceintes avant (Pour NSX-A740 ces numeros quand on contacte un distributeur Aiwa en cas de difficult. N" de modele CX-NA71 SX-NA741SX-ANA72 SX-FNA71 SX-R240 (NSX-A74 - AIWA CX-NA71 | Operating Instructions - Page 57
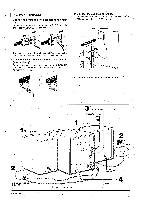
NSX-A721NSX-A71 Enceintes L'enceinte marquee R est I'enceinte droite, et celle marquee L rXit la gauche. 1 Connecter I'enceinte droite a I'appareil principal. ~ Connecter Ie cordon de haut-parleur surround a la borne SURROUND SPEAKERS R. 2 Connecter I'enceinte gauche a I'appareil principal. - AIWA CX-NA71 | Operating Instructions - Page 58
Connecter. Ies enceintes droite et gauche a I'appareil principal. Connecter Ies cordons de I'enceinte droite aux bornes SPEAKERS R, et ceux de I'enceinte gauche aux bornes 3 Connecter Ies antennes fournies. Connecter I'antenne FM aux bornes FM 75 !2 et I'antenne AM aux bornes AM LOOP. Le cordon d' - AIWA CX-NA71 | Operating Instructions - Page 59
un endroit aui peut supporter son ~oids. m"c 4 8"=-,O..!-,. '"/k ,, ;"":" .. . . . . . Quand Ie systeme SURROUND est hors service, aucun son ne sort Ies piles par des neuves. Utilisation de la telecommande Les instructions donnees clans ce manuel concernment principalement Ies touches de I' - AIWA CX-NA71 | Operating Instructions - Page 60
VOLUME de I'appareil principal, ou appuyer sur Ies touches VOLUME de la telecommande Le niveau du volume Guides par eclairage Chaque fois qu'on branche Ie cordon secteur ou qu'on appuie sur une des touches de fonction, Ies touches correspondent a cette operation s'allument ou clignotent. SYSTEME - AIWA CX-NA71 | Operating Instructions - Page 61
pendant I'enregistrement On peut faire varier Iibrement Ie volume de sortie et la tonalite (BBE excepte) des est monophonique Selectionner LIVE pour obtenir un effet stereo simu16, Quand DISCO ou HALL est selectionne, systeme BBE hors service pour eviter une distortion du son aux frequencies e[evees. - AIWA CX-NA71 | Operating Instructions - Page 62
ou W UP. q La recherche automatique risque de ne pas s'arr&er sur Ies stations presentant des signaux tres faibles. Quand une emission FM stereo presente des parasites Appuyer sur la touche MONO de la telecommande de maniere que "MONO" apparaisse sur I'affichage. Les parasites sent reduits, mais la - AIWA CX-NA71 | Operating Instructions - Page 63
d'accord AM Le reglage jar defautde I'intervalle d'accord AM est de 10 kHz/ pas. Si on utilise cet appareil clans un endroit ou Ie systeme deallocation de frequencies est de 9 kHz/pas, changer I'intervalle d'accord. Appuyer sur la touche POWER tout en appuyant sur la touche TUNER/BAND. Pour - AIWA CX-NA71 | Operating Instructions - Page 64
OPERATIONS DE BASE MISE EN PLACE DE DISQUES ,+10 Appuyer sur la touche CD, puis appuyer sur la touche A OPEN/CLOSE pour ouvrir Ie compartment a disques. - AIWA CX-NA71 | Operating Instructions - Page 65
aleatoire/repetee - RANDOM et c& s'allument sur I'affichage. Annulation - RANDOM et G disparaissent de I'affichage. Pendant la lecture aleatoire, Ies operations suivantes sent impossible: - selection directe des plages avec Ies touches numeriques. - saut a la plage precedemment Iue en appuyant sur - AIWA CX-NA71 | Operating Instructions - Page 66
-.-- OPERATIONS DE BASE LECTURE D'UNE CASSErTE MISE EN PLACE DE CASSETTES TAPEI DECK 1/2 cassette en place. 1 Appuyer sur la touche DOLEIY NR pour mettre Ie reducteur de bruit en ou hors service, en fonction de la cassette a Iire. InlNR Pour Ies cassettes enregish'ees DOLBY, ailumer IIU NR, - AIWA CX-NA71 | Operating Instructions - Page 67
pour selectionner =1. 4 Appuyer sur la touche - AIWA CX-NA71 | Operating Instructions - Page 68
enregistrer sur Ies deux faces, selectionner =) ou (1). 3 Appuyer sur la touche DOLBY NR pour mettre Ie reducteur de bruit Dolby en ou hors service. Pour enregistrer avec reducteur de bruit DOLBY, allumer DO NR, Pour enregistrer saris reducteur de bruit DOLBY, eteindre DO NR. 4 Appuyer sur une - AIWA CX-NA71 | Operating Instructions - Page 69
Dolby Iors de la lecture de la cassette dupliquee Appuyer sur la touche DOLBY NR pour mettre Ie reducteur de bruit Dolby en ou hors service, en fonction de la cassette originale. Si I'ergot de securite d'une face ou I'autre de la cassette est absent, I'enregistrement ne demarre pas. H?A/V~A/S 16 - AIWA CX-NA71 | Operating Instructions - Page 70
faces. 1 Inserer la cassette clans la platine 2 puis appuyer sur la touche DOLBY NR pour mettre Ie reducteur de bruit Dolby en ou hors service. Inserer la cassette avec la face a enregistrer en premier orientee vers I'exterieur de I'apparei[. 2 Appuyer sur la touche CD et mettre Ie(s) disque(s) en - AIWA CX-NA71 | Operating Instructions - Page 71
faces. 1 Inserer la cassette clans la platine 2 puis appuyer sur la touche DOLBY NR pour mettre Ie reducteur de bruit Dolby en ou hors service. Inserer la cassette avec la face a enregistrer en premier orientee vers I'exterieur de I'appareii. 2 Appuyer sur la touche CD et mettre Ie(s) disque(s) en - AIWA CX-NA71 | Operating Instructions - Page 72
enfoncee tandis que I'echo est en service. Les reglages "L" (Long) et volume de microphone et de niveau d'echo sent annules, Microphones recommandes L'utilisation de microphones de type unidirectionnel est recommandee pour eviter Ie hurlement. Pour plus de d6tails, contacter Ie distributeur Aiwa - AIWA CX-NA71 | Operating Instructions - Page 73
- Disques ou cassettes avec la partie vocale enregistree sur la droite ou la gauche du spectre sonore q Quand la fonction Karaoke est en service, le son est sorti en monophonic. " Quand la fmction est changee, la fonction Karaoke est annulee. PROGIRAMME DE KARAOKE 1 2 4 9 3 Repeter I'etape 2 pour - AIWA CX-NA71 | Operating Instructions - Page 74
auatre secondes aui suivent. @ est affiche et Ies heures clignotent. Si on n'appuie pas sur la touche II SET clans Ies quatre secondes, une autre operation peut demarrer. 2 Specifier Ies heures en appuyant sur la toluche W DOWN ou M UP, puis appuyer sur la touche [I SET pour Ies regler. Proceder de - AIWA CX-NA71 | Operating Instructions - Page 75
et la lecture commence sur la source selectionnee. * Quand on coupe I'alimentation alors que Ie niveau du volume est regle a 17 ou plus, ce niveau est automatiquement regle a16. . . .. Pour Controler I'heure et la source speclflees Appuyer sur la touche TIMER. L'heure de la mise sous tension par la - AIWA CX-NA71 | Operating Instructions - Page 76
Les cc)rdons de raccordement ne sent pas fournis. Se procurer Ies cordons necess~res. q Pour Ies appareils option nels disponibles, consulter Ie distributeur Aiwa local. 1 Appuyer sur la tcmche VIDEO/AUX ou MD. Quand on veut utiliser un appareil connecte aux prises VIDEO/AUX: appuyer sur la touche - AIWA CX-NA71 | Operating Instructions - Page 77
pas comme decrit clans ce mocie d'emploi, contrbler Ie guide suivant. GENERALITIES II n'y a pas de son. q Le son sorti n'est pas stereo. q La fonction Karaoke n'est-elle pas en service? (+ page 19) Un affichage son presenle de la distortion. q Le systeme ne capte-t-il pas des bruits exterieurs ou - AIWA CX-NA71 | Operating Instructions - Page 78
SPECIFICATIONS Appareil principal CX-NA71 Partie "tuner FM Plage cl'accord Sensibility utile (IHF) Bornes d' signal/bruit Systeme d'enregistrement Tetes 4 pistes, 2 canaux stereo Bande CrOz: 50 Hz - 16000 Hz Bande normale: 50 Hz - 15000 Hz 60 dB (Reducteurde bruit Dolby B en service, bande CrOz - AIWA CX-NA71 | Operating Instructions - Page 79
acoustiques Aiwa a diffusion sonore froz.utalesur 180° donnent un excellent equilibre sonore pour une vraie reproduction stereo a partir bien que la directivit~ de ces haut-parleurs compense les differences de volume per~u causbes par les differences de distance jusqu'~ l'auditeur. Par consequent - AIWA CX-NA71 | Operating Instructions - Page 80
PAFITS INDEX Instructions about each part on the main unit or remote control are indicated on the right side. The parts are listed in alphabetic order. INDICE DE LAS PARTES Las instrucciones de cada parte de la unidad principal o del control remoto se indican a la derecha. Las partes se indican en
-
 1
1 -
 2
2 -
 3
3 -
 4
4 -
 5
5 -
 6
6 -
 7
7 -
8
-
9
-
10
-
11
-
12
-
13
-
14
-
15
-
16
-
17
-
18
-
19
-
20
-
21
-
22
-
23
-
24
-
25
-
26
-
27
-
28
-
29
-
30
-
31
-
32
-
33
-
34
-
35
-
36
-
37
-
38
-
39
-
40
-
41
-
42
-
43
-
44
-
45
-
46
-
47
-
48
-
49
-
50
-
51
-
52
-
53
-
54
-
55
-
56
-
57
-
58
-
59
-
60
-
61
-
62
-
63
-
64
-
65
-
66
-
67
-
68
-
69
-
70
-
71
-
72
-
73
-
74
-
75
-
76
-
77
-
78
-
79
-
80
 |
 |
For assistance
and information
call toll free 1=800-BUY-AIWA
(United
States and Puerto Rico)
87-NF5-911-11
971216 BKH-U-9
m
dliIEiiE
DIGITAL AUDIO