AIWA CX-NA71 Operating Instructions - Page 4
Connections, Eiiea - stereo
 |
View all AIWA CX-NA71 manuals
Add to My Manuals
Save this manual to your list of manuals |
Page 4 highlights
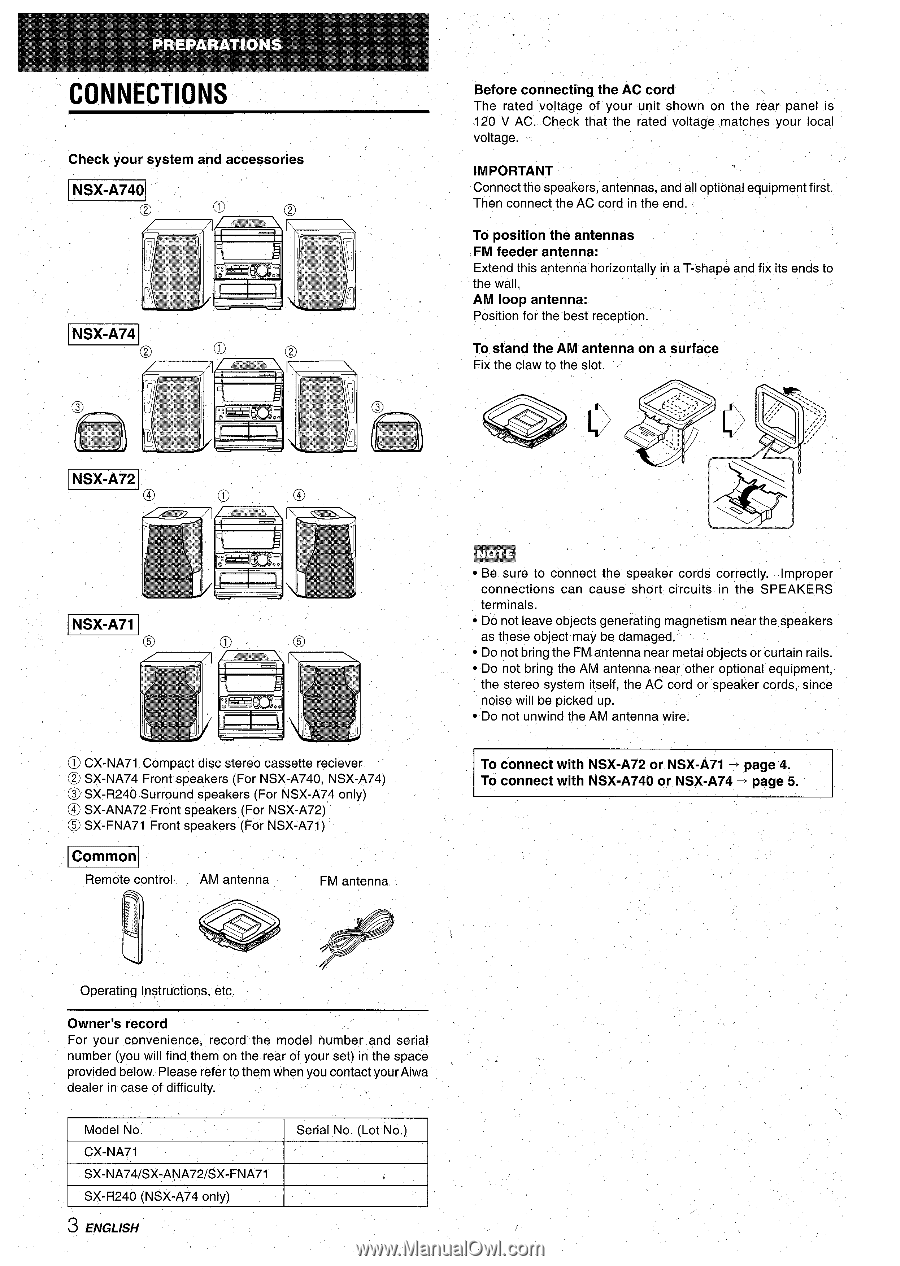
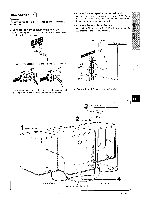
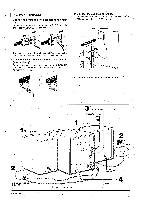
CONNECTIONS Check your system and accessories -. -('2 o (2 Before connecting the AC cord The rated voltage of your unit shown on the rear panel is 120 V AC. Check that the rated voltage matches your local voltage. - IMPORTANT Connect the speakers, antennas, and all optional equipment first. Then connect the AC cord in the end. To position the antennas FM feeder antenna: Extend this antenna horizontally the wall, AM loop antenna: Position for the best reception. in a T-shape and fix its ends to , To stand the AM antenna on a surface Fix the claw to the slot. ~ CX-NA71 Compact disc stereo cassette reciever @ SX-NA74 Front speakers (For NSX-A740, NSX-A74) @ SX-R240 Surround speakers (For NSX-A74 only) @ SX-ANA72 Front speakers (For NSX-A72) @ SX-FNA71 Front speakers (For NSX-A71 ) EiiEa Remote control AM antenna FM antenna m q Be sure to connect the speaker cords correctly. Improper connections can cause short circuits in the SPEAKERS terminals. c Do not leave objects generating magnetism near the speakers as these object may be damaged. q Do not bring the FM antenna near metal objects or curtain rails. q Do not bring the AM antenna--near other optional equipment, the stereo system itself, the AC cord or speaker cords, since noise will be picked up. q Do not unwind the AM antenna wire. To connect with NSX-A72 or NSX-A71 + page 4. To connect with NSX-A740 or NSX-A74 + page 5. I I Operating Instructions, etc. Owner's record ~ For your convenience, record the model number and serial number (you will find them on the rear of your set) in the space , provided below, Please refer to them when you contact yourAiwa dealer in case of difficulty. Model No, CX-NA71 SX-NA741SX-ANA721SX-FNA71 SX-R240 (NSX-A74 only) I Serial No. (Lot No.) ~ ENGLISH
-
 1
1 -
 2
2 -
 3
3 -
 4
4 -
 5
5 -
 6
6 -
 7
7 -
 8
8 -
 9
9 -
 10
10 -
11
-
12
-
13
-
14
-
15
-
16
-
17
-
18
-
19
-
20
-
21
-
22
-
23
-
24
-
25
-
26
-
27
-
28
-
29
-
30
-
31
-
32
-
33
-
34
-
35
-
36
-
37
-
38
-
39
-
40
-
41
-
42
-
43
-
44
-
45
-
46
-
47
-
48
-
49
-
50
-
51
-
52
-
53
-
54
-
55
-
56
-
57
-
58
-
59
-
60
-
61
-
62
-
63
-
64
-
65
-
66
-
67
-
68
-
69
-
70
-
71
-
72
-
73
-
74
-
75
-
76
-
77
-
78
-
79
-
80
 |
 |