Aastra OpenCom X320 User Guide - Page 36
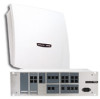
Position of the interfaces, PBX Configuration: Ports, Slots, Status
 |
View all Aastra OpenCom X320 manuals
Add to My Manuals
Save this manual to your list of manuals |
Page 36 highlights
Installation Interface cards card with one hand. With the other hand briefly touch the capacitor on the board (see diagram on page 31). 3. Carefully plug the interface card into its designated slot. The component side must be facing to the right. Make sure the card is sitting firmly in the slot. 4. No connections are required for the fax function. If you want to use the V.24 function, connect the 8-pin RJ45 plug of the provided serial cable with the RJ45 socket on the card. The other end of the serial cable has a 9-pin Sub-D socket to connect to a printer or to a PC. It is recommended that the serial cable is laid at the cover inner sides using the designated cable guidances. For pull relief, fasten the cable with a cable tie to one of the square teeth under the connection panel. 5. Close the cover. Switch on the OpenCom X320. You can view the Fax/V.24 card's status in the Web console once you have restarted OpenCom X320. To do this, call up the menu item PBX Configuration: Ports: Slots. You will see a green tick in the Status column in the table. 3.6.3 Position of the interfaces The following overview shows the available interface cards and the assignment of the relevant connection blocks. The following diagram shows the position of the interfaces: 34
-
 1
1 -
2
-
3
-
4
-
5
-
6
-
7
-
8
-
9
-
10
-
11
-
12
-
13
-
14
-
15
-
16
-
17
-
18
-
19
-
20
-
21
-
22
-
23
-
24
-
25
-
26
-
27
-
28
-
29
-
30
-
 31
31 -
 32
32 -
 33
33 -
 34
34 -
 35
35 -
 36
36 -
 37
37 -
 38
38 -
 39
39 -
 40
40 -
 41
41 -
42
-
43
-
44
-
45
-
46
-
47
-
48
-
49
-
50
-
51
-
52
-
53
-
54
-
55
-
56
-
57
-
58
-
59
-
60
-
61
-
62
-
63
-
64
-
65
-
66
-
67
-
68
-
69
-
70
-
71
-
72
-
73
-
74
-
75
-
76
-
77
-
78
-
79
-
80
-
81
-
82
-
83
-
84
-
85
-
86
-
87
-
88
-
89
-
90
-
91
-
92
-
93
-
94
-
95
-
96
-
97
-
98
-
99
-
100
-
101
-
102
-
103
-
104
-
105
-
106
-
107
-
108
-
109
-
110
-
111
-
112
-
113
-
114
-
115
-
116
-
117
-
118
-
119
-
120
-
121
-
122
-
123
-
124
-
125
-
126
-
127
-
128
-
129
-
130
-
131
-
132
-
133
-
134
-
135
-
136
-
137
-
138
-
139
-
140
-
141
-
142
-
143
-
144
-
145
-
146
-
147
-
148
-
149
-
150
-
151
-
152
-
153
-
154
-
155
-
156
-
157
-
158
-
159
-
160
-
161
-
162
-
163
-
164
-
165
-
166
-
167
-
168
-
169
-
170
-
171
-
172
-
173
-
174
-
175
-
176
-
177
-
178
-
179
-
180
-
181
-
182
-
183
-
184
-
185
-
186
-
187
-
188
-
189
-
190
-
191
-
192
 |
 |
