Acer G330 Altos G330 User's Guide - Page 41
Configuring a hard drive - altos raid
 |
UPC - 750519177044
View all Acer G330 manuals
Add to My Manuals
Save this manual to your list of manuals |
Page 41 highlights
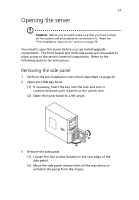
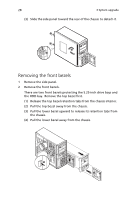
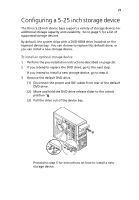
31 Configuring a hard drive The Altos G330 HDD cage bay accommodates both hot-plug and easy-swap HDD cage models. The main difference between these two cage models is the presence of a backplane board on the rear side of the hot-plug HDD cage. Both cage models support up to four SATA II or SAS hard disk drives. Users have the option to purchase extra hard disks to provide the system with additional storage capacity and scalability. Hard drive configuration reminders • A dummy HDD carrier occupies a vacant HDD bay. Users need to purchase a blank HDD carrier to install additional hard drive(s). • If you intend to install a SAS hard drive model, install the SAS or SAS RAID card option first. • If you intend to install at least three 15K RPM SAS hard drives, an HDD fan is required to maintain proper system cooling. Contact your local Acer representative for more information on how to purchase these optional items. To remove a hot-plug hard drive: 1 If necessary, unlock the front bezel, then pull it open. 2 Remove the hot-plug hard drive from its bay. (1) Press the hard disk carrier button to release the ejector lever. (2) Use the ejector lever to pull the drive out of the cage. Make sure to support the drive when pulling it out of the cage.
-
 1
1 -
2
-
3
-
4
-
5
-
6
-
7
-
8
-
9
-
10
-
11
-
12
-
13
-
14
-
15
-
16
-
17
-
18
-
19
-
20
-
21
-
22
-
23
-
24
-
25
-
26
-
27
-
28
-
29
-
30
-
31
-
32
-
33
-
34
-
35
-
 36
36 -
 37
37 -
 38
38 -
 39
39 -
 40
40 -
 41
41 -
 42
42 -
 43
43 -
 44
44 -
 45
45 -
 46
46 -
47
-
48
-
49
-
50
-
51
-
52
-
53
-
54
-
55
-
56
-
57
-
58
-
59
-
60
-
61
-
62
-
63
-
64
-
65
-
66
-
67
-
68
-
69
-
70
-
71
-
72
-
73
-
74
-
75
-
76
-
77
-
78
-
79
-
80
-
81
-
82
-
83
-
84
-
85
-
86
-
87
-
88
-
89
-
90
-
91
-
92
-
93
-
94
-
95
-
96
-
97
-
98
-
99
-
100
-
101
-
102
-
103
-
104
-
105
-
106
-
107
-
108
-
109
-
110
-
111
-
112
-
113
-
114
-
115
-
116
-
117
-
118
-
119
-
120
-
121
-
122
-
123
-
124
 |
 |
