Alpine D900 Owners Manual - Page 57
Operating the Navigation sold separately, Operating a separately sold, TV monitor
 |
UPC - 793276200310
View all Alpine D900 manuals
Add to My Manuals
Save this manual to your list of manuals |
Page 57 highlights
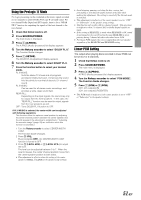
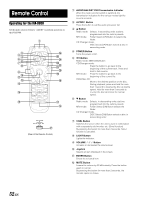
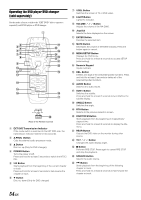
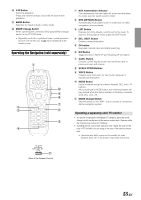
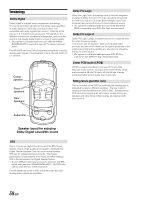
< Button Performs playback. Press and hold for at least 2 seconds for slow motion playback. = BAND Button Switches the band of Audio or Disc mode. > MODE Change Switch When operating the connected DVD player/DVD changer, switch to the EXT DVD side. • Depending on the disc or playback status, certain operations may not work. In this case, the mark is displayed on the monitor screen. Operating the Navigation (sold separately) 1 ! 9 8 7 2 3 6 5 4 1 NAV. transmission indicator The transmission indicator lights for a few seconds when the mode selector switch is set to "NAV.". 2 DTR (DETOUR) Button Automatically recalculates route if a road block or traffic congestion is encountered. 3 LIST Button Displays list of the streets currently set for the route. To return to the guidance mode, press the DISP button. 4 DEL. DEST. Button Deletes current destination. 5 OK button Executes numeral input and starts searching. 6 N/H Button Toggles between North UP and Heading UP orientation. 7 CANC. Button Cancels current display screen and switches back to previous screen with menus. 8 SCALE UP/DN Buttons 9 VOICE Button Initiates vocal instruction for next route maneuver or repeats last instruction. ! MODE Button Inputs numerals using the numeric keypad, DEL. and +10 buttons. After pressing the MODE button, the following buttons will be pressed while the status indicator is blinking: numerals (0-9), DEL. and +10. " MODE Change Switch Sets this switch to the "NAV." side to operate a connected Alpine navigation system. Operating a separately sold TV monitor • To operate a separately sold Alpine TV monitor, press the mode change switch on the rear of the remote control unit. Operate while the transmission indicator is blinking. • Included remote control unit operation seal: Apply the seal for the type of TV monitor you are using to the rear of the remote control unit. • Operation may differ or may not be possible for some products. Also refer to the product's operating instructions. " (Rear of the Remote Control) 55-EN
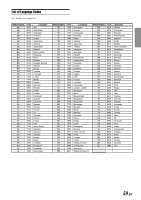
-
 1
1 -
2
-
3
-
4
-
5
-
6
-
7
-
8
-
9
-
10
-
11
-
12
-
13
-
14
-
15
-
16
-
17
-
18
-
19
-
20
-
21
-
22
-
23
-
24
-
25
-
26
-
27
-
28
-
29
-
30
-
31
-
32
-
33
-
34
-
35
-
36
-
37
-
38
-
39
-
40
-
41
-
42
-
43
-
44
-
45
-
46
-
47
-
48
-
49
-
50
-
51
-
 52
52 -
 53
53 -
 54
54 -
 55
55 -
 56
56 -
 57
57 -
 58
58 -
 59
59 -
 60
60 -
 61
61 -
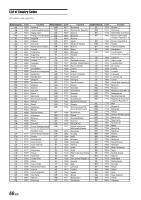 62
62 -
63
-
64
-
65
-
66
-
67
-
68
-
69
-
70
-
71
-
72
-
73
-
74
-
75
-
76
-
77
-
78
-
79
-
80
-
81
-
82
-
83
 |
 |