Alpine X409-WRA-JL Installation Manual - Page 10
X409-WRA-JL
 |
View all Alpine X409-WRA-JL manuals
Add to My Manuals
Save this manual to your list of manuals |
Page 10 highlights
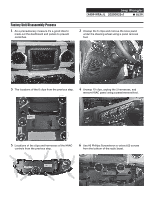
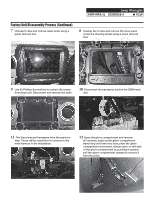
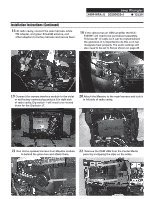
Jeep Wrangler X409-WRA-JL 20200825v1 ˜ 10/29 Factory Unit Disassembly Process (Continued) 13 For vehicles with the power inverter remove the ventilation duct behind the drivers side knee panel using a panel removal tool to release the one clip holding it in place. Once the installation of the X409-WRA-JL tuner is completed the vent can go back in place. 14 For vehicles with heated seats or the power inverter the bracket for the module needs to be removed. Remove the (4) 10mm screws to remove the bracket. Then remove the (2) 8mm screws lower and the (2) 10mm screws top to remove the module. 15 Remove the two knee panel brackets. Each bracket is held in by (1) 10mm screw. 16 Remove the A pillar by removing the (2) 8mm screws and unclipping the panel. The screws can be exposed using a panel removal tool.
-
 1
1 -
2
-
3
-
4
-
 5
5 -
 6
6 -
 7
7 -
 8
8 -
 9
9 -
 10
10 -
 11
11 -
 12
12 -
 13
13 -
 14
14 -
 15
15 -
16
-
17
-
18
-
19
-
20
-
21
-
22
-
23
-
24
-
25
-
26
-
27
-
28
-
29
 |
 |
