Alpine X409-WRA-JL Installation Manual - Page 14
cable, HDMI, FM adapter, and other adapters
 |
View all Alpine X409-WRA-JL manuals
Add to My Manuals
Save this manual to your list of manuals |
Page 14 highlights
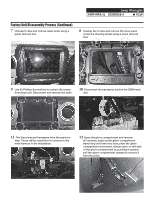
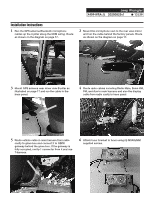
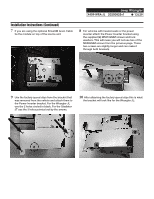
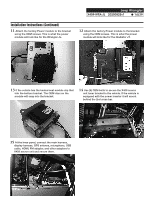
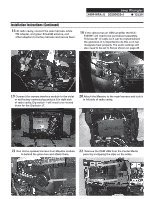
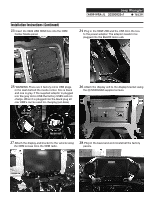
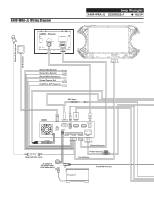
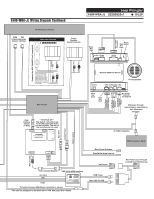
Jeep Wrangler X409-WRA-JL 20200825v1 ˜ 14/29 Installation Instructions (Continued) 11 Attach the factory Power module to the bracket using the OEM screws. This is what the power module will look like for the Wrangler JL. 12 Attach the factory Power module to the bracket using the OEM screws. This is what the power module will look like for the Gladiator JT. 13 If the vehicle has the heated seat module clip that into the bottom bracket. The OEM clips on the module will snap into the bracket. 14 Use (4) OEM bolts to secure the X409 source unit tuner bracket to the vehicle. If the vehicle is equipped with the power inverter it will mount behind the 2nd cross bar. 15 At the knee panel, connect the main harness, display harness, GPS antenna, microphone, USB cable, HDMI, FM adapter, and other adapters to X409 source unit and secure them.
-
 1
1 -
2
-
3
-
4
-
5
-
6
-
7
-
8
-
 9
9 -
 10
10 -
 11
11 -
 12
12 -
 13
13 -
 14
14 -
 15
15 -
 16
16 -
 17
17 -
 18
18 -
 19
19 -
20
-
21
-
22
-
23
-
24
-
25
-
26
-
27
-
28
-
29
 |
 |
