Alpine X409-WRA-JL Installation Manual - Page 13
Installation Instructions Continued
 |
View all Alpine X409-WRA-JL manuals
Add to My Manuals
Save this manual to your list of manuals |
Page 13 highlights
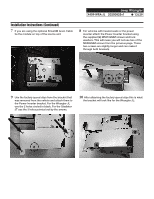
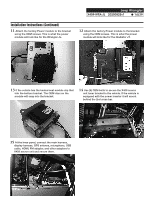
Jeep Wrangler X409-WRA-JL 20200825v1 ˜ 13/29 Installation Instructions (Continued) 7 If you are using the optional SiriusXM tuner, Cable tie the module on top of the source unit. 8 For vehicles with heated seats or the power inverter attach the Power Inverter bracket using the supplied (2) M5X10LMM screws and lock washers. This will mean you will not use two of the M5X8LMM screws from the previous page. These two screws are slightly longer and can make it through both brackets. 9 Use the factory speed clips from the bracket that was removed from the vehicle and attach them to the Power Inverter bracket. For the Wrangler JL use the 2 holes circled in black. For the Gladiator JT use the 3 holes pointed out by the arrows. 10 After attaching the factory speed clips this is what the bracket will look like for the Wrangler JL.
-
 1
1 -
2
-
3
-
4
-
5
-
6
-
7
-
 8
8 -
 9
9 -
 10
10 -
 11
11 -
 12
12 -
 13
13 -
 14
14 -
 15
15 -
 16
16 -
 17
17 -
 18
18 -
19
-
20
-
21
-
22
-
23
-
24
-
25
-
26
-
27
-
28
-
29
 |
 |
