Alpine X409-WRA-JL Installation Manual - Page 15
Remove the OEM USB from the Center Media
 |
View all Alpine X409-WRA-JL manuals
Add to My Manuals
Save this manual to your list of manuals |
Page 15 highlights
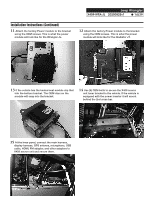
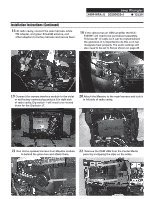
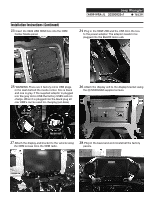
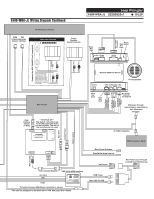
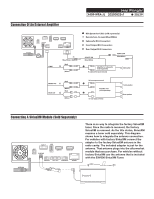
Jeep Wrangler X409-WRA-JL 20200825v1 ˜ 15/29 Installation Instructions (Continued) 16 At radio cavity, connect the main harness, white FM adapter, and green SiriusXM antenna, and other adapters to factory harness and secure them. 18 If the vehicle has an OEM amplifier the KCX- F200INT will need to be purchased separately. This has 30" of cable so it can be routed behind the glovebox. It is important to do this so it can disappate heat properly. The audio settings will also need to be set to flat as shown on page 28. 19 Connect the camera interface module to the violet or red factory camera plug and put it in right side of radio cavity. Dip switch 1 will need to be moved down for the Gladiator JT. 20 Attach the Maestro to the main harness and tuck it in left side of radio cavity. 21 Run chime speaker harness from Maestro module 22 Remove the OEM USB from the Center Media to behind the glove box and attach there. panel by unclipping the clips on the sides.
-
 1
1 -
2
-
3
-
4
-
5
-
6
-
7
-
8
-
9
-
 10
10 -
 11
11 -
 12
12 -
 13
13 -
 14
14 -
 15
15 -
 16
16 -
 17
17 -
 18
18 -
 19
19 -
 20
20 -
21
-
22
-
23
-
24
-
25
-
26
-
27
-
28
-
29
 |
 |
