Alpine X409-WRA-JL Installation Manual - Page 12
Installation Instructions
 |
View all Alpine X409-WRA-JL manuals
Add to My Manuals
Save this manual to your list of manuals |
Page 12 highlights
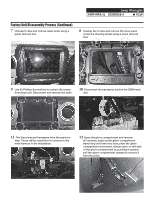
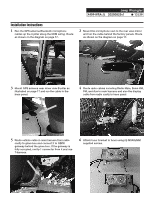
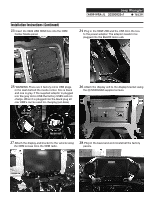
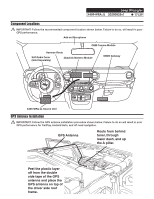
Jeep Wrangler X409-WRA-JL 20200825v1 ˜ 12/29 Installation Instructions 1 Run the GPS antenna Bluetooth microphone cables up the A pillar along the OEM wiring. Route as shown on the diagram on page 17. 2 Mount the microphone next to the rear view mirror and run the cable behind the factory panels. Route as shown on the diagram on page 17. 3 Mount GPS antenna near driver side B-pillar as illustrated on page 17 and run the cable to the knee panel. 4 Route radio cables including Radio Main, Sirius XM, FM, and Aux in main harness and also the display cable from radio cavity to knee panel. 5 Route vehicle cable in main harness from radio cavity to glove box and connect it to OBDII gateway behind the glove box. If the gateway is fully occupied, unclip 1 connector from it and use T-harness. 6 Attach tuner bracket to tuner using (4) M5X8LMM supplied screws.
-
 1
1 -
2
-
3
-
4
-
5
-
6
-
 7
7 -
 8
8 -
 9
9 -
 10
10 -
 11
11 -
 12
12 -
 13
13 -
 14
14 -
 15
15 -
 16
16 -
 17
17 -
18
-
19
-
20
-
21
-
22
-
23
-
24
-
25
-
26
-
27
-
28
-
29
 |
 |
