Alpine X409-WRA-JL Installation Manual - Page 28
Set Up Guide, Troubleshooting Guide
 |
View all Alpine X409-WRA-JL manuals
Add to My Manuals
Save this manual to your list of manuals |
Page 28 highlights
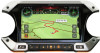
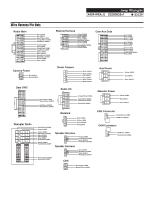
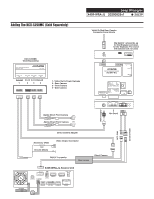
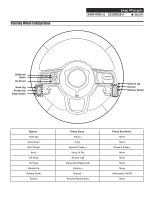
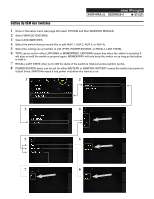
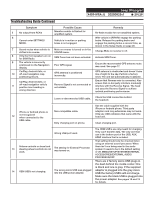
Set Up Guide Jeep Wrangler X409-WRA-JL 20200825v1 ˜ 28/29 1 Turn the vehicle's Ignition switch to ACC. 2 Turn ON the X409-WRA-JL by pressing any key. 3 Select the user language and press OK. 4 To get into the settings the parking brake sequence needs to be done. Engage the parking brake, release the parking brake, and engage the parking brake again. 5 When the KAC-001 (External Accessory Control Module) is present be sure to turn it ON in the SETUP MENU. Page 96 of the owners manual goes over the details of setting it up. That can be found on the support page of the website. (MENU/SYSTEM/EXTERNAL ACCESSORIES/EXTERNAL ACCESSORY CTLR). 6 When the KCX-C250MC (Multi Camera Selector Interface) is present be sure to turn it ON in the SETUP MENU. (MENU/SYSTEM/CAMERA/CAMERA SELECT/CAMERA SELECTOR). 7 Vehicle information- Set the desired gauge information. (MENU/VEHICLE INFO/GAUGES/CAR SETTINGS). 8 If the vehicle is equipped with the factory accessory switches set those up. See previous page for details. (MENU/FACTORY SYSTEM SETUP/MAESTRO MODULE/VEHICLE FEATURES/AUX SWITCHES). 9 For vehicles with an OEM amplifier the Time Correction, P-EQ, and X-Over must be set flat. (MENU/GENERAL/ SOUND). Troubleshooting Guide Symptom 1 iPhone not working with HDMI. 2 Android phone is not working with HDMI. Possible Cause Not using Apple HDMI to Lightning adapter. Didn't plug USB power into a 2A source. Using incorrect HDMI adapter. Miracast or HDMI adapter isn't plugged into a 2A source. Remedy Purchase the HDMI to Lightning adapter directly from Apple. Not all 3rd party adapters work the same. A 2A USB power source must be used to power on the device. If the phone has the feature to use an HDMI adapter it must be the one purchased from the manufacturer of the phone, not a third party adapter. A 2A USB power source must be used to power on the device. Miracast adapter has resolution settings that are too high. Plug the adapter into another monitor (for example a television in the home) and reduce the resolution settings. 3 Incorrect serial number is being iDatalink website says serial used. number is invalid. Serial number may not be in iDatalink database. In the X409-WRA-JL settings confirm the serial number. MENU/SETUP/GENERAL/ ABOUT. Call ADS at 1-866-427-2999 and verify. 4 Incorrect serial number was used when flashing maestro. Flash Maestro with correct serial number. Headunit will not turn on. 4 pin Maestro data cable is disconnected or damaged. Check for proper connection or disconnected pins. OBD2 cable is not plugged in. Connect OBD2 connector to the OBD2 port. Monitor, key-harness or main harness are not connected. Check for proper connection or disconnected pins.
-
 1
1 -
2
-
3
-
4
-
5
-
6
-
7
-
8
-
9
-
10
-
11
-
12
-
13
-
14
-
15
-
16
-
17
-
18
-
19
-
20
-
21
-
22
-
 23
23 -
 24
24 -
 25
25 -
 26
26 -
 27
27 -
 28
28 -
 29
29
 |
 |
