Alpine X409-WRA-JL Installation Manual - Page 8
Factory Unit Disassembly Process
 |
View all Alpine X409-WRA-JL manuals
Add to My Manuals
Save this manual to your list of manuals |
Page 8 highlights
Factory Unit Disassembly Process 1 As a precautionary measure it's a good idea to mask out the dashboard and panels to prevent scratches. Jeep Wrangler X409-WRA-JL 20200825v1 ˜ 8/29 2 Unsnap the 6 clips and remove the knee panel under the steering wheel using a panel removal tool. 3 The locations of the 6 clips from the previous step. 4 Unsnap 10 clips, unplug the 2 harnesses, and remove HVAC panel using a panel removal tool. 5 Locations of the clips and harnesses of the HVAC controls from the previous step. 6 Use #2 Phillips Screwdriver to extract (2) screws from the bottom of the radio bezel.
-
 1
1 -
2
-
 3
3 -
 4
4 -
 5
5 -
 6
6 -
 7
7 -
 8
8 -
 9
9 -
 10
10 -
 11
11 -
 12
12 -
 13
13 -
14
-
15
-
16
-
17
-
18
-
19
-
20
-
21
-
22
-
23
-
24
-
25
-
26
-
27
-
28
-
29
 |
 |

Jeep Wrangler
X409-WRA-JL
20200825v1
±
8/29
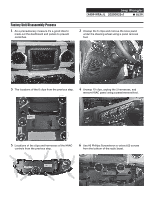
Factory Unit Disassembly Process
1
As a precautionary measure it’s a good idea to
mask out the dashboard and panels to prevent
scratches.
2
Unsnap the 6 clips and remove the knee panel
under the steering wheel using a panel removal
tool.
3
The locations of the 6 clips from the previous step.
4
Unsnap 10 clips, unplug the 2 harnesses, and
remove HVAC panel using a panel removal tool.
5
Locations of the clips and harnesses of the HVAC
controls from the previous step.
6
Use #2 Phillips Screwdriver to extract (2) screws
from the bottom of the radio bezel.