Alpine iLX-407 Owners Manual English - Page 26
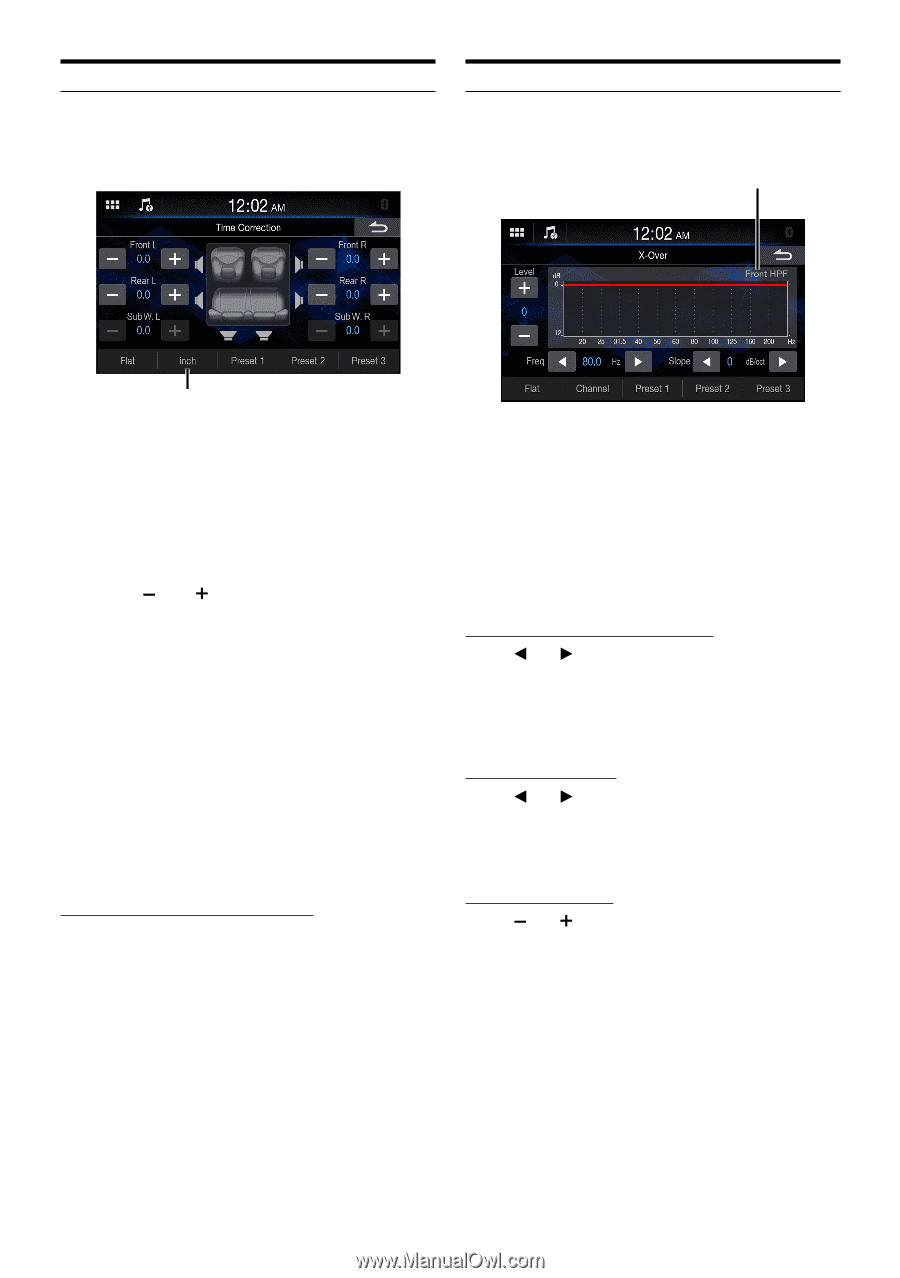
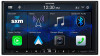
Time Correction Settings, Crossover Settings (X-Over), Touch [Channel], and then select [Front HPF]
 |
View all Alpine iLX-407 manuals
Add to My Manuals
Save this manual to your list of manuals |
Page 26 highlights
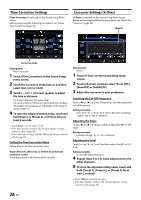
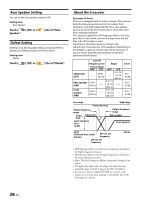
Time Correction Settings [Time Correction] is selected on the Sound Setup Menu screen. Before performing the following procedures, see "About Time Correction" (page 29). Crossover Settings (X-Over) [X-Over] is selected on the Sound Setup Menu screen. Before performing the following procedures, see "About the Crossover" (page 28). Channel Correction mode Setting item: Time Correction 1 Touch [Time Correction] on the Sound Setup menu screen. 2 Touch the Correction mode button, and then select [ms], [cm] or [inch]. 3 Touch [ ] or [ ] for each speaker to adjust the time or distance. 0.0 msec to 9.9 msec (0.1 msec/step) 0.0 cm (0.0 inch) to 336.6 cm (132.56 inch) (3.4 cm/step) All speaker setting values are adjustable in the range of 20 ms or 680 cm. 4 To store the adjusted setting value, touch and hold [Preset 1], [Preset 2], or [Preset 3] for at least 2 seconds. • Touch [Flat] to set all values to 0.0. • If the Rear Speaker setting is Off, the Rear Speaker setting cannot be edited (page 28). • If the Subwoofer setting is Off, the Subwoofer setting cannot be edited (page 27). Calling the Time Correction Value Calling the pre-set time correction value. Touch [Preset 1], [Preset 2], or [Preset 3] on the time correction screen. The setting stored in the Preset will be recalled. Setting item: X-Over 1 Touch [X-Over] on the Sound Setup menu screen. 2 Touch [Channel], and then select [Front HPF], [Rear HPF] or [SubW.LPF]. 3 Adjust the crossover to your preference. Selecting the Cut-Off Frequency Touch [ ] or [ ] of "Freq." (Frequency), and then select the cut-off frequency. Setting contents: 20.0 / 25.0 / 31.5 / 40.0 / 50.0 / 63.0 / 80.0 (Initial setting) / 100.0 / 125.0 / 160.0 / 200.0 Hz Adjusting the Slope Touch [ ] or [ ] of "Slope", and then adjust the HPF or LPF slope. Setting contents: 0 (Initial setting) / 6 / 12 / 18 / 24 dB/oct. Adjusting the Level Touch [ ] or [ ] of "Level", and then adjust the HPF or LPF level. Setting contents: -12 to 0 dB (Initial setting: 0) 4 Repeat steps 2 to 3 to make adjustment to the other channels. 5 To store the adjusted setting value, touch and hold [Preset 1], [Preset 2], or [Preset 3] for at least 2 seconds. • Touch [Flat] to initialize all values. • If the Rear Speaker setting is Off, the Rear Speaker setting cannot be edited (page 28). 26-EN
-
 1
1 -
2
-
3
-
4
-
5
-
6
-
7
-
8
-
9
-
10
-
11
-
12
-
13
-
14
-
15
-
16
-
17
-
18
-
19
-
20
-
 21
21 -
 22
22 -
 23
23 -
 24
24 -
 25
25 -
 26
26 -
 27
27 -
 28
28 -
 29
29 -
 30
30 -
 31
31 -
32
-
33
-
34
-
35
-
36
-
37
-
38
-
39
-
40
-
41
-
42
-
43
-
44
-
45
-
46
-
47
-
48
-
49
-
50
-
51
-
52
-
53
-
54
-
55
-
56
-
57
-
58
-
59
-
60
-
61
-
62
-
63
-
64
-
65
-
66
-
67
-
68
-
69
-
70
-
71
-
72
-
73
-
74
-
75
-
76
 |
 |