Apple IMAC Service Source - Page 159
No Power, No fan, no hard drive noise, and the screen is black.
 |
UPC - 067540444435
View all Apple IMAC manuals
Add to My Manuals
Save this manual to your list of manuals |
Page 159 highlights
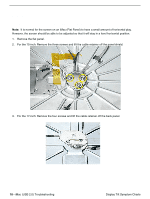
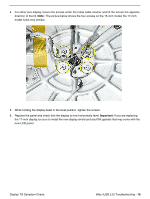
No Power No fan, no hard drive noise, and the screen is black. 1. Verify the power outlet is good. Plug a different device into the socket to ensure there is power, or plug computer into another outlet. 2. Check the power cord. Use a known good power cord. 3. Check connection of the power cord on both ends. Verify that the plug is securely plugged into both the A/C outlet and back of the computer. 4. Remove keyboard, mouse, and other peripherals such as speakers. 5. Disconnect the power cord, place the computer in the service stand, and remove the user access plate. 6. Reset PMU. Refer to "Resetting the PMU on the Logic Board" mentioned earlier in this chapter. 7. Using a voltmeter, check the voltage on the battery test point (see graphic below). If the reading is over 3.5 volts, go to the next step. If the reading is under 3.5 volts, replace the battery and test again. 8. Plug the unit in, but do NOT press the power button. Using a voltmeter, check the voltage from the test point marked "12VSLP" (see graphic above). You should get a reading of approximately 12 volts. If the reading is 12 volts, go to the next step. If you don't get a 12 volt reading, go to step 11. 9. Press the power switch on the computer. Using a voltmeter, check the voltage on the test point marked "12V" (see graphic above). You should get a reading of approximately 12 volts. If the reading is 12 volts, go to the next step. If you do not get a 12 volt reading, replace the main logic board. 10. Using a voltmeter, check the voltage on the test point marked "5V" (see graphic above). You should get a reading of approximately 5 volts. If the reading is 5 volts, go to the next step. If you do not get a 5 volt reading, replace the main logic board. 14 - iMac (USB 2.0) Troubleshooting No Power Symptom Charts
-
 1
1 -
2
-
3
-
4
-
5
-
6
-
7
-
8
-
9
-
10
-
11
-
12
-
13
-
14
-
15
-
16
-
17
-
18
-
19
-
20
-
21
-
22
-
23
-
24
-
25
-
26
-
27
-
28
-
29
-
30
-
31
-
32
-
33
-
34
-
35
-
36
-
37
-
38
-
39
-
40
-
41
-
42
-
43
-
44
-
45
-
46
-
47
-
48
-
49
-
50
-
51
-
52
-
53
-
54
-
55
-
56
-
57
-
58
-
59
-
60
-
61
-
62
-
63
-
64
-
65
-
66
-
67
-
68
-
69
-
70
-
71
-
72
-
73
-
74
-
75
-
76
-
77
-
78
-
79
-
80
-
81
-
82
-
83
-
84
-
85
-
86
-
87
-
88
-
89
-
90
-
91
-
92
-
93
-
94
-
95
-
96
-
97
-
98
-
99
-
100
-
101
-
102
-
103
-
104
-
105
-
106
-
107
-
108
-
109
-
110
-
111
-
112
-
113
-
114
-
115
-
116
-
117
-
118
-
119
-
120
-
121
-
122
-
123
-
124
-
125
-
126
-
127
-
128
-
129
-
130
-
131
-
132
-
133
-
134
-
135
-
136
-
137
-
138
-
139
-
140
-
141
-
142
-
143
-
144
-
145
-
146
-
147
-
148
-
149
-
150
-
151
-
152
-
153
-
 154
154 -
 155
155 -
 156
156 -
 157
157 -
 158
158 -
 159
159 -
 160
160 -
 161
161 -
 162
162 -
 163
163 -
 164
164 -
165
-
166
-
167
-
168
-
169
-
170
-
171
-
172
-
173
-
174
-
175
-
176
-
177
-
178
-
179
-
180
-
181
-
182
-
183
-
184
-
185
-
186
-
187
-
188
-
189
-
190
-
191
-
192
-
193
-
194
-
195
-
196
-
197
-
198
-
199
-
200
 |
 |
