Apple IMAC Service Source - Page 178
Installing the Memory Module
 |
UPC - 067540444435
View all Apple IMAC manuals
Add to My Manuals
Save this manual to your list of manuals |
Page 178 highlights
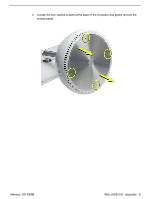
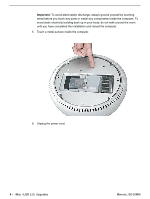
Installing the Memory Module Note: If you are replacing a defective memory module, rather than adding a module, remove the defective module before proceeding. 1. Line up the notch on the memory module with the notch on the memory slot. Important: Do not push the slot clips (on each side) when inserting memory. They are used to remove memory from the slot, not to insert memory. These clips are fragile and could break. 2. Gently insert the memory module into the slot. You will hear a click when the memory is completely inserted into the slot. Note: Make certain to push the memory module in the direction of the arrows. Memory, SO-DIMM iMac (USB 2.0) Upgrades - 5
-
 1
1 -
2
-
3
-
4
-
5
-
6
-
7
-
8
-
9
-
10
-
11
-
12
-
13
-
14
-
15
-
16
-
17
-
18
-
19
-
20
-
21
-
22
-
23
-
24
-
25
-
26
-
27
-
28
-
29
-
30
-
31
-
32
-
33
-
34
-
35
-
36
-
37
-
38
-
39
-
40
-
41
-
42
-
43
-
44
-
45
-
46
-
47
-
48
-
49
-
50
-
51
-
52
-
53
-
54
-
55
-
56
-
57
-
58
-
59
-
60
-
61
-
62
-
63
-
64
-
65
-
66
-
67
-
68
-
69
-
70
-
71
-
72
-
73
-
74
-
75
-
76
-
77
-
78
-
79
-
80
-
81
-
82
-
83
-
84
-
85
-
86
-
87
-
88
-
89
-
90
-
91
-
92
-
93
-
94
-
95
-
96
-
97
-
98
-
99
-
100
-
101
-
102
-
103
-
104
-
105
-
106
-
107
-
108
-
109
-
110
-
111
-
112
-
113
-
114
-
115
-
116
-
117
-
118
-
119
-
120
-
121
-
122
-
123
-
124
-
125
-
126
-
127
-
128
-
129
-
130
-
131
-
132
-
133
-
134
-
135
-
136
-
137
-
138
-
139
-
140
-
141
-
142
-
143
-
144
-
145
-
146
-
147
-
148
-
149
-
150
-
151
-
152
-
153
-
154
-
155
-
156
-
157
-
158
-
159
-
160
-
161
-
162
-
163
-
164
-
165
-
166
-
167
-
168
-
169
-
170
-
171
-
172
-
 173
173 -
 174
174 -
 175
175 -
 176
176 -
 177
177 -
 178
178 -
 179
179 -
 180
180 -
 181
181 -
 182
182 -
 183
183 -
184
-
185
-
186
-
187
-
188
-
189
-
190
-
191
-
192
-
193
-
194
-
195
-
196
-
197
-
198
-
199
-
200
 |
 |

iMac (USB 2.0)
Upgrades -
5
Memory, SO-DIMM
Installing the Memory Module
Note:
If you are replacing a defective memory module, rather than adding a module,
remove the defective module before proceeding.
1.
Line up the notch on the memory module with the notch on the memory slot.
Important:
Do not push the slot clips (on each side) when inserting memory. They are
used to remove memory from the slot, not to insert memory. These clips are fragile
and could break.
2.
Gently insert the memory module into the slot. You will hear a click when the memory
is completely inserted into the slot.
Note:
Make certain to push the memory module in
the direction of the arrows.