Apple IMAC Service Source - Page 60
Replacement Note, Warning, Failure to follow these steps could cause the computer to overheat
 |
UPC - 067540444435
View all Apple IMAC manuals
Add to My Manuals
Save this manual to your list of manuals |
Page 60 highlights
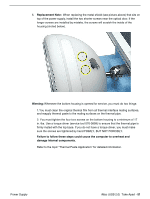
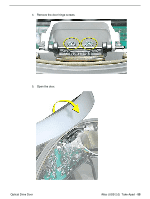
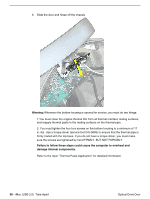
5. Replacement Note: When replacing the metal shield (see picture above) that sits on top of the power supply, install the two shorter screws near the optical door. If the longer screws are installed by mistake, the screws will scratch the inside of the housing (circled below). Warning: Whenever the bottom housing is opened for service, you must do two things: 1.You must clean the original thermal film from all thermal interface mating surfaces, and reapply thermal paste to the mating surfaces on the thermal pipe. 2. You must tighten the four torx screws on the bottom housing to a minimum of 17 in.-lbs. Use a torque driver (service tool 076-0899) to ensure that the thermal pipe is firmly mated with the top base. If you do not have a torque driver, you must make sure the screws are tightened by hand FIRMLY, BUT NOT FORCIBLY. Failure to follow these steps could cause the computer to overheat and damage internal components. Refer to the topic "Thermal Paste Application" for detailed information. Power Supply iMac (USB 2.0) Take Apart - 51
-
 1
1 -
2
-
3
-
4
-
5
-
6
-
7
-
8
-
9
-
10
-
11
-
12
-
13
-
14
-
15
-
16
-
17
-
18
-
19
-
20
-
21
-
22
-
23
-
24
-
25
-
26
-
27
-
28
-
29
-
30
-
31
-
32
-
33
-
34
-
35
-
36
-
37
-
38
-
39
-
40
-
41
-
42
-
43
-
44
-
45
-
46
-
47
-
48
-
49
-
50
-
51
-
52
-
53
-
54
-
 55
55 -
 56
56 -
 57
57 -
 58
58 -
 59
59 -
 60
60 -
 61
61 -
 62
62 -
 63
63 -
 64
64 -
 65
65 -
66
-
67
-
68
-
69
-
70
-
71
-
72
-
73
-
74
-
75
-
76
-
77
-
78
-
79
-
80
-
81
-
82
-
83
-
84
-
85
-
86
-
87
-
88
-
89
-
90
-
91
-
92
-
93
-
94
-
95
-
96
-
97
-
98
-
99
-
100
-
101
-
102
-
103
-
104
-
105
-
106
-
107
-
108
-
109
-
110
-
111
-
112
-
113
-
114
-
115
-
116
-
117
-
118
-
119
-
120
-
121
-
122
-
123
-
124
-
125
-
126
-
127
-
128
-
129
-
130
-
131
-
132
-
133
-
134
-
135
-
136
-
137
-
138
-
139
-
140
-
141
-
142
-
143
-
144
-
145
-
146
-
147
-
148
-
149
-
150
-
151
-
152
-
153
-
154
-
155
-
156
-
157
-
158
-
159
-
160
-
161
-
162
-
163
-
164
-
165
-
166
-
167
-
168
-
169
-
170
-
171
-
172
-
173
-
174
-
175
-
176
-
177
-
178
-
179
-
180
-
181
-
182
-
183
-
184
-
185
-
186
-
187
-
188
-
189
-
190
-
191
-
192
-
193
-
194
-
195
-
196
-
197
-
198
-
199
-
200
 |
 |
