Asus A7V8X A7V8X User Manual - Page 134
Manual Installation of IDE/RAID Drivers - la windows 7 drivers
 |
View all Asus A7V8X manuals
Add to My Manuals
Save this manual to your list of manuals |
Page 134 highlights
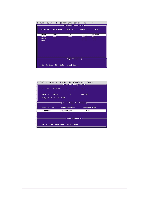
5.5 Manual Installation of IDE/RAID Drivers The A7V8X support CD contains several IDE and RAID 0 or 1 drivers in the Promise folder, including Windows, NetWare and NT4. Below follow two popular OS installations. The others are available on the support CD. 5.5.1 Win9x-ME Promise® FastTrak376™ Driver 1. Ensure the Support CD-ROM is in the CD Drive and press "Start" button. 2. Move highlight bar to "Settings" and select "Control Panel". 3. Double click on "System" icon. 4. Select "Device Manager" page. 5. View device by type and find "Other devices" node. 4. Select the "PCI Mass Storage Controller" node and then click "Properties." 6. Please select [General] page to reinstall driver or select [Driver] page to update the driver. 7. Follow the instruction to insert your Windows CD or ASUS support CD to install the driver. (Driver Location: {CD-ROM driver}:\Promise\Raid0or1\Win9x-ME) 5.5.2 Win2000 / XP Promise® FastTrak376™ Driver 1. Right click "My Computer" icon on the desktop. Select "Properties" when the menu appears. Or you can Press "Start" button. Move highlight bar to "Settings" and select: "Control Panel". Double click on "System" icon. 2. Select "Hardware" page and then click [Device Manager] button. 3. View device by type and find "Other devices" node. 4. Right Click the "Mass Storage Controller" node. 5. When the menu appears, click the "Properties" item. 6. Please select select [Driver] page to update driver. 7. Press Next while "Upgrade Device Driver Wizard" window appears. 8. Choose "Select for a suitable driver for my device(recommended)" option and then press Next. 9. Select "Specify a location" check box. 10. Type or browse the path {CD-ROM Drive}: \Promise \Raid0or1 \Win2000 to the driver and click OK. 11. Press Next. 12. Press Yes. 13. Finally, press Finish to complete the installation. 14. Please restart you computer for these changes to take effect. (Driver Location: {CD-ROM driver}:\Promise\Raid0or1\Win2000) 5-34 Chapter 5: Software support
-
 1
1 -
2
-
3
-
4
-
5
-
6
-
7
-
8
-
9
-
10
-
11
-
12
-
13
-
14
-
15
-
16
-
17
-
18
-
19
-
20
-
21
-
22
-
23
-
24
-
25
-
26
-
27
-
28
-
29
-
30
-
31
-
32
-
33
-
34
-
35
-
36
-
37
-
38
-
39
-
40
-
41
-
42
-
43
-
44
-
45
-
46
-
47
-
48
-
49
-
50
-
51
-
52
-
53
-
54
-
55
-
56
-
57
-
58
-
59
-
60
-
61
-
62
-
63
-
64
-
65
-
66
-
67
-
68
-
69
-
70
-
71
-
72
-
73
-
74
-
75
-
76
-
77
-
78
-
79
-
80
-
81
-
82
-
83
-
84
-
85
-
86
-
87
-
88
-
89
-
90
-
91
-
92
-
93
-
94
-
95
-
96
-
97
-
98
-
99
-
100
-
101
-
102
-
103
-
104
-
105
-
106
-
107
-
108
-
109
-
110
-
111
-
112
-
113
-
114
-
115
-
116
-
117
-
118
-
119
-
120
-
121
-
122
-
123
-
124
-
125
-
126
-
127
-
128
-
 129
129 -
 130
130 -
 131
131 -
 132
132 -
 133
133 -
 134
134 -
 135
135 -
 136
136 -
 137
137 -
 138
138 -
 139
139 -
140
-
141
-
142
 |
 |