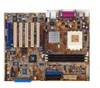
Asus A7V8X A7V8X User Manual - Page 135
Installing the Promise, FastTrak376, Driver in, a New Windows 2000 / XP System, Win NT Promise, - la motherboard drivers windows 7
 |
View all Asus A7V8X manuals
Add to My Manuals
Save this manual to your list of manuals |
Page 135 highlights
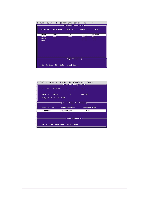
5.5.3 Win NT Promise® FastTrak376™ Driver 1. Press "Start" button. 2. Move highlight bar to "Settings" and select "Control Panel". 3. Double click on "SCSI Adapters" icon. 4. Select "Driver" page. 5. Press "Add..." button. 6. Select item "Unlisted or Updated Driver" in "List of Drivers" list box. 7. Specify path {CD-ROM Drive}:\Drivers\Promise\NT4 to the driver. 8. When dialog appears, select "WinNT Promise FastTrak376 (tm) Lite Controller" item from the list and press "OK" button. 9. Please restart Windows NT system. 5.5.4 Installing the Promise® FastTrak376™ Driver in a New Windows 2000 / XP System 1. Read ASUS support CD in another PC and click Browse Support CD. 2. Click Driver folder. 3. Click Promise folder. 4. Select the Promise chip used on your motherboard and click on it. 5. For example, we want to use RAID 0 function on A7V8X motherboard under Windows XP. The Promise RAID chip on A7V8X is PDC20276. Accordingly, look for the files in the appropriate Promise Chip folder: WinXP, FASTTRAK, README, and TXTSETUP.OEM. Copy these three files to a floppy diskette. 6. Go back to your new RAID motherboard. 7. If available, make sure the RAID_SW jumper on the motherboard is enabled and enable the appropriate fields in the BIOS. 8. Insert a Windows 2000 or XP installation CD. 9. Boot from CD-ROM. 10. Start to install Windows 2000 or XP. 11. The operation system installation program will ask you "Press F6 if you want to install a third party SCSI or RAID driver." 12. Quickly press F6 when you see "Press F6 if you want to install a third party SCSI or RAID driver." 13. Press S to set up RAID controller. 14. Insert the floppy diskette with the files you copied earlier. 15. Choose WinXP Promise FastTrak376™ Controller. 16. The RAID system is now setup to work with the XP or 2000 platform. Complete the Windows OS installation process. ASUS A7V8X motherboard user guide 5-35
-
 1
1 -
2
-
3
-
4
-
5
-
6
-
7
-
8
-
9
-
10
-
11
-
12
-
13
-
14
-
15
-
16
-
17
-
18
-
19
-
20
-
21
-
22
-
23
-
24
-
25
-
26
-
27
-
28
-
29
-
30
-
31
-
32
-
33
-
34
-
35
-
36
-
37
-
38
-
39
-
40
-
41
-
42
-
43
-
44
-
45
-
46
-
47
-
48
-
49
-
50
-
51
-
52
-
53
-
54
-
55
-
56
-
57
-
58
-
59
-
60
-
61
-
62
-
63
-
64
-
65
-
66
-
67
-
68
-
69
-
70
-
71
-
72
-
73
-
74
-
75
-
76
-
77
-
78
-
79
-
80
-
81
-
82
-
83
-
84
-
85
-
86
-
87
-
88
-
89
-
90
-
91
-
92
-
93
-
94
-
95
-
96
-
97
-
98
-
99
-
100
-
101
-
102
-
103
-
104
-
105
-
106
-
107
-
108
-
109
-
110
-
111
-
112
-
113
-
114
-
115
-
116
-
117
-
118
-
119
-
120
-
121
-
122
-
123
-
124
-
125
-
126
-
127
-
128
-
129
-
 130
130 -
 131
131 -
 132
132 -
 133
133 -
 134
134 -
 135
135 -
 136
136 -
 137
137 -
 138
138 -
 139
139 -
 140
140 -
141
-
142
 |
 |