Asus A7V8X A7V8X User Manual - Page 63
Managing and updating your BIOS - la bios update
 |
View all Asus A7V8X manuals
Add to My Manuals
Save this manual to your list of manuals |
Page 63 highlights
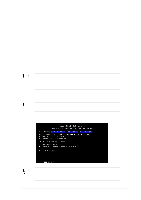
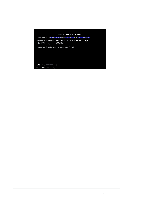
4.1 Managing and updating your BIOS It is recommended that you save a copy of the motherboard's original BIOS to a bootable floppy disk in case you need to reinstall the original BIOS later. 4.1.1 Using ASUS EZ Flash to update the BIOS The ASUS EZ Flash feature allows you to easily update the BIOS without having to go through the long process of booting from a diskette and using a DOS-based utility. The EZ Flash is built-in the BIOS firmware so it is accessible by simply pressing + during the Power-On Self Tests (POST). Follow these steps to update the BIOS using ASUS EZ Flash. 1. Download the latest BIOS file from the ASUS website (see ASUS contact information on page x). Save the file to a floppy disk. Write down the BIOS file name on a piece of paper. You need to type the exact BIOS file name at the EZ Flash screen. 2. Reboot the computer. 3. To use EZ Flash, press + during POST to display the following screen. ASUS EZ Flash V1.00 Copyright (C) 2002, ASUSTeK COMPUTER INC. [Onboard BIOS Information] BIOS Version : ASUS A7V8X ACPI BIOS Revision 1001 Beta 003 BIOS Model : A7V8X BIOS Built Date : 07/29/02 Please Enter File Name for NEW BIOS: _ *Note: EZ Flash will copy file from A:\, Press [ESC] to reboot The BIOS information in the above screen is for reference only. What you see on your screen may not be exactly the same as shown. 4. Insert the disk that contains the new BIOS file into the floppy drive. You will receive the error message, "WARNING! Device not ready." if you proceed to step 5 without the disk in the drive. ASUS A7V8X motherboard user guide 4-1
-
 1
1 -
2
-
3
-
4
-
5
-
6
-
7
-
8
-
9
-
10
-
11
-
12
-
13
-
14
-
15
-
16
-
17
-
18
-
19
-
20
-
21
-
22
-
23
-
24
-
25
-
26
-
27
-
28
-
29
-
30
-
31
-
32
-
33
-
34
-
35
-
36
-
37
-
38
-
39
-
40
-
41
-
42
-
43
-
44
-
45
-
46
-
47
-
48
-
49
-
50
-
51
-
52
-
53
-
54
-
55
-
56
-
57
-
 58
58 -
 59
59 -
 60
60 -
 61
61 -
 62
62 -
 63
63 -
 64
64 -
 65
65 -
 66
66 -
 67
67 -
 68
68 -
69
-
70
-
71
-
72
-
73
-
74
-
75
-
76
-
77
-
78
-
79
-
80
-
81
-
82
-
83
-
84
-
85
-
86
-
87
-
88
-
89
-
90
-
91
-
92
-
93
-
94
-
95
-
96
-
97
-
98
-
99
-
100
-
101
-
102
-
103
-
104
-
105
-
106
-
107
-
108
-
109
-
110
-
111
-
112
-
113
-
114
-
115
-
116
-
117
-
118
-
119
-
120
-
121
-
122
-
123
-
124
-
125
-
126
-
127
-
128
-
129
-
130
-
131
-
132
-
133
-
134
-
135
-
136
-
137
-
138
-
139
-
140
-
141
-
142
 |
 |