Asus E210 User Guide - Page 32
Working with Windows® Embedded 7, Starting for the first time - review
 |
View all Asus E210 manuals
Add to My Manuals
Save this manual to your list of manuals |
Page 32 highlights
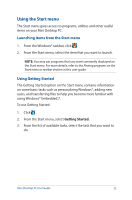
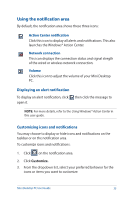
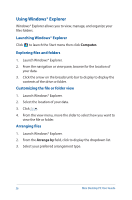
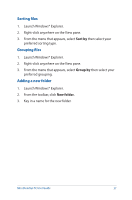
Working with Windows® Embedded 7 Starting for the first time When you start your Mini Desktop PC for the first time, a series of screens appear to guide you in configuring the basic settings of your Windows® Embedded 7 operating system. To start your Mini Desktop PC for the first time: 1. Turn on your Mini Desktop PC. Wait for a few minutes until the Set Up Windows screen appears. 2. From the dropdown list, select your preferred language then click Next. 3. From the dropdown lists, select your Country or region, Time and currency, and Keyboard layout then click Next. 4. Key in unique names for the user name and Mini Desktop PC name then click Next. 5. Key in the necessary information to set up your password, then click Next. You may also click Next to skip this step without entering any information. NOTE: If you want to set up a password for your account later, refer to the Setting up a user account and password section in this user guide. 6. Carefully read the license terms. Tick I accept the license terms then click Next. 7. Select Use recommended settings or Install important updates only to set up the security settings of your Mini Desktop PC. To skip this step, select Ask me later. 8. Review your date and time settings. Click Next. The system loads the new settings then restarts. 9. After restarting, you may now start using your Mini Desktop PC. 32 Mini Desktop PC User Guide
-
 1
1 -
2
-
3
-
4
-
5
-
6
-
7
-
8
-
9
-
10
-
11
-
12
-
13
-
14
-
15
-
16
-
17
-
18
-
19
-
20
-
21
-
22
-
23
-
24
-
25
-
26
-
 27
27 -
 28
28 -
 29
29 -
 30
30 -
 31
31 -
 32
32 -
 33
33 -
 34
34 -
 35
35 -
 36
36 -
 37
37 -
38
-
39
-
40
-
41
-
42
-
43
-
44
-
45
-
46
-
47
-
48
-
49
-
50
-
51
-
52
-
53
-
54
-
55
-
56
-
57
-
58
-
59
-
60
-
61
-
62
-
63
-
64
-
65
-
66
-
67
-
68
-
69
-
70
-
71
-
72
-
73
-
74
-
75
-
76
-
77
-
78
-
79
-
80
-
81
-
82
-
83
-
84
-
85
-
86
-
87
-
88
-
89
-
90
-
91
-
92
-
93
-
94
-
95
-
96
-
97
-
98
-
99
-
100
-
101
-
102
-
103
-
104
-
105
-
106
-
107
-
108
-
109
-
110
-
111
-
112
-
113
-
114
 |
 |