Asus KN97 User Manual - Page 24
Insert the SEC Cartridge
 |
View all Asus KN97 manuals
Add to My Manuals
Save this manual to your list of manuals |
Page 24 highlights
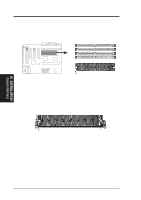
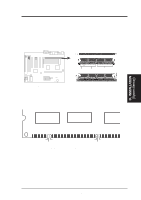
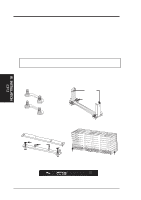
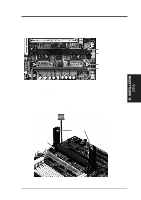
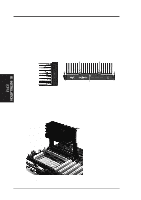
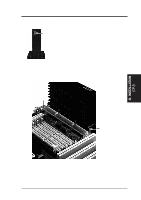
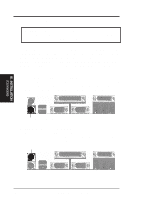
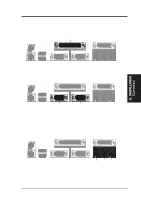
Lock Lock III. INSTALLATION (CPU) III. INSTALLATION 2. Mount the Heat Sink: Place the SEC cartridge face down on a flat surface and lay the heat sink flush on the back (metal side) of the SEC cartridge. Check the orientation of the heatsink with the pictures. The thicker fin should be on the bottom of the SEC cartridge. The top clamp is larger than the bottom clamp so only this orientation will fit. With a screw driver, push the clamps one at a time into the SEC cartridge. Make sure that the heatsink is tight against the heatsink by firmly pressing the SEC cartridge and the heatsink together. When correctly installed, there should not be any light showing between the thermal pad of the heat sink and the SEC cartridge. WARNING: If the heatsink is not mounted tightly against the SEC cartridge, the CPU will overheat. (8) (9) Push Clamp Push each end of the Clamps until they lock (8) Push Clamp (9) The Thermal Pad & SEC cartridge should not have a gap! SEC Cartridge with Heatsink (Side) SEC Cartridge with Heatsink (Top) 3. Insert the SEC Cartridge: Push the SEC cartridge's two locks inward (the preceding picture shows the Locks in the outward position and inward in the picture below) and insert the cartridge with the heat sink facing the motherboard's memory slots. Push down slowly while holding the Retention Mechanism's sides inward so that the SEC cartridge does not push away the two walls of the Retention Mechanism. Push Lock Inward (3) Pentium II processor with heatsink being mounted into the Retention Mechanism. 24 ASUS KN97-X User's Manual
-
 1
1 -
2
-
3
-
4
-
5
-
6
-
7
-
8
-
9
-
10
-
11
-
12
-
13
-
14
-
15
-
16
-
17
-
18
-
 19
19 -
 20
20 -
 21
21 -
 22
22 -
 23
23 -
 24
24 -
 25
25 -
 26
26 -
 27
27 -
 28
28 -
 29
29 -
30
-
31
-
32
-
33
-
34
-
35
-
36
-
37
-
38
-
39
-
40
-
41
-
42
-
43
-
44
-
45
-
46
-
47
-
48
-
49
-
50
-
51
-
52
-
53
-
54
-
55
-
56
-
57
-
58
-
59
-
60
-
61
-
62
-
63
-
64
 |
 |
