Behringer POLY D Quick Start Guide - Page 17
POLY D Getting started, POLY D Puesta en marcha
 |
View all Behringer POLY D manuals
Add to My Manuals
Save this manual to your list of manuals |
Page 17 highlights
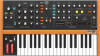
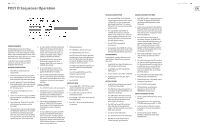
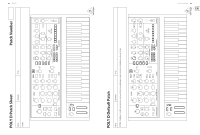
32 POLY D POLY D Getting started (EN) Step 3: Getting started OVERVIEW This 'getting started' guide will help you set up the POLY D analog synthesizer and briefly introduce its capabilities. CONNECTION To connect the POLY D to your system, please consult the connection guide earlier in this document. SOFTWARE SETUP The POLY D is a USB Class Compliant MIDI device, and so no driver installation is required. The POLY D does not require any additional drivers to work with Windows and MacOS. The "Synthtool.exe" application allows you to select the MIDI channel number and to set and adjust various parameters of the POLY D to suit your preferences. SysEx commands can also be used. Please see the information later in this manual. HARDWARE SETUP Make all the connections in your system. Apply power to the POLY D using the supplied power adapter only. Ensure your sound system is turned down. Turn on the POLY D power switch. WARM UP TIME We recommend leaving 15 minutes or more time for the POLY D to warm up before recording or live performance. (Longer if it has been brought in from the cold.) This will allow the precision analog circuits time to reach their normal operating temperature and tuned performance. MIXER SECTION The POLY D has four oscillators, an internal Noise generator, and an external source input. Each of these, and any combination, are used by the POLY D to generate sound. The Mixer section allows you to turn each of these sources on or off, and adjust the volume of each to create an overall mix. Start by turning on the top switch for Oscillator 1, and turn off the others. Adjust the volume control of Oscillator 1. In the Output section, adjust the main volume. Now, if you play a note on your keyboard, you should hear the sound of Oscillator 1 only. Turn on other oscillators and/or noise and adjust their volume controls to create a mix. If the MODE switch is set to POLY, the first note will play Oscillator 1, playing 2 notes plays Oscillator 1 and 2, playing 3 notes plays Oscillator 1, 2, and 3, and playing 4 notes plays Oscillator 1, 2, 3, and 4. OSCILLATOR SECTION In the Oscillator section, adjust the Range knob and you will hear the sound of the various octaves. Adjust the wavetype and listen to the differences. The oscillator modulation switch allows the oscillator frequency to be modulated by the modulation mix. The OSC 4 switch allows its frequency to be affected by, or be independent of, the notes played on the keyboard, and the modulation and pitch wheels. Note: The TUNE knob and OSCILLATOR 2, 3, and 4 FREQUENCY knobs are marked in units of semi tones as a general guide. FILTER SECTION Play with the Cutoff Frequency, Emphasis, and Contour, and listen to their effects on the sound. Adjust the Attack, Decay, and Sustain; they affect the cutoff frequency with time, while a note is played. The 2 keyboard switches affect how much the filter is affected by the frequency of notes that are played. If the filter modulation switch is ON then the filter section is modulated by the modulation mix. LOUDNESS CONTOUR SECTION In this section, adjust the Attack, Decay, and Sustain; they affect the overall level with time, while a note is played. The loudness decay switch affects the decay in level after a note is released. CONTROLLERS SECTION First set the 2 switches to choose from internal LFO or internal Noise, OSC 4 or the filter envelope, and then use the MODULATION MIX knob to vary the mix between them. You can experiment by first setting the switch to OSC 4, and turning the MODULATION MIX knob to OSC 4. Then set the Oscillator 4 range control to LO, and the Oscillator Modulation switch ON. You may now be able to hear the sound of the Oscillator 1 modulated by OSC 4. Use the Modulation wheel of your keyboard to increase the effect. If the Filter Modulation switch is ON, listen to the effect of modulation on the filter. The Modulation Sensitivity curve can be chosen from hard, medium, or soft (the default), using the SysEx commands shown later in this manual. SEQUENCER SECTION Details of the Sequencer operation are shown on page 38. ARPEGGIATOR To use the arpeggiator, press the ARP switch in the sequencer section: 1. Press it once to play the arpeggiator. (It stops when notes are released.) 2. Press HOLD to play and hold the arpeggiator. (It continues when notes are released.) The arpeggiator rate is set by the TEMPO/GATE LENGTH knob. The order in which the arpeggiator notes are played has 8 options, and this can be changed by pressing either when the arpeggiator is playing. The LOCATION LED shows the current order 1 to 8: 1. UP 1 2. DOWN 1 3. DOWN and UP 4. RANDOM 5. UP (+1 OCT) 6. DOWN (+1 OCT) 7. UP (-1 OCT) 8. DOWN (-1 OCT) FIRMWARE UPDATE Please check our website behringer.com regularly for any updates to the firmware of your POLY D synthesizer. The firmware file can be downloaded and stored on your computer, and then used to update the POLY D. It comes with detailed instructions on the update procedure. HAVE FUN The POLY D has various Gate and CV inputs and outputs that allow for further experimentation and expansion to other POLY D units and modular synthesizer equipment. Make copies of the patch sheet at the end of this manual, and record your favorite settings. With all these controls, the possibilities for musical creativity are endless, rather like an artist with a new box of paints. We hope that you will enjoy your new POLY D. POLY D Puesta en marcha Quick Start Guide 33 (ES) Paso 3: Puesta en marcha RESUMEN Esta guía de 'puesta en marcha' le ayudará a configurar el sintetizador analógico POLY D y hará que pueda ver un resumen de sus capacidades. CONEXIÓN A la hora de conectar el POLY D a su sistema, consulte primero la guía de conexión un poco antes en este documento. CONFIGURACIÓN DE SOFTWARE El POLY D es un dispositivo MIDI USB Class Compliant, por lo que no hace falta que instale ningún driver. El POLY D no requiere la instalación de ningún driver adicional para funcionar con dispositivos Windows y MacOS. La aplicación "Synthtool.exe" le permite elegir el número de canal MIDI y configurar y ajustar diversos parámetros del POLY D para adaptarlos a sus gustos y necesidades. También puede usar órdenes SysEx. Vea toda la información más adelante en este mismo manual. CONFIGURACIÓN DE HARDWARE Realice todas las conexiones en su sistema. Conecte a la corriente el POLY D exclusivamente por medio del adaptador de corriente incluido. Asegúrese de que su sistema de sonido esté apagado y después encienda el POLY D por medio del interruptor de encendido. PERIODO DE CALENTAMIENTO Le recomendemos que deje un periodo de unos 15 minutos para que el POLY D se caliente antes de iniciar una grabación o actuación en directo con él. (Aumente este periodo de calentamiento si va a usarlo en un entorno frío). Esto permitirá que los circuitos analógicos de precisión alcancen su temperatura operativa normal y que le ofrezcan el máximo rendimiento. SECCIÓN DE MEZCLADOR El POLY D dispone de 4 osciladores, un generador de ruido interno y una entrada de fuente de señal exterior. Cada uno de ellos, y cualquier combinación de todos, es usado por el POLY D para generar sonido. La sección de mezclador (Mixer) le permite activar o desactivar cada una de estas fuentes, así como ajustar el volumen de cada una para crear una mezcla global. Empiece activando el interruptor superior para el Oscilador 1 y desactivando el resto. Ajuste el control de volumen del Oscilador 1. En la sección de salida (Output), ajuste el volumen principal. Ahora, si toca una nota en su teclado MIDI, debería escuchar únicamente el sonido del Oscilador 1. Active los otros osciladores y/o el ruido y ajuste sus controles de volumen para crear una mezcla. Si el interruptor MODE está ajustado a POLY, la primera nota reproducirá el Oscilador 1, el tocar 2 notas reproducirá el Oscilador 1 y 2, el tocar 3 notas reproducirá el Oscilador 1, 2 y 3, y el tocar 4 notas añadirá el Oscilador 1, 2, 3 y 4. SECCIÓN DE OSCILADOR En la sección de oscilador (Oscillator), ajuste el mando Range y escuchará el sonido de las distintas octavas. Ajuste el tipo de onda y escuche las diferencias que produce cada una. El interruptor de modulación del oscilador permite que la frecuencia del oscilador sea modulada por la mezcla de modulación. El interruptor OSC4 permite que su frecuencia se vea afectada por las notas tocadas en el teclado y de las ruedas de modulación e inflexión tonal, o que sea independiente de ellas. Nota: El mando TUNE y los mandos OSCILLATOR-2, 3 y 4 FREQUENCY están marcados en unidades de semitono para que le sirvan de guía general. SECCIÓN DE FILTRO Juegue con la frecuencia de corte, énfasis y contorno y escuche su efecto sobre el sonido. Ajuste el ataque, decaimiento y sustain; estos controles afectarán a la frecuencia de corte a lo largo del tiempo, mientras toque la nota. Los 2 interruptores de control de teclado afectan a la forma en que se verá afectado el filtro por la frecuencia de las notas tocadas. Si el interruptor de modulación de filtro está activado (ON), entonces la sección de filtro será modulada por la mezcla de modulación. SECCIÓN DE CONTORNO DEL VOLUMEN PERCIBIDO (LOUDNESS) En esta sección, ajuste el ataque, decaimiento y sustain; estos controles afectarán al comportamiento del nivel global a lo largo del tiempo mientras toca la nota. El interruptor de decaimiento del volumen percibido afecta al decaimiento del nivel una vez que deje de pulsar la nota. SECCIÓN DE CONTROLADORES Ajuste primero los 2 interruptores para elegir entre el LFO interno o el generador de ruido interno, OSC 4 o la envolvente de filtro y después use el mando MODULATION MIX para modificar la mezcla entre ellos. Puede hacer pruebas ajustando primero el interruptor a OSC 4 y girando el mando MODULATION MIX hacia OSC4. Ajuste después el control de rango OSC4 a LO, y coloque el interruptor de modulación de oscilador en ON. Ahora podrá escuchar el sonido del OSC1 modulado por OSC4. Use la rueda de modulación de su teclado para aumentar el efecto. Si el interruptor de modulación de filtro está en ON, escuche el efecto de la modulación sobre el filtro. SECCIÓN DE SEQUENCER Vea los detalles en la página 38. ARPEGGIATOR Para usar el arpegiador, pulse el interruptor ARP de la sección de secuenciador: 1. Púlselo una vez para poner en marcha el arpegiador (se detendrá cuando deje de pulsar las notas). 2. Pulse HOLD y ARP para mantener la reproduccion del arpeggio (seguira sonando aun cuando deje de pulsar las notas). La velocidad del arpegiador es ajustada con TEMPO/ GATE LENGTH. El orden en el que son reproducidas las notas del arpegiador tiene 8 opciones que puede cambiar pulsando mientras el arpegiador está en marcha. El piloto LOCATION le mostrará el orden activo entre 1 y 8: 1. UP 1 2. DOWN 1 3. DOWN and UP 4. RANDOM 5. UP (+1 OCT) 6. DOWN (+1 OCT) 7. UP (-1 OCT) 8. DOWN (-1 OCT) ACTUALIZACIÓN DEL FIRMWARE Acceda cada cierto tiempo a la web behringer.com para ver si hay disponible alguna actualización del firmware del sintetizador POLY D. El fichero de firmware puede ser descargado y almacenado en su ordenador y después usarlo para actualizar el POLY D. Este fichero incluye instrucciones detalladas acerca del proceso de actualización. DIVIÉRTASE El POLY D dispone de varias entradas y salidas CV (control de voltaje) y de puerta de ruidos (Gate) que le permiten una mayor experimentación y expansión con otras unidades POLY D y sintetizadores modulares. Haga copias de la tabla de patches o conexiones que hay al final de este manual y registre en ellas sus ajustes preferidos. Con todos estos controles, sus posibilidades de creatividad musical son ilimitadas, tal como un pintor con un lienzo en blanco y una caja de pinturas nuevas. Esperamos que disfrute con su nuevo POLY D.
-
 1
1 -
2
-
3
-
4
-
5
-
6
-
7
-
8
-
9
-
10
-
11
-
 12
12 -
 13
13 -
 14
14 -
 15
15 -
 16
16 -
 17
17 -
 18
18 -
 19
19 -
 20
20 -
 21
21 -
 22
22 -
23
-
24
-
25
 |
 |
