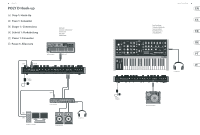
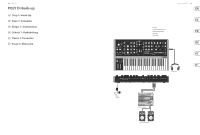
Behringer POLY D Quick Start Guide - Page 7
POLY D Controls - used
 |
View all Behringer POLY D manuals
Add to My Manuals
Save this manual to your list of manuals |
Page 7 highlights
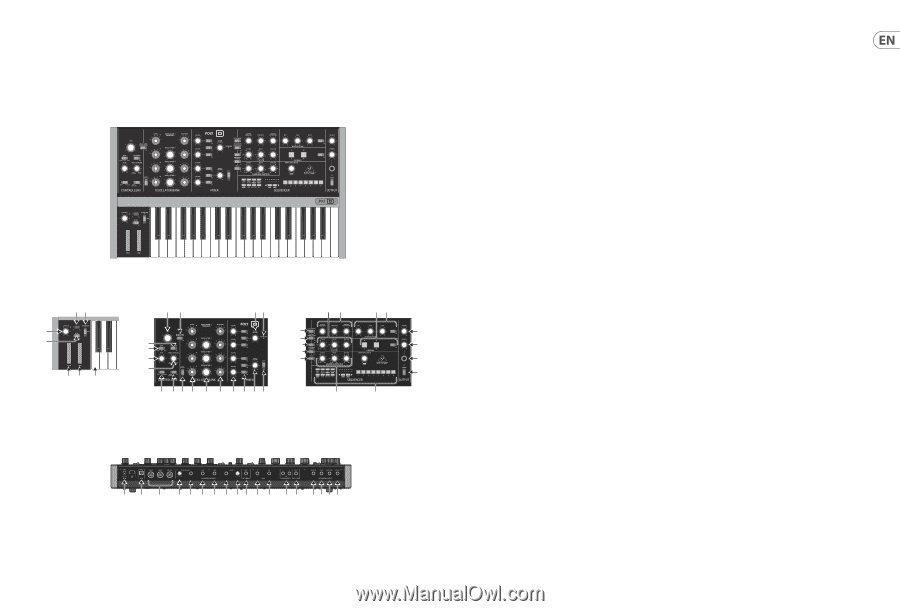
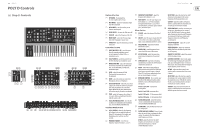
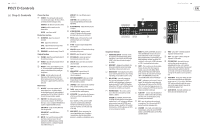
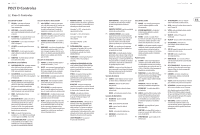
12 POLY D POLY D Controls (EN) Step 2: Controls (6) (7) (5) (4) (3) (2) (1) (14) (15) (13) (12) (11) (10) (24)(25) (30) (31) (29) (28) (27) 1 2 (26) (33) (34) (36) (37) (38) (39) (9) (8) (16)(17) (18) (19) (20) (21) (22) (23) (32) (35) (40) (41) (42) (43) (44) (45) (46) (47) (48)(49) (50) (51) (52) (53) (54)(55)(56)(57) Quick Start Guide 13 Keyboard Section (1) KEYBOARD - the keyboard has 37 semi-weighted, full-size keys. (2) MOD WHEEL - adjust the modulation depth from off to maximum. (3) PITCH WHEEL - this wheel allows you to lower or raise the pitch. (4) GLIDE ON/OFF - this turns the Glide on or off. (5) LFO RATE - adjusts the frequency of the LFO. (6) WAVE SHAPE - select the LFO wave shape from either triangular or square wave. (7) TRANSPOSE - adjust the keyboard up or down one octave. Controllers Section (8) NOISE (MOD SRC)/ LFO - switch between Noise (or external modulation source) or Low Frequency Oscillator (LFO) as a modulation source. (9) OSC4/FILTER EG - switch between OSC 4 or the Filter Envelope as a modulation source. (10) MODULATION MIX - adjust the modulation mix between OSC4/Filter EG and Noise/LFO. Note: Use the MOD WHEEL to adjust the modulation depth. (11) GLIDE - adjust the amount of Glide (Portamento), between notes on the keyboard. (12) MODE - select the synthesizer mode from Monophonic, Unison, or Polyphonic. (13) AUTO DAMP ON/OFF- when OFF, and a chord is played, the chord will continue to play until all its notes are released, or a new note is played. When ON, only non-released notes will continue to play; the others are damped. (18) FREQUENCY ADJUSTMENT - adjust the frequency of Oscillator 2, 3, or 4. (19) WAVE SHAPE - select the wave shape used for Oscillator 1, 2, 3, or 4 from: triangular, triangular/sawtooth (OSC 1, 2, 3), reverse sawtooth (OSC 4), sawtooth, square, medium pulse, and narrow pulse. Mixer Section (20) VOLUME - adjust the volume of Oscillator 1, 2, 3, or 4. (21) ON/OFF - select the sources to play from OSC 1, OSC 2, OSC 3, OSC 4, Noise, and External Input, or any combination of these 6 sources. (22) NOISE VOLUME - adjust the level of the internal Noise source. (23) WHITE/PINK - switch the internal Noise source from Pink noise to White noise. (24) EXT IN VOLUME - adjust the level of any external source playing into the external Input. (25) OVERLOAD LED - to prevent overloading and distortion, turn down the EXT IN volume control if this LED turns on. (26) DECAY - when ON, the signal will decay during the time set by the DECAY TIME knob after a note or external trigger is released. When OFF, it will decay immediately after a note or external trigger is released. (27) KEYBOARD CONTROL - these switches vary the effect of the keyboard tracking, where the filter section is affected by the pitch of note played. Switch 1 and 2 OFF - no keyboard tracking effect Switch 1 and 2 ON - maximum effect DECAY TIME - adjust the time for the cutoff frequency to decay down to the sustain frequency after the attack time is over. SUSTAIN - adjust the cutoff to a frequency which is sustained after the attack time and initial decay time have been reached. (31) FILTER CONTROLS - the filter can be low-pass or high-pass, depending on the setting of the FILTER MODE switch. In low-pass mode, audio frequencies above the cutoff frequency are attenuated. In high-pass mode, audio frequencies below the cutoff frequency are attenuated. CUTOFF FREQUENCY - adjusts the cut-off frequency of the filter. FILTER EMPHASIS - adjusts the amount of volume level boost (resonance) given at the cut-off frequency. AMOUNT OF CONTOUR - adjusts the amount of Filter Envelope contour. (32) LOUDNESS CONTOUR - these 3 knobs adjust the overall shape enveloping the audio after it has passed through the mixer section and filter section. The controls affect the change in volume (loudness) level with time. ATTACK - adjust the time it takes for the signal to reach a maximum level after a note is played. DECAY TIME - adjust the time for a signal to decay down to the sustain volume level after the attack time is over. If the DECAY switch is ON, this is also how long it takes to decay to minimum once a note is released. SUSTAIN - adjust the volume level that the signal is sustained after the attack time and initial decay time have been reached. (14) TUNE - adjust the frequency of oscillators 1, 2, 3, and 4. (OSC4 is not affected if the OSC4 CONTROL switch is off.) (15) OSCILLATOR MODULATION - when ON, the oscillators are modulated by the modulation mix, set by the MODULATION MIX knob. Oscillator Bank Section (16) OSC 4 CONTROL - when ON, the frequency of Oscillator 4 will vary with the keyboard. When OFF, the keyboard, Pitch wheel, and Modulation wheel, will have no effect on OSC4. (17) FREQUENCY RANGE - select from six frequency ranges of Oscillator 1, 2, 3, or 4. Switch 1 ON (only) - 1/3 of maximum effect Switch 2 ON (only) - 2/3 of maximum effect (28) FILTER MODULATION - when ON, the filter section is modulated by the modulation mix, set by the MODULATION MIX knob. (29) FILTER MODE - select the filter between Lowpass or High-pass. (30) FILTER ENVELOPE CONTROLS - these 3 knobs adjust the overall shape enveloping the filter section. The controls affect the change in cutoff frequency with time. ATTACK - adjust the time for the cutoff frequency to increase from its set value and reach the frequency set by the CUTOFF FREQUENCY control.
-
 1
1 -
 2
2 -
 3
3 -
 4
4 -
 5
5 -
 6
6 -
 7
7 -
 8
8 -
 9
9 -
 10
10 -
 11
11 -
 12
12 -
13
-
14
-
15
-
16
-
17
-
18
-
19
-
20
-
21
-
22
-
23
-
24
-
25
 |
 |