BenQ GV31 User Manual - Page 27
Installing the ATV dongle
 |
View all BenQ GV31 manuals
Add to My Manuals
Save this manual to your list of manuals |
Page 27 highlights
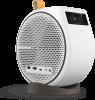
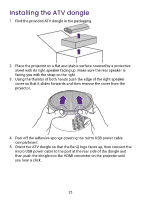
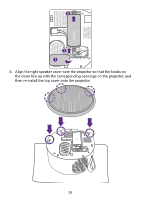
Installing the ATV dongle 1. Find the provided ATV dongle in the packaging. 2. Place the projector on a flat and stable surface covered by a protective sheet with its right speaker facing up. Make sure the rear speaker is facing you with the strap on the right. 3. Using the thumbs of both hands push the edge of the right speaker cover so that it slides forwards and then remove the cover from the projector. 4. Peel off the adhesive sponge covering the micro USB power cable compartment. 5. Orient the ATV dongle so that the BenQ logo faces up, then connect the micro USB power cable to the port at the rear side of the dongle and then push the dongle into the HDMI connector on the projector until you hear a click. 25
-
 1
1 -
2
-
3
-
4
-
5
-
6
-
7
-
8
-
9
-
10
-
11
-
12
-
13
-
14
-
15
-
16
-
17
-
18
-
19
-
20
-
21
-
 22
22 -
 23
23 -
 24
24 -
 25
25 -
 26
26 -
 27
27 -
 28
28 -
 29
29 -
 30
30 -
 31
31 -
 32
32 -
33
-
34
-
35
-
36
-
37
-
38
-
39
-
40
-
41
-
42
-
43
-
44
-
45
-
46
-
47
-
48
-
49
-
50
-
51
-
52
-
53
-
54
-
55
-
56
-
57
-
58
-
59
-
60
-
61
-
62
-
63
-
64
-
65
-
66
-
67
-
68
-
69
 |
 |

25
Installing the ATV dongle
1.
Find the provided ATV dongle in the packaging.
2.
Place the projector on a flat and stable surface covered by a protective
sheet with its right speaker facing up. Make sure the rear speaker is
facing you with the strap on the right.
3.
Using the thumbs of both hands push the edge of the right speaker
cover so that it slides forwards and then remove the cover from the
projector.
4.
Peel off the adhesive sponge covering the micro USB power cable
compartment.
5.
Orient the ATV dongle so that the BenQ logo faces up, then connect the
micro USB power cable to the port at the rear side of the dongle and
then push the dongle into the HDMI connector on the projector until
you hear a click.